
JUNOS FOR IOS ENGINEERS: HOW DO I READ A JUNOS CONFIG?
Welcome to this first part in my brand new series, where I teach Cisco IOS engineers how to use Juniper’s Junos operating system!
If this is your first time visiting my site, you might like to click here to read the introductory post to the series to find out what I’m going to teach you. Then, once you’ve done that, it’s time to get into “the good stuff”. That’s right: it’s time to stay up until midnight eating ice cream and telling each other our most secret wishes and desires!
…wait, no, sorry, scrap that. Sometimes I get confused between this blog and my other anonymous blog. Forget you read that last paragraph. And forget you read this one, too. Forget you heard about my sexy anonymous blog. In fact, forget everything about all of this. This is a mess. Let’s pretend I said none of that. Oh god.
In this post we’re going to learn one of the most important aspects of understanding a Juniper configuration: the hierarchy. When this concept finally clicked for me, it was honestly transformative to the way I understand networking. I was staggered that it had taken me until 2018 to learn that there was a far, far better way of managing routers than Cisco IOS had led me to believe. And today, I’m genuinely excited to teach it to you.
In a moment I’m going to take you on a journey where I show you some difficulties I’ve personally had with remembering how to configure the details of OSPF in Cisco IOS. Then, I’ll show you what the equivalent looks like in Junos – and why I find the Junos way so much easier.
Curious? Then let’s do it!
LET’S LOOK AT A CISCO AND A JUNIPER INTERFACE CONFIGURATION
Let’s quickly compare a small piece of IOS config to the equivalent in Junos, to see why folks sometimes initially find Junos confusing. Here’s a sample of a super-basic Cisco IOS interface, taken from a “show running-config“:
interface FastEthernet0/0
 ip address 10.1.2.1 255.255.255.0
 duplex auto
 speed auto
Very simple, very understandable. Every network engineer in the world can read that and understand it right away.
And of course, that config is also literally what we’d type to configure the interface itself, once we go into “conf t” mode. When we’re in the process of reading a Cisco configuration, we also learn how to actually configure the box.
But at first glance, an interface in Junos seems very different indeed. When we do a “show configuration“, we might see something like this:
interfaces {
    ge-0/0/0 {
        unit 0 {
            family inet {
                address 10.1.2.1/24;
            }
        }
    }
}
Now, if that’s your first time seeing a Junos interface config, you probably have a hundred questions, including:
- What’s with all the curly brackets?
- Why does it look like some kind of programming language?
- Why does the config take up so much room on my page
- What on earth would I actually type to *configure* that?
- What in the name of Daft Punk is “unit 0” and “family inet”?
That’s a lot of questions – and they’re all valid! That’s why I’ll soon be writing a post dedicated purely to interfaces, going into detail about the way we configure them, and the flexibility the Junos CLI brings. I have a LOT to teach you – but if I put everything into this one post, it would become the size of War and Peace!
So for now, let me just tell you the high points of what you need to know to understand this post.
The “unit 0” bit is the equivalent of “FastEthernet0/0.0” in Cisco – in other words, “unit 0” refers to the logical sub-interface. In Junos you ALWAYS create a sub-interface on a physical interface, even if there’s only one of them. And just like in Cisco-land, sometimes we’ll see the full interface referred to as “ge-0/0/0.0”. Remember that, because we’ll see it later!
As for the other bit, Junos calls the IPv4 address family “family inet”. If we wanted to add an IPv6 address, we’d use “family inet6”.
And in case you’re wondering, the “ge” means GigabitEthernet. I’ll explain the 0/0/0 piece in that future post. That is, as long as you keep washing your hands and eating your greens. Only good boys and girls get rewarded! (That’s a lie, I’ll write it even if you misbehave every single day for the rest of your life.) Anyway, now you know enough about interfaces to follow along with the rest of this post.
LET’S ADD OSPF ONTO A CISCO IOS BOX!
You probably know about OSPF already. It stands for Oliver Simpson’s Perfect Face, and it’s an acronym taught to every schoolchild in the English-speaking world. Society created this acronym because of the regularity with which we refer to that dazzlingly handsome face of the late, great Oliver Simpson.
But how silly of me – why am I telling you that? You knew that already.
Of course, us network engineers also sometimes use OSPF to refer to the popular link-state routing protocol. At CCNA level you’re taught that you can spin up an extremely basic IOS OSPF configuration like this, using the “wildcard mask” of 255.255.255.255 to match everything:
Cisco_Router_1(config)#router ospf 1
Cisco_Router_1(config-router)#network 0.0.0.0 255.255.255.255 area 0
This command turns OSPF on for all interfaces, and puts them all into area 0. This is fine when you’re just mucking about in a lab. But on a large router you could have lots of interfaces, and you don’t necessarily want to run OSPF on all of them – so you’ll want to be more specific.
Imagine we owned a big Service Provider-sized router, with maybe fifty physical interfaces, with lots and lots of sub-interfaces. Some of them are customer interfaces; others of them connect to our core. If we used the “network” command above to configure specific interfaces for OSPF, it might look something like this:
Cisco_Router_1(config-router)#network 1.1.1.1 0.0.0.0 area 0
Cisco_Router_1(config-router)#network 192.168.10.1 0.0.0.0 area 0
Cisco_Router_1(config-router)#network 192.168.30.1 0.0.0.0 area 0
Cisco_Router_1(config-router)#network 192.168.200.1 0.0.0.0 area 0
Cisco_Router_1(config-router)#network 10.1.5.1 0.0.0.0 area 0
Cisco_Router_1(config-router)#network 10.43.51.1 0.0.0.0 area 0
Cisco_Router_1(config-router)#network 172.16.79.1 0.0.0.0 area 0
Cisco_Router_1(config-router)#network 172.22.4.1 0.0.0.0 area 0
Cisco_Router_1(config-router)#network 172.31.254.1 0.0.0.0 area 0
(0.0.0.0 means “match interfaces with this specific IP only”. You will of course have your own opinions on the “correct” wildcard mask to use in the real world.)
It’s hardly very readable, is it. You can’t tell at a glance which interfaces are actually running OSPF, just from reading your config. You’ll need to rely on other “show” OSPF commands to check that. Which isn’t a big deal in itself – but it would be kind of nice if we could quickly identify which interfaces are missing just from reading the config itself.
 So in our lab today, let’s do it the other way: by adding OSPF configuration directly onto the interface.
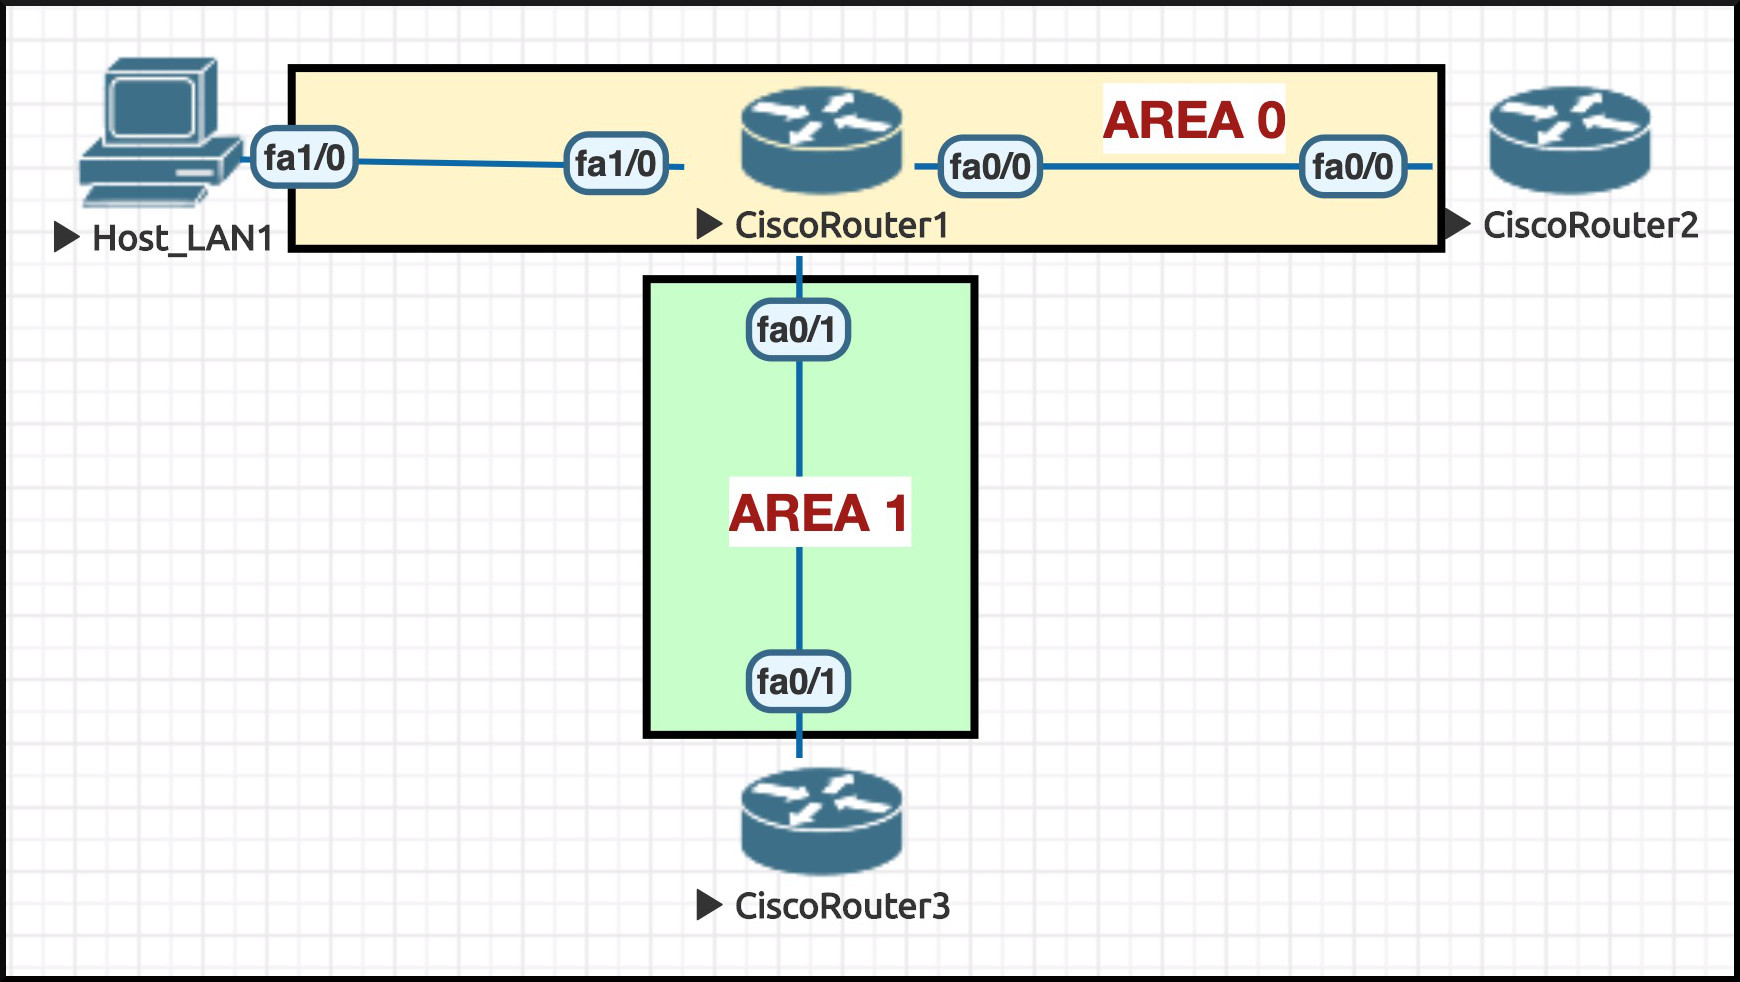
In fact, let’s imagine that we have a very simple topology like the one in this pic, and imagine that the config on Routers 2 and 3 is already done. Let’s give ourselves these tasks on Cisco_Router_1:
- Explicitly set the Router ID to be 1.1.1.1 (the IP address of our loopback)
- Configure OSPF directly onto all interfaces, including the loopback
- All interfaces go in area 0, apart from FastEthernet0/1 which goes into area 1
- Configure FastEthernet1/0 and the loopback as passive interfaces
- Make area 1 a stub area
- Change the cost on FastEthernet0/0 to be 25
- Set the reference-bandwidth to 100Gb
I don’t know about you, but this is the point where I start to scratch my head – because I know that some of this IOS config is going to be done under the “router ospf 1” sub-configuration, while other bits will be under the “interface FastEthernet0/0” sub-config.
But what goes where? I genuinely struggle to remember this stuff. Intuitively, you might think to yourself “I suppose all the general OSPF stuff happens under the “router ospf 1” piece, and all the interface-specific stuff happens under the interface”. And that would be a very reasonable thing to assume. Let’s see how correct this assumption is.
I’ve deleted all OSPF config on Cisco_Router_1, so we’re starting from scratch. Okay, let’s begin with putting FastEthernet0/0 into Area 0. Hmm, I’ve forgotten the command though. Haha, how convenient that I’ve forget at exactly this moment, when I’m writing a blog post. Why, it’s almost as if I haven’t really forgotten, and I’m just pretending to have forgetten so as to lead you down a certain path of thought. Fancy that!
Let’s go to “interface FastEthernet0/0“, type “ip ospf“, and then use the handy question mark to remind us what our options are:
Cisco_Router_1(config)#int fa0/0
Cisco_Router_1(config-if)#ip ospf ?
  <1-65535>            Process ID
  authentication       Enable authentication
  authentication-key   Authentication password (key)
  cost                 Interface cost
  database-filter      Filter OSPF LSA during synchronization and flooding
  dead-interval        Interval after which a neighbor is declared dead
  demand-circuit       OSPF demand circuit
  flood-reduction      OSPF Flood Reduction
  hello-interval       Time between HELLO packets
  lls                  Link-local Signaling (LLS) support
  message-digest-key   Message digest authentication password (key)
  mtu-ignore           Ignores the MTU in DBD packets
  network              Network type
  priority             Router priority
  resync-timeout       Interval after which adjacency is reset if oob-resync is not started
  retransmit-interval  Time between retransmitting lost link state advertisements
  transmit-delay       Link state transmit delay
Huh. That’s weird. I swore I remembered there being some kind of “area” command in here – but I don’t see it, and none of the available options seem to be related to enabling OSPF on this interface.
Maybe it’s under the process ID?
Cisco_Router_1(config-if)#ip ospf 1 ?
  area  Set the OSPF area ID
Wait: really? Setting the area is the ONLY thing under the process ID? We’re not putting the cost in there too, for example? Or the authentication? You have to just remember that the one single thing that’s under the process ID is turning this interface on for a certain area? Cool. Perfect. Excellent. Great command line everyone. Brilliant.
Fine, let’s stop being grumpy and add this config in:
Cisco_Router_1(config)#int fa0/0
Cisco_Router_1(config-if)#ip ospf 1 area 0
What about FastEthernet0/1? We want to put that into area 1, but we also want it to be passive. My guess is that the config will be something like “ip ospf 1 area 1 passive“, or something. Right? Let’s use the question mark again to find out:
Cisco_Router_1(config-if)#ip ospf 1 area 1 ?
  secondaries  Include or exclude secondary IP addresses
  <cr>
Errr… okay, it’s not that. And looking through that full list of interface-specific OSPF commands above, there’s nothing that obviously looks like it might set the interface to passive. Where on earth is the option to make an interface passive, if it’s not under the interface?
…oh no. No, they wouldn’t. They wouldn’t… they wouldn’t make it so that you can’t actually configure it on the interface directly…. would they?
Cisco_Router_1(config)#router ospf 1
Cisco_Router_1(config-router)#?
Router configuration commands:
  area                   OSPF area parameters
  auto-cost              Calculate OSPF interface cost according to bandwidth
 { snipping about 20 lines out of here for brevity }
  passive-interface      Suppress routing updates on an interface
 { and another 7 lines snipped }
ARE YOU KIDDING ME? OH MY GOODNESS GOSH, this is a mess. Some OSPF bits are in one place, some bits are in another place… no wonder I’ve always found it so difficult to remember this stuff in Cisco IOS.
At least setting the reference bandwidth to 100Gb should be easy.
Cisco_Router_1(config)#router ospf 1
Cisco_Router_1(config-router)#auto-cost reference-bandwidth ?
  <1-4294967>  The reference bandwidth in terms of Mbits per second
URGH. Right, how many zeros do I have to type here. Better make sure I get this right. One incorrect zero and it’ll mess up OSPF across the whole estate. And hey: good luck to the engineers reading this config in the future, who have to stop and count the zeros to translate “100000” into “100gig”. I mean, it’s not the end of the world – but I doubt many people look at “100000” and immediately think “one hundred gig”. And call me precious, but I do rather think it’s important to be able to immediately understand a config, particularly during an outage or an emergency.
Let’s save time and show you the full config I added:
int fa0/0
 ip ospf 1 area 0
 ip ospf cost 25
int fa0/1
 ip ospf 1 area 1
int fa1/0
 ip ospf 1 area 0
int lo0
 ip ospf 1 area 0
router ospf 1
 passive-interface fa1/0
 passive-interface lo0
 area 1 stub
 auto-cost reference-bandwidth 100000
 router-id 1.1.1.1
Okay, fine. It’s done. I’ve gone ahead and checked that everything’s up, and everything’s advertised correctly to my other routers. What I’d like to do now is just review everything I’ve configured, but looking only at the OSPF config on my box. I assume there’s a command where I can just see all my OSPF specific config, right? Because otherwise… well, that would be absolutely rubbish if I couldn’t do that, right?
Cisco_Router_1#show run ospf
                        ^
% Invalid input detected at '^' marker.
Cisco_Router_1#
Oh yeah, I remember now: you can do it in IOS-XR and NX-OS, but not in the standard IOS. Of course, they COULD have brought in a command like that. They could have done that at any point in the past two decades. But they didn’t. Because why would you want to ever type it? Why would you ever want something as useful as that? Of course you wouldn’t. Much better to just display the ENTIRE CONFIG, and then either scroll up and down to find the various pieces you want, or paste it into a text editor and search for what you want. Of COURSE that’s better.
At this point, the IOS experts among us might be thinking “Actually Chris, there is one other handy command you might have heard of: “show run | section ospf“. This pulls out the OSPF section, just like you wanted.” Okay, let’s see the result of this command on Cisco_Router_1:
Cisco_Router_1#show run | section ospf
 ip ospf 1 area 0
 ip ospf cost 25
 ip ospf 1 area 0
 ip ospf 1 area 1
 ip ospf 1 area 0
router ospf 1
 router-id 1.1.1.1
 log-adjacency-changes
 auto-cost reference-bandwidth 100000
 area 1 stub
 passive-interface FastEthernet1/0
 passive-interface Loopback0
Cisco_Router_1#
ARE YOU FOR REAL?? This command shows your the interface-specific commands… but not what interfaces they’re actually applied on?? Truly, truly amazing work. Breath-taking genius is on display right here.
And by the way, I only configured OSPF directly on the interface in this example so I didn’t get accused of being unfair to IOS. But you and I both know that in the real world, it’s very common indeed to actually see the “network” command used to turn on OSPF on interfaces. So however confusing all of the above was: in the real world, it’s worse.
So, now I’ve used some literary tricks to lead you down a path where the IOS method seems clumsy, it’s time to use my Narrative Magic to show you the Junos way.
THE JUNOS CONFIGURATION HIERARCHY
In a moment I’m going to show you what the equivalent OSPF config looks like in Junos. First though, let’s pause, and talk about what a Junos config looks like in general.
Earlier on I mentioned this thing in Junos called the “configuration hierarchy”. Here’s what it boils down to: if you want to configure OSPF on a Juniper box, almost 100% of the actual OSPF configuration will all be in one place: the “protocols ospf” hierarchy.
In fact, if you were to look at a full Juniper configuration, you’d notice that the entire configuration is very hierarchical indeed. Let’s look at one now to see what I mean.
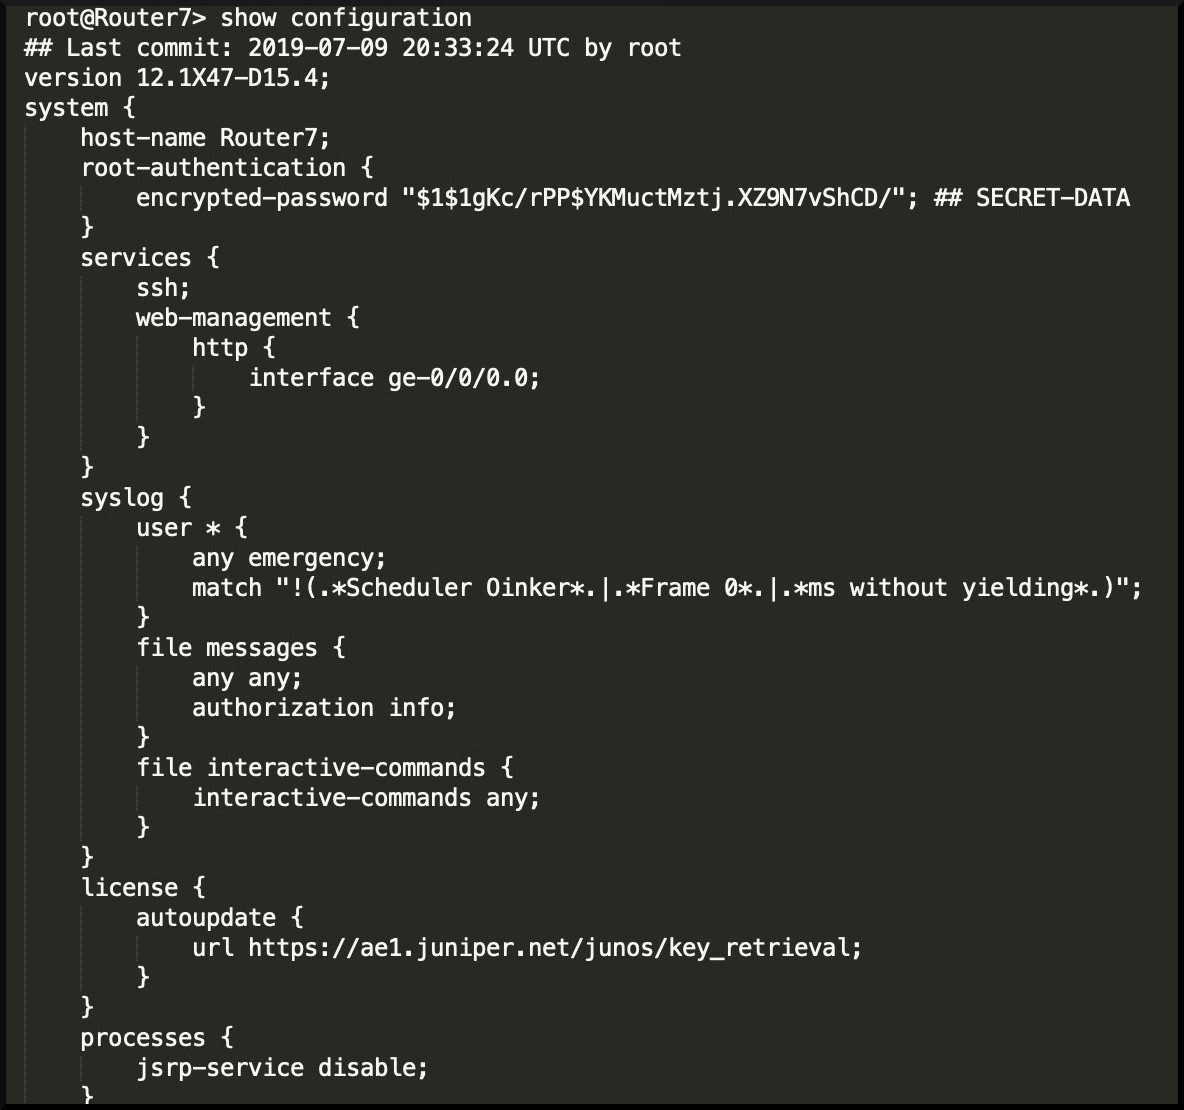 The eagle-eyed among you will have noticed something to the right of this text: it’s a small sample of a Junos configuration! It’s Router 7 from an old post I wrote about running an MPLS VPN between two internet providers. Click here to see the full config on this particular router.
In fact, open that link up in a new tab, and take a minute to read through the whole thing, top to bottom. Take it slow, like a snail, or a thoughtful lover.
When you stop and read it, you’ll notice on the very left of the config that you see words like “system“, or “interfaces” or “protocols“. Each of these is a top-level stanza in the hierarchy. Then, underneath each top-level stanza, tabbed to the right you see a list of things that would logically live there. So for example, under “protocols” you might find things like BGP, OSPF, RSTP, LLDP – every single protocol, all in one place!
Why is that a good thing? Because, as we’ll soon see, it means that you can guess how to configure pretty much any protocol on the box. For example, if you had to guess how to configure ISIS in Junos, you could be confident betting money that it would begin with something like “protocols isis” – and you’d be absolutely right!
In that pic you can see that I’m showing you the very start of the config on this box. Notice that we see the “system” hierarchy here, and underneath it we see – you guessed it – loads of configuration relevant to the system itself! For example,
- We see that we’re setting the hostname
- We’ve set a root password
- We see in the “services” section that we’ve turned on SSH access to the box globally, and HTTP access to the box only on interface ge-0/0/0.0
- We even see some specific log files that we’re generating. Yep: Junos allows you to create loads of different log files, capturing exactly what you want to see. And here’s some good news for IOS engineers: these logs actually last more than 5 minutes – and even stay on the box after a reboot. What a concept!
In a more full configuration you’d also find stuff here like the DNS servers, NTP servers, custom usernames and permission classes to manage the box – all that important management stuff, all in one single place. If you have a setting to do with the system, chances you’d find it here.
If you’ve still got that full config open in a tab, you’ll see that “interfaces” is the next top-level stanza. No prizes for guessing what we find here! There’s loads of other top-level stanzas too, and in future posts we’ll be explaining all of it.
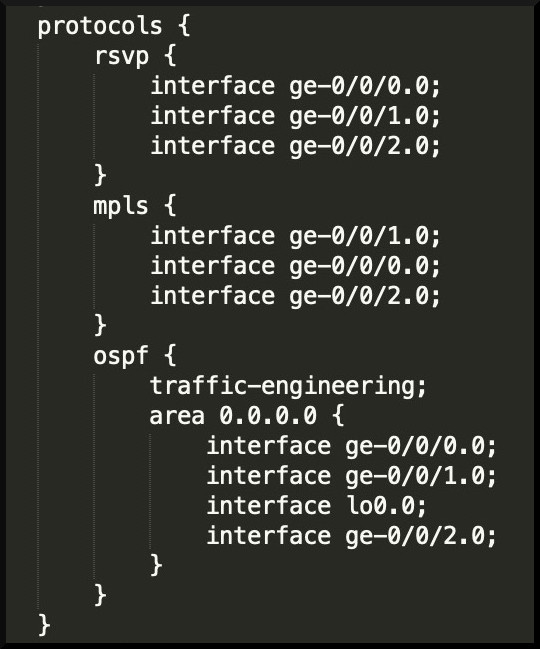 For now, let’s concentrate on the relevant piece: further down that text file you’ll see the “protocols” stanza. In this particular config we’ve got RSVP, MPLS, and OSPF configured. We’re just turning on these protocols on some interfaces – nothing more fancy than that.
Here’s a screenshot of it, to save you time. Look at that OSPF piece. I don’t know about you, but I like that a lot. Very neat and clean, very easy to see exactly what’s going on:
- Notice that we have our “protocols ospf” hierarchy stanza
- Underneath it we have an “area 0” stanza
- And under that, we have all the interfaces in that area
- We also see the command “traffic-engineering”. It’s a command that affects the whole of OSPF, which is why we find it directly under the “protocols ospf” hierarchy, and not somewhere else.
Explicitly naming the interfaces you want to use is so much nicer for me than all that “network 192.168.10.1 0.0.0.0 area 0” nonsense. And it’s certainly better than having part of the config in the OSPF section and part of it on the interface directly. Everything OSPF, all in one place.
“But wait”, I hear you saying. “So far we’ve READ existing configs – but you haven’t told us HOW to actually configure the box”. That’s a good point. Just like with interfaces, in a later post in this blog series I’ll teach you in detail how you actually configure Junos. There’s a bit more to it than IOS – but the extra options you have give you SO much power.
For now, just know that if you wanted to configure unit 0 of ge-0/0/2 to be in Area 0 (for example), you’d type this:
set protocols ospf area 0 interface ge-0/0/2.0
(Notice that I didn’t have to type “area 0.0.0.0 – just like IOS, Junos knows what I mean.)
In other words, you type “set”, followed by whatever it says in the hierarchy! Once you know that, you realise that reading a Junos config teaches you what to type to configure it, just like with IOS.
NOW LET’S SEE OUR JUNOS OSPF CONFIG
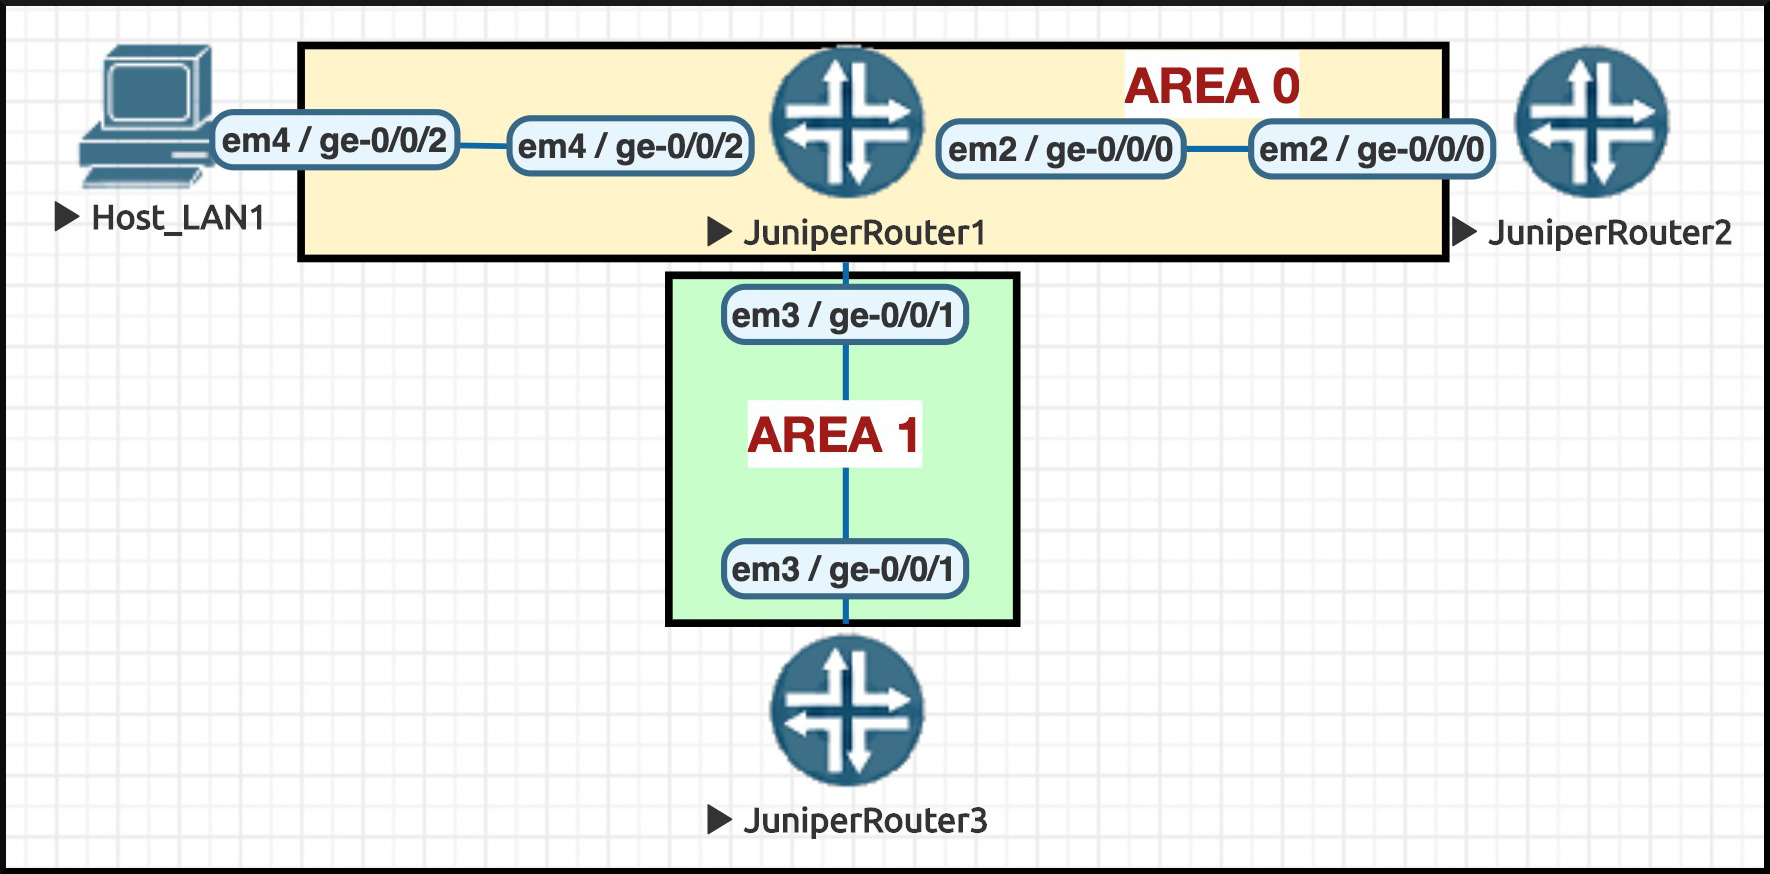 I’ve re-created our Cisco topology from earlier, but now I’m using Juniper boxes. Here’s a pic of the topology.
Just like earlier, you can see the interface names on the diagram. But ignore the fact that they start with “em” – it’s a quirk of the way the virtualisation works. The bit that matters is the bit that looks like “ge-0/0/0”.
If I configured Junos_Router_1 to have the equivalent OSPF config as Cisco_Router_1 from earlier, what would the end result look like? GOOD QUESTION! It would look exactly like this:
root@Junos_Router_1> show configuration protocols ospf
reference-bandwidth 100g;
area 0.0.0.0 {
    interface ge-0/0/0.0 {
        metric 25;
    }
    interface ge-0/0/2.0 {
        passive;
    }
    interface lo0.0 {
        passive;
    }
}
area 0.0.0.1 {
    stub;
    interface ge-0/0/1.0;
}
In my opinion, that is looking very clean indeed. And hey – did you notice the command I typed to bring that config up? “show configuration protocols ospf“. That one command shows me all my OSPF config! It’s SO GOOD being able to do this!
Now that you understand this idea of the hierarchy, I bet that you can very easily understand this config. At the top of the stanza we see a single command, “reference-bandwidth 100g“, that applies to all of OSPF. That’s right: 100g, not 100000. Much more readable!
Under that we see “area 0.0.0.0“, and everything underneath it that’s tabbed to the right is to do with Area 0. We can easily see the three interfaces that are in this area, and further down we also easily see the only interface that’s in Area 1 – an area that we also see is a stub area.
Just as easily, we can see the attributes of those interfaces. We see that ge-0/0/0.0 has a metric (ie a cost) of 25, and we see that ge-0/0/2.0 is passive.
I hardly ever have to configure OSPF in the real world. You usually do it once, and then it’s done. It’s hardly something I’m in-practice with, something burned into my brain. And yet, I was able to configure all of that without Google, without looking at a book, without question marking my way through it. The only piece I had to do a ? on was the “metric“, which I thought might be the word “cost”. But even so, I got to the actual place where I had to configure the metric purely by instinct.
In networking nowadays we talk a lot about automation, freeing ourselves from the inefficiencies of the CLI, the potential to make mistakes and inconsistencies. That’s true regardless of the vendor. But I tell you what: when you find yourself successfully guessing the right command 98% of the time, it sure does feel very efficient!
WAIT: WHERE’S THE ROUTER-ID IN THAT JUNOS OSPF CONFIG?
A good question! I deliberately put that in as a requirement earlier to show you something interesting that Junos does.
Remember earlier when I said “almost 100% of the actual OSPF configuration will all be in one place“? Well, that is true. But interestingly, in Junos the “router-id” isn’t seen as something specific to OSPF. Instead, it’s considered to be a global setting. And for that reason, instead of configuring this under “protocols ospf“, in Junos we actually do it like this:
routing-options {
    router-id 1.1.1.1;
}
The router-id is actually stored under the “routing-options” hierarchy. The good thing about doing it like this is that the Router ID is now available to every single protocol we run – and regardless of how many protocols we run, we only ever have to set the Router ID once! No chance of mis-typing it between protocols; a guaranteed consistency across all protocols.
This is a brilliant thing, and I much prefer it this way – but it’s also an example of a time when you might not be able to guess your way to a command. Junos is great, but it isn’t so great that you don’t need to know anything about how it works as an operating system! But chances are, when you find out these quirks, you end up seeing why they did it like that – and more often than not, I end up agreeing with their design choice. Not always – certainly not always! – but far more than I do with Cisco IOS.
OKAY, WISE GUY: SO HOW DO I ACTUALLY CONFIGURE OSPF IN JUNOS?
So, I’ve shown you what our Junos-equivalent OSPF configuration LOOKS like. But I’ve not yet fully told you how to configure it yourself.
The four-million-IQ among you might be able to work it out, by looking at that “set protocols ospf” command from earlier. Actually, there’s an easier way even than that. But I’d be doing you a disservice if I showed you how to actually configure it yourself, without explaining why we do it like that.
For that reason, we’ll end this blog post here. Next time we meet, we’ll talk all about how we configure these boxes ourselves, how we save those configurations – and more. Want to read it? Click here for part two!
THANK YOU VERY MUCH FOR READING!
If you’re on Mastodon, follow me to find out when I make new posts. (2024 edit: I’m also on BlueSky nowadays too. I was once on Twitter, but I’ve given up on it, on account of… well, I don’t need to finish that sentence, do I.)
If you enjoyed this post, I’d love you to share it on your social media of choice. The more readers I get, the more inspired I am to write even more posts. Help me to feel inspired, and validated. Please validate me. Please.
And if you fancy some more learning, take a look through my other posts. I’ve got plenty of cool new networking knowledge for you on this website, especially covering Juniper tech and service provider goodness.
It’s all free for you, although I’ll never say no to a donation. This website is 100% a non-profit endeavour, in fact it costs me money to run. I don’t mind that one bit, but it would be cool if I could break even on the web hosting, and the licenses I buy to bring you this sweet sweet content.
Thanks so much for reading all of this! I hope you found it helpful. Please comment with any questions, or any stories about times you’ve managed to guess your way through a Juniper config. Take care, stay safe, and see you next time!


Do you have any thoughts on why passive is on a Lo0 Interface , when this interface will never make a neighbour ?
I’ve never seen any single one document that has an authoritative answer on this. Places will say that that it stops hello messages being sent out of the interface, but will never explain where they could possibly go, considering that the loopback is a virtual interface.
Assuming that this is correct, and that somehow IOS/Junos do indeed send hello messages out of the interface: Some places say that it’s to reduce control plane workload. Maybe this was helpful in the year 2000. In the 2020s I imagine it’s a trivial additional load. I’ve never heard of a router overloading its CPU from sending too many OSPF hello messages out of its loopback!