

USING PYTHON TO CREATE 12,000 LINES OF JUNIPER SRX CONFIG IN 0.01 SECONDS
This post assumes ZERO Python knowledge on your part! You don’t even need Junos knowledge: I’ll do my best to make this useful for folks of ALL skill levels. If you’ve ever wanted to learn Python, but never knew where to start… read on!
Also: I’m not a Python guru. I wrote this post to show you how easy it is to achieve something with only limited knowledge of Python. If you are a Python coder, please don’t cringe at my amateur attempts. My hope here is to inspire you to learn, rather than you show you a neat and elegant solution.
The best way to learn something is by doing it, or so “they” say. And it’s true. For example, I’ve recently become a real expert at a hobby that I like to call “sitting around eating snacks to distract myself from the upcoming end of the world”. Did I learn it from a book? No sir: I learnt it by doing it every single day for the past two months. The only way to master a craft is to commit to it.
Sadly, I haven’t had quite as much opportunity to get hands-on with Python. You know: because my hands are always full of snacks.
Real talk though, I’d love to learn Python. But there’s about 20 other things I also really want to know, and only so many hours in the day. I’ve learned a tiny bit, but there’s rarely been space in my recent day jobs to put it into practice. And as for my spare time, more important things have always taken a priority. Things like using chocolate as a security blanket that softens the thought of the inevitable collapse of civilisation. Do you understand?
But as it happens, I had an idea for a project recently that gave me a perfect opportunity to put into practice the little Python that I’ve learned so far, and it was a massively satisfying experience.
Let’s imagine someone gives you a spreadsheet of 6,000 – that’s six metric thousand – locations, each with a unique IP address or subnet. This person wants us to add all of these sites to a Juniper SRX firewall policy, to whitelist any traffic from those locations. Sounds like an ideal scenario to put my Python studying into practice.
And you know me: when I achieve or learn something, I want to blog it & teach it to other folks to do it too. But before I started writing this blog post, I checked in on Twitter to see if there’d be any interest – and out of this poll came something very eye-opening:
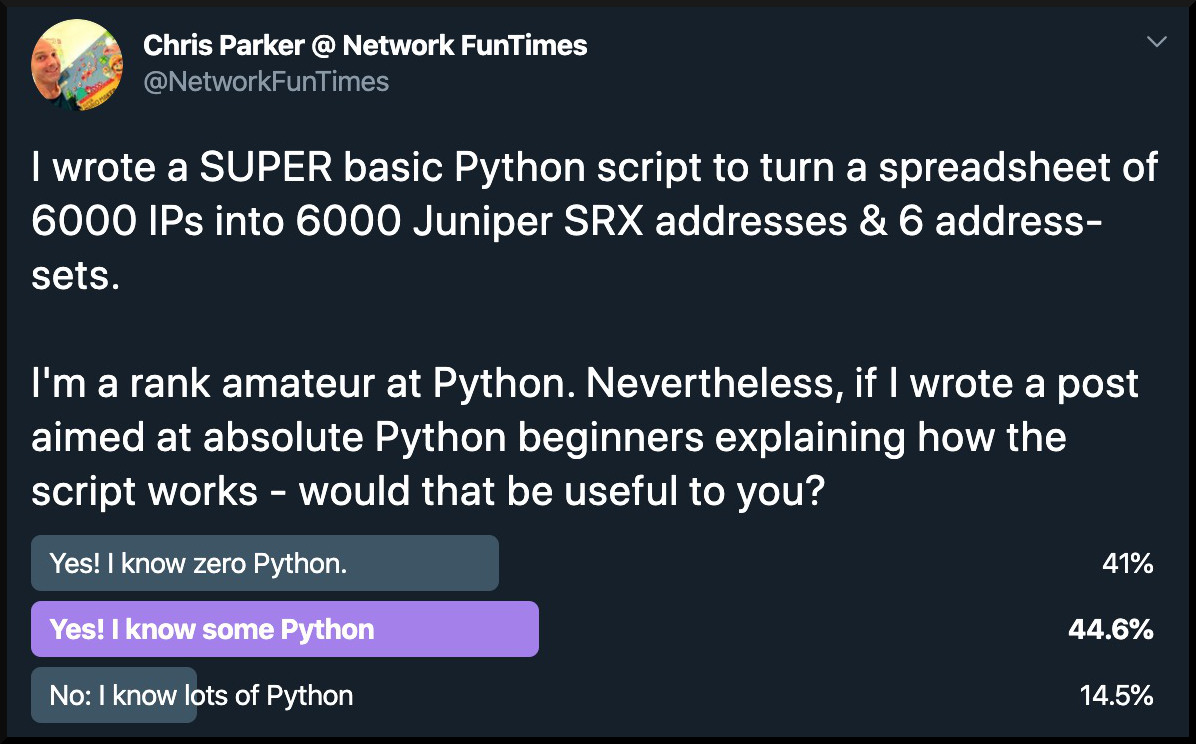
There’s clearly a huge desire from the networking community to start learning Python, but look at those numbers: we’re starting at a point where over 40% of the community actually doesn’t know any Python at all, and another 45% only knows a little.
That’s why I thought I’d take time in this post to not only share my actual script with you, but to tell you what every single piece of it does, from scratch, assuming no Python knowledge at all. If you don’t know what a loop is, or a function, or a list, or a module, or even a variable, then you’ve come to the right place. I’ll take time to explain the moving parts, and by the end of this post even a complete beginner to Python will be able to confidently talk about how my script works.
I AM BAD AT PYTHON!
Now, I want you to be under no illusion: I’m not good at Python. I’m twenty-five ranks below “absolute n00b”. In fact, here’s my total knowledge: I’ve read the first 100 pages of a brilliant book called Automate The Boring Stuff With Python (ATBSWP for short), and…. er, that’s it. As such, I know some of the basic moving parts. You could say I know enough to be dangerous! But there’s tons I’ve yet to learn.
As such, the script you’re going to see today can definitely be improved. Unquestionably. In some ways, the audacity of me even writing this blog post is like if six-year-old were to do a painting, and then put it up on the wall in The Louvre – with a tutorial on how you can do it too.
With that in mind, if you’re smart at Python and you can either find efficiencies or improvements, I’d love to hear about them! Please comment and let me know. Your feedback will help not just me, but everyone who reads this post. Just do me one favour: please read this entire post before commenting. At the very end of this post I’ll mention some ways I’d improve this script if I had the knowledge. Perhaps you can tell me how to make those improvements, and perhaps you can even provide code for improvements of your own!
THE CUSTOMER’S REQUIREMENT
So, imagine receiving a spreadsheet of 6,000 sites, with a request for them all to be whitelisted via a Juniper SRX security policy.
In total this would actually involve 12,000 lines of config. Why? 6,000 lines are the individual addresses – but then each address needs to be put into a group, so that our security policy can refer just to the group, rather than all the individual addresses. In SRX talk, these groups are called “address-sets”.
How best to create 12,000 lines of configuration? If your company is rich and unaware of tech, the solution is obvious: write the commands manually by copy-pasting them one at a time from the spreadsheet into a text file, and then claim about 200 hours of overtime for your fantastic work.
(That’s a joke. Don’t do that. Or, do it and give the money to charity. Actually, now I think about it, definitely do it like that.)
But of course, a much better way would be to write a script that could pull information out of the spreadsheet, and create the Junos config for us automatically. And as it happened, although my Python skill are very basic, I did know that the wonderful ATBSWP book has a chapter near the back that talked about manipulating information in spreadsheets. Lucky that I actually read the contents page before I started to read the book itself!
Add a little Google-fu to the mix, and I’m proud to say that I wrote a script that generated all 12,000 lines of config – and generated it in about 0.01 seconds. And in this post, I’m going to show you how I did it.
One final thing: I honestly can’t recommend ATBSWP enough. It’s so SO perfect. It’s clear, practical, interesting, engaging, and a joy to read. The vast majority of the stuff I’ll teach you in this post is stuff I myself learned from that book. If you’re unsure where to start on your network automation journey, start with that book. It doesn’t matter that it’s not network-focused – it’ll give you the groundwork that will make learning the network-specific stuff a walk in the park. Click that link and buy the 2nd edition direct from the publisher, and you’ll get a PDF copy of it too! Buy it buy it buy it. It’s truly brilliant.
LET’S INSTALL PYTHON & PREPARE OUR SPREADSHEET
 Do you know what a CSV file is? It stands for Comma-Separated Value, and it’s a very basic format for storing data for a spreadsheet. Later on we’re going to use a module in Python that understands CSV format.
The customer’s spreadsheet actually came to me in Excel format (.xlsx) with a ton of columns, most of which weren’t relevant to me. It would have done no harm to leave those unnecessary columns in – but to make it neater and easier for me, here’s what I did:
- Opened the spreadsheet in Excel
- Deleted any columns I didn’t need
- Saved it as a .csv file
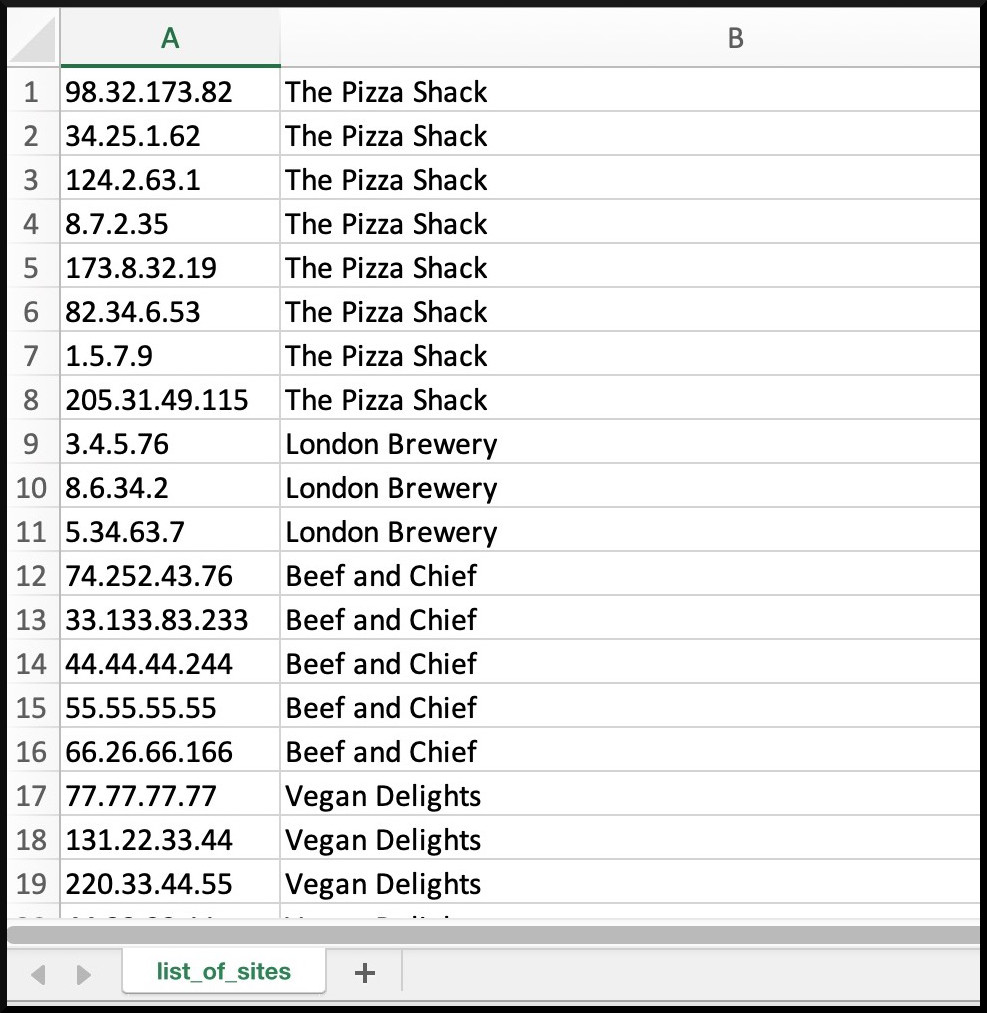
The end result looked something like this screenshot on the right. This is a clearly fake list of company names, and IP addresses that I made up, and you can download it here, so you can play along at home. I’m going to pretend that we’ve got 6000 restaurants that suddenly need whitelisting. Why restaurants? Because it’s lunchtime and I’m REALLY HUNGRY.
By the way, any resemblance between these fake restaurant names and a real-life restaurant is entirely coincidental. Though if any of these names actually do exist, I will have no choice but to marry the proprietor, because we clearly think alike and therefore are destined for a blissful future together.
The IPs are also totally made-up. I mean, they exist in the real world, I’m just bashing keys at random because I found it much easier to look at than a massive string of 10.x.x.x. and 172.16.x.x addresses.

CSV files are more simple than .xlsx files in terms of structure. In this pic on the left you can see what it looks like when you open a .csv file in a text editor. It’s literally just a list of cells, separated by a comma. Hence, Comma-Separated Value!
As for installing Python, please do so if you haven’t already! Go to https://www.python.org/downloads/ and live your best life. Make sure you get Python3, not Python2.
Python comes with an interactive shell called IDLE, which lets you type bits of code on the fly to check that it works. Any output below that starts with >>> is where I typed some code into the IDLE shell, so that I can show you the immediate result of that code. If you install IDLE too, you can do the same as you read along!
In a moment we’ll see the actual script. But first, let me tell you the high points of what it does. Then, we’ll break it down line-by-line, so you’ll understand 100% of what’s going on.
WHAT WILL OUR SCRIPT DO?
First, I import some code built for reading CSV spreadsheet files. I open the spreadsheet, put the contents of the spreadsheet into memory, and then convert it into a list. We’ll talk about lists later, but basically lists store the spreadsheet in such a way that we can retrieve individual cells out of it in any order we like.
Next I open a text file called results.txt, and I give myself the ability to write to it from the script.
The rest of the script is a loop that repeats exactly as many times as there are lines in the spreadsheet.
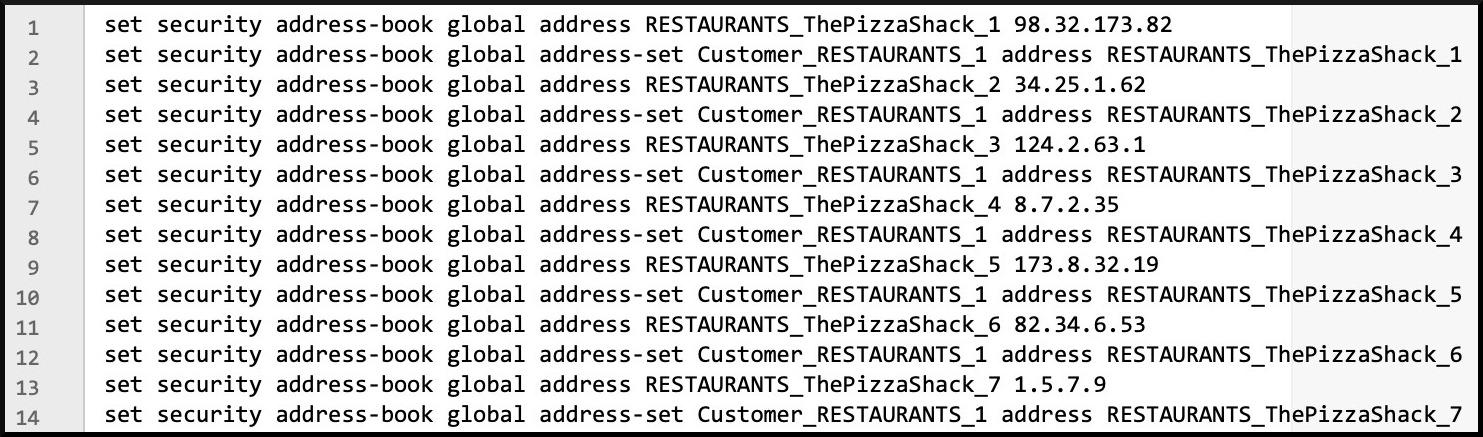
The first thing the loop will do is to write a line of Junos config to our text file. To do this, the script pulls the restaurant name and IP out of the current line of the spreadsheet, and creates something like this: “set security address-book global address RESTAURANTS_ThePizzaShack_1 98.32.173.82“. These fictional restaurants have many franchises, so site names appear multiple times with different IPs. The number I’m putting at the end of the restaurant name (ThePizzaShack_1) guarantees that the address book name is unique.
Next there’s an “if” statement that puts the address book entry into one of six possible address-sets, with an aim of having no more than 1000 address book entries in a single address-set. Junos has a limitation of 1,024 addresses per address-set. I’m just using 1,000 to make the script more readable for myself.
And once that’s done, it loops again and again, until the end of the spreadsheet. Does my script stop to rest? No. Does it pause for a drink? No madam! It works and works and works until the job is done. Inspiring story, isn’t it?
The result will, hopefully, be a text file with many thousands of lines of Junos config, that looks a little bit like this:
THE SCRIPT
Now you understand how our script works, and what the end result will look like, have a read of it below. Even if you know zero Python, I bet money that you’ll be able to understand a fair bit of it, now that you know what it’s trying to do. And if even a single piece of it doesn’t make sense, don’t worry – I’m going to explain 100% of it.
Here’s a screenshot of the script, nicely laid out, and with a bit of colour for good measure. This pic is a clickable link. Notice on the left that the lines are numbered. I’ll refer to particular lines now and again, so I HIGHLY recommend opening this up in a new tab so you can refer back to it as we go.
Now here’s the text of the code. Sorry for the word-wrapping. It’s more readable in the pic above, but you can use the text below to paste it into a text editor. Call the file whatever you like – but make sure it has .py at the end.
And of course, in the script itself you’ll want to change the location of the spreadsheet to wherever it’s stored on your local machine! Unless you want to hack into my laptop and run it from there, in which case go right ahead. If you’re on Windows and your file is on your local disk, instead of starting the path with c:\, you might need to start it with \\. If you get any kind of error message, a quick Google for that exact error message should sort you out.
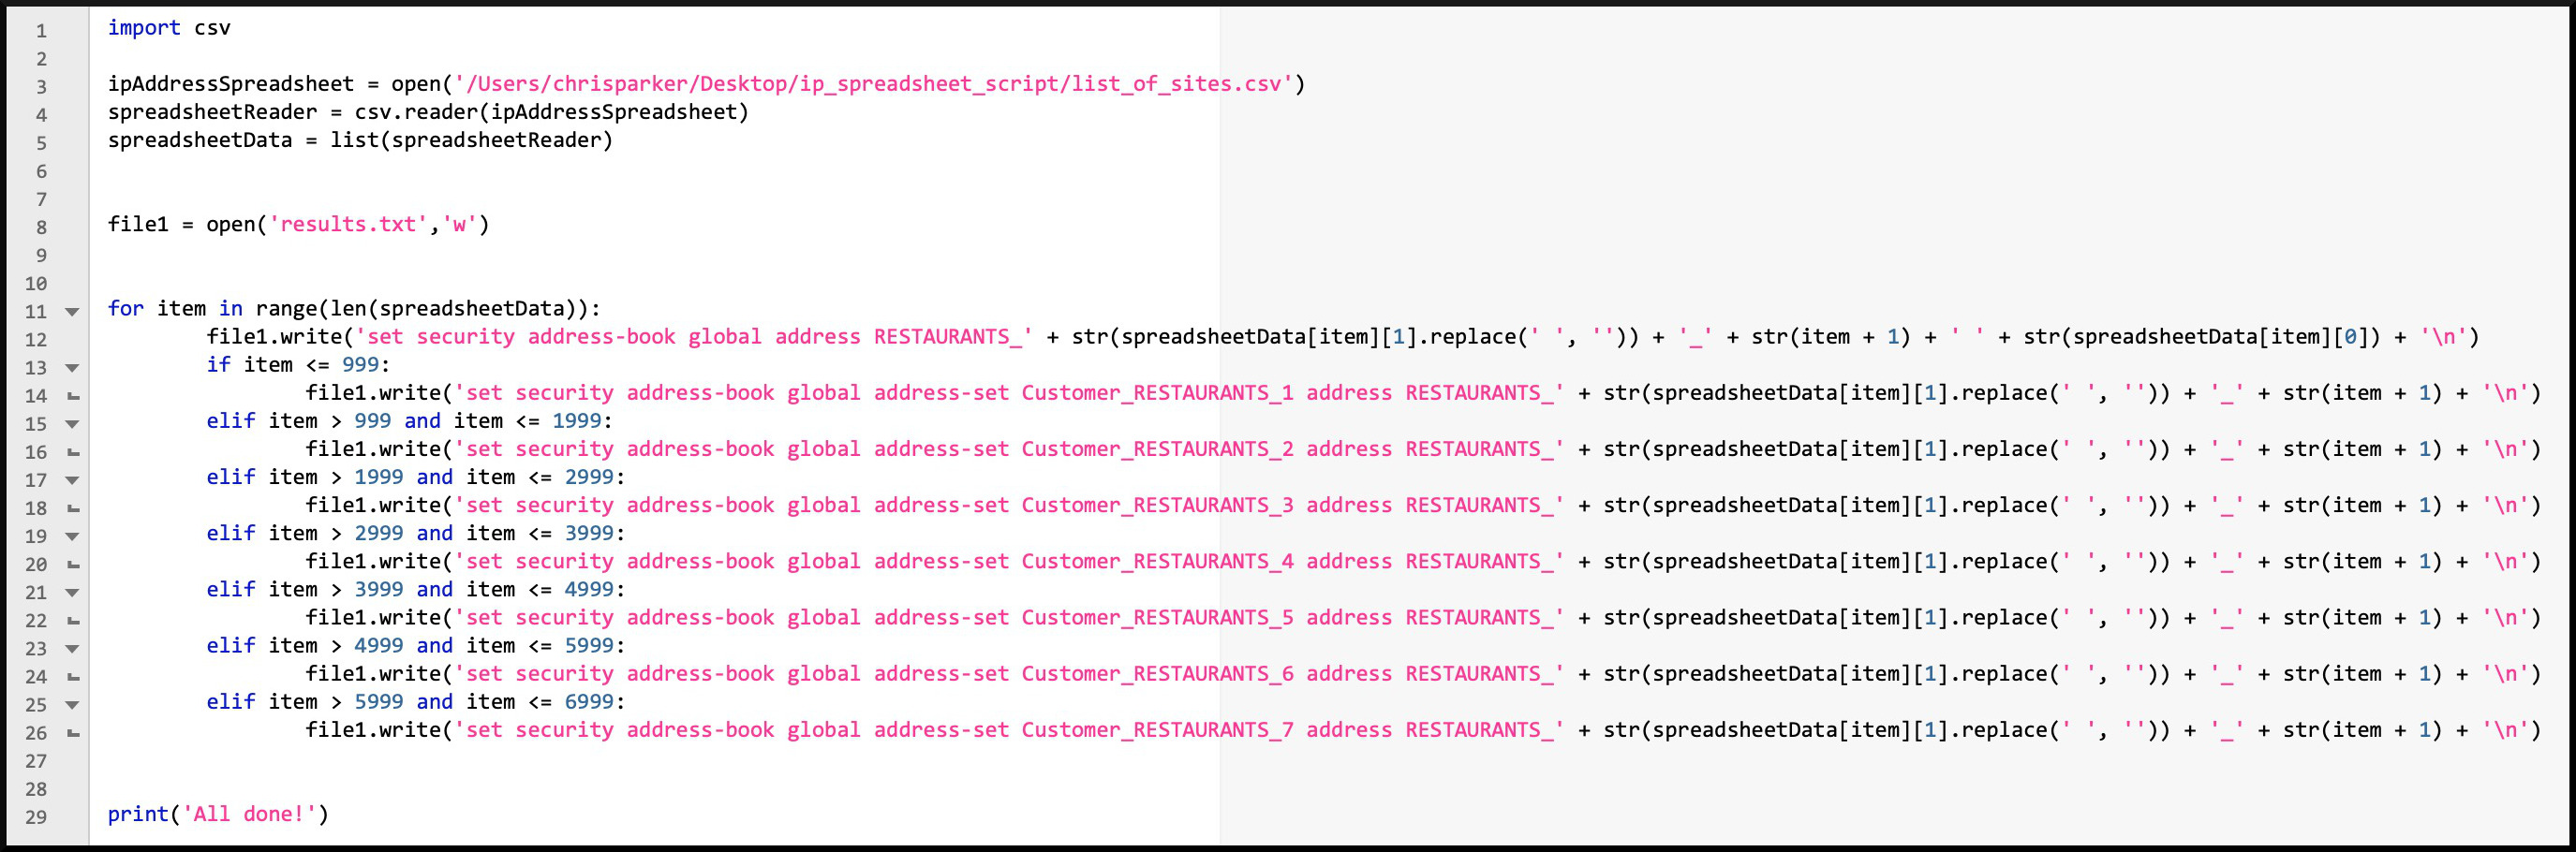
import csv

ipAddressSpreadsheet = open('/Users/chrisparker/Desktop/ip_spreadsheet_script/list_of_sites.csv')
spreadsheetReader = csv.reader(ipAddressSpreadsheet)
spreadsheetData = list(spreadsheetReader)


file1 = open('results.txt','w')


for item in range(len(spreadsheetData)):
        file1.write('set security address-book global address RESTAURANTS_' + str(spreadsheetData[item][1].replace(' ', '')) + '_' + str(item + 1) + ' ' + str(spreadsheetData[item][0]) + '\n')
        if item <= 999:
                file1.write('set security address-book global address-set Customer_RESTAURANTS_1 address RESTAURANTS_' + str(spreadsheetData[item][1].replace(' ', '')) + '_' + str(item + 1) + '\n')
        elif item > 999 and item <= 1999:
                file1.write('set security address-book global address-set Customer_RESTAURANTS_2 address RESTAURANTS_' + str(spreadsheetData[item][1].replace(' ', '')) + '_' + str(item + 1) + '\n')
        elif item > 1999 and item <= 2999:
                file1.write('set security address-book global address-set Customer_RESTAURANTS_3 address RESTAURANTS_' + str(spreadsheetData[item][1].replace(' ', '')) + '_' + str(item + 1) + '\n')
        elif item > 2999 and item <= 3999:
                file1.write('set security address-book global address-set Customer_RESTAURANTS_4 address RESTAURANTS_' + str(spreadsheetData[item][1].replace(' ', '')) + '_' + str(item + 1) + '\n')
        elif item > 3999 and item <= 4999:
                file1.write('set security address-book global address-set Customer_RESTAURANTS_5 address RESTAURANTS_' + str(spreadsheetData[item][1].replace(' ', '')) + '_' + str(item + 1) + '\n')
        elif item > 4999 and item <= 5999:
                file1.write('set security address-book global address-set Customer_RESTAURANTS_6 address RESTAURANTS_' + str(spreadsheetData[item][1].replace(' ', '')) + '_' + str(item + 1) + '\n')
        elif item > 5999 and item <= 6999:
                file1.write('set security address-book global address-set Customer_RESTAURANTS_7 address RESTAURANTS_' + str(spreadsheetData[item][1].replace(' ', '')) + '_' + str(item + 1) + '\n')


print('All done!')
LET’S BREAK DOWN THE FIRST LINE!
Line 1 of our script is this:
import csv
This one command imports the csv module. But hey: what is a Python module?
Python has loads of commands that can perform a task. These “commands” are really called functions. Some come out of the box; others need to be imported in. For example, there’s a function called print() that literally just prints text to the screen. Inside those brackets you put the text you want to display. For example, bring up the IDLE interactive shell and type this:
>>> print('I am a really cool person!')
I am a really cool person!
Functions always end with () even if there’s nothing inside the brackets. If you go to IDLE and type print() you’ll get a blank line. Hey: you’re a true programmer now!
Modules are similar to functions, except a bit bigger. I’ve seen multiple websites describe a module as “a collection of functions”. Module code lives outside of your script, in a separate file. You can write your own modules, and you can even download other modules from the internet – but Python actually comes with loads of modules already that are super handy.
The “csv” module is one such example. With this one line of code (“import csv“), we’re importing the module that can both read and write data in CSV format. This is great: if it weren’t for this module, we’d have to write this functionality ourselves, which is a bit beyond my abilities! Someone’s done all the hard work for us. Nice!
THE NEXT THREE LINES: OPENING THE SPREADSHEET
I made line 2 blank, for my own readability. How about lines 3, 4, and 5? Even in just these three short lines, there’s a lot going on.
ipAddressSpreadsheet = open('/Users/chrisparker/Desktop/ip_spreadsheet_script/list_of_sites.csv')

spreadsheetReader = csv.reader(ipAddressSpreadsheet)

spreadsheetData = list(spreadsheetReader)
When you import a module, it often comes with a list of functions inside it that you can use. For example, the csv.reader() function does exactly what it says on the tin: it reads the spreadsheet.
But “hold” your “horses”! Before we can read the spreadsheet, we first have to open it. Easy: we just use the the built-in open() function, and tell it where our spreadsheet is. Here’s line 3 again:
ipAddressSpreadsheet = open('/Users/chrisp/Desktop/ip_spreadsheet_script/list_of_sites.csv')
Notice that I’m creating a new variable called ipAddressSpreadsheet, and I’m putting the entirety of my CSV file into this variable.
Chances are you know what a variable is already: it’s a named container that you can store data inside, and retrieve later. You can manipulate the data any way you like, and even overwrite it if you need to. You use the = sign to put some data inside a variable. For example, let’s put the number 1 into a variable called beef:
>>> beef = 1
>>> print(beef)
1
>>>
There’s actually different kinds of data in Python. For example, pure numbers are treated differently to strings of text. In other words, the number 1 is treated differently to the text character “1”. And even within numbers, there’s a distinction between whole numbers (ie integers, like 1) and fractional numbers (or floating-points, like 2.3 or 3.14). The difference between a string and an integer will be really important later on in our script.
So, back to our three lines. All we’ve done so far is OPEN the spreadsheet. The open() function doesn’t actually import it in the way that we want. In fact, we can see this by taking a peek at what’s inside the variable ipAddressSpreadsheet. In Python’s IDLE interactive shell, I’ve copy-pasted each line of the script so far into the shell, one line at a time. As such, typing the name of the variable is enough to display what’s inside it:
>>> ipAddressSpreadsheet
<_io.TextIOWrapper name='/Users/chrisparker/Desktop/ip_spreadsheet_script/list_of_sites.csv' mode='r' encoding='US-ASCII'>
To turn this into data we can actually manipulate, we need to do two more things. First, we need to pass the contents of the ipAddressSpreadsheet variable to the csv.reader() function – and then we need to put the result of THAT command into a brand new variable called spreadsheetReader. We can do both of these things with this one single piece of code, on line 4:
spreadsheetReader = csv.reader(ipAddressSpreadsheet)
Notice that we’re actually using the csv module now! And in particular, we’re using the reader function that comes with the csv module. We’re making progress – but the spreadsheetReader variable still isn’t exactly what we want:
>>> spreadsheetReader
<_csv.reader object at 0x10a70a198>
To get the actual spreadsheet in a format we can use, we need this one piece, which you’ll find on line 5:
spreadsheetData = list(spreadsheetReader)
The list() function turns the contents of the spreadsheetReader variable into something we can actually use – and puts this new usable content into a brand new variable called spreadsheetData. What does that look like? I’ll just show you just the start of the output, because the total result is massive. (If you do this yourself, be patient – it might take a while to display!)

Wow, it looks a lot more promising now!
You might notice two things. First, every line on the spreadsheet is enclosed in square brackets. Second, you’ll notice that the entire thing also starts with an additional opening square bracket, right at the very start. There’s a closing one at the end, too. These square brackets tell us that this variable is a huge list, and that each line on the spreadsheet is itself a list within the main list.
But what is a list? Good question. Read on!
LISTS IN PYTHON
Entire chapters of books have been written on this topic, so believe me when I say that this is just the high-level summary!
Lists are, on the surface, exactly what they sound like: if a variable contains a list, it means that the variable contains multiple items. You can print out the entire list, or just certain items in the list, in any order you like.
To show the advantage of lists, let’s look at what would happen if we didn’t have them. Let’s put some text into two new variables, name1, and name2. Notice below that I put the text in quotes. That’s important, and I’ll explain why later.
>>> name1 = "Barry"
>>> name2 = "Susan"
>>>
>>> print (name1 + name2)
BarrySusan
>>>
There’s the print() function in action again! The fact that you can do maths (or math, depending on where you are in the world) on two names makes me very happy. As any mathematician will tell you, Barry + Susan = BarrySusan. Nice! Keep in your mind the fact that you can combine text together using the + symbol, because we’ll use it in our script later on.
Notice though that when we printed these two names out, there wasn’t a space between them. Why? Because we didn’t put a space in there. Let’s fix that:
>>> print(name1 + ' ' + name2)
Barry Susan
>>>
We could even make it more readable like this:
>>> print(name1 + ' and ' + name2)
Barry and Susan
>>>
In this example we have two variables that we’re printing one after the other. But what if we wanted to add a third name in there? And a fourth? We’d have to re-write our code to define new variables like name3, name4, and so on. Doing it like this means we can only have a set number of friends at any one time. What a sad story! I want to live in a world where I can have as many friends as I want.
That’s where lists come in. When you use a list, you’re not constrained to the number of variables you may have pre-defined. Check it out: let’s define a list of all my friends. To make a list you just put the items in square brackets, and separate them by commas:
>>> namesOfAllMyFriends = [ "Barry", "Susan", "Jeff", "Xanador The Destroyer" ]
>>>
>>> print(namesOfAllMyFriends)
['Barry', 'Susan', 'Jeff', 'Xanador The Destroyer']
>>>
Getting something out of a list is easy: you just mention the location in the list that you want to get. It’s like an index. Numerical 0 is the start of the list (there’s another thing for you to remember – the fact that we start at numerical 0 to refer to the first item in the list will be REALLY important later on!), so for this list, we’d do this to get individual things from the list:
>>> print(namesOfAllMyFriends[0])
Barry
>>>
>>> print(namesOfAllMyFriends[2])
Jeff
>>>
Good old Jeff. Jeff never lets us down.
Here’s a question: I mentioned that a list can grow or shrink, and isn’t limited to a set number of items. In that case, how would you retrieve the very last items in the list, regardless of how long the list is? It’s easy: you can actually use negative numbers to start the index at the end, and work backwards. So In the list above, we can do this to see what the final item in the list is:
>>> print(namesOfAllMyFriends[-1])
Xanador The Destroyer
Lists are mutable, which is a word I hadn’t heard of before I started studying Python. I guess it’s like “mutateable”, ie it can change. As an example, here’s how you add something to the end of a list:
>>> namesOfAllMyFriends = namesOfAllMyFriends + ["Karen"]
>>>
>>> print(namesOfAllMyFriends)
['Barry', 'Susan', 'Jeff', 'Xanador The Destroyer', 'Karen']
Although it’s not relevant for today, let me tell you this just for completion’s sake: by contrast, there’s another data type called a tuple. It does exactly the same thing, but you can’t add/delete/swap things in a tuple. A tuple is said to be immutable. You write tuples in exactly the same way as lists, except you use (round brackets) instead of [square brackets].
There’s also a thing called a dictionary, which doesn’t at all do what you’d think it does from the name. In Python, a dictionary is like a list, but each item in the list has its own named key, and you can refer to the key to get the corresponding item. Very useful when you want to have a variable that contains various pieces of a configuration! You use {curly brackets} to define a dictionary.
CAN YOU HAVE LISTS WITHIN LISTS?
You sure can! And actually, that’s exactly what we do in this script. Each line on the spreadsheet is stored as an item in a big list, and that line on the spreadsheet is then broken down into a second list, made up of the IP and the name of the site.
With all that in mind, it’s hopefully a little easier now to see what line 5 does:
spreadsheetData = list(spreadsheetReader)
And it’s probably clearer what’s going on in that screenshot from earlier:
You’ll remember that we opened our .csv file, passed it to the csv.reader() module, stored the result in a variable, and then passed that variable to the list() function. Now that we’ve talked about what a list is, you might see the advantage we’ve given ourselves: we can now call upon each individual IP and each individual name in the spreadsheet, whenever we like! BWAHAHAHA!! THE POWER!!! THE SHEER POWER!!!!
Earlier we called individual items out of one single list by just saying their location, eg we used [1] to refer to the 2nd item in the list. But here we have a list of lists!! How on EARTH do we call information out of that?? Easy:
>>> spreadsheetData[5][1]
'The Pizza Shack'
>>>
Remembering that we start counting from numerical zero, what we just said there was “I want something out of list [5], and in particular I want item [1] in that list.”
WRITING CONFIG, AND KNOWING HOW MANY TIMES TO LOOP
Lines 6 and 7 are blank. Here’s the next piece of code, on line 8:
file1 = open('results.txt','w')
You can probably guess what that does: the script opens a file I made called results.txt, and gives itself write access to the file. In a moment we’re going to be writing lots of lines of configuration to it.
How about this line?
for item in range(len(spreadsheetData)):
This one might be a bit less clear.
There’s different ways of making a Python script loop over the same piece of code multiple times. One way is to use a while loop, which runs some code while something is true. You could write something like this:
>>> myAge = 1
>>>
>>> while myAge < 50:
         print(myAge)
         myAge = myAge + 1
1
2
3
4
5
6
7
[snip]
You get the idea with that: when myAge reaches 50, the loop stops. Something to think about there for those of us who are getting older.
A for loop is similar, except that it loops for a set number of times. How many times? However many you specify in the range() function.
>>> numberOfLoops = 5
>>>
>>> for i in range(numberOfLoops):
         print("I'm looping!")
I'm looping!
I'm looping!
I'm looping!
I'm looping!
I'm looping!
>>>
The variable i goes up by one every time the script loops, until it equals the number of times the loop has to run.
I could have just said “for i in range(5)” there, but I wanted to show you that you don’t have to hard-set the number of times your code loops. And indeed, to come back to our script, that’s what we do here…
for item in range(len(spreadsheetData)):
…except that we do one thing extra. See, at the moment the contents of the variable “spreadsheetData” isn’t a number: it’s a list of lists. But what we can do is run the len() function on the contents of the variable, to see how many items are in the list. Here’s what it looks like in the IDLE shell:
>>> len(spreadsheetData)
6166
What we see in our for loop is that it’s possible to take a variable, pass it to a function, and the pass the result to another function. In our script we’re taking the contents of spreadsheetData, passing it to len(), and passing the resulting number (6166) to the range() function.
By the way, notice that the loop in our actual script uses a variable called “item“. Remember this. We’ll be referring to that variable a few times in the upcoming code.
Do you know what? If you’re one of the people who started reading this blog with zero Python knowledge, take a moment to stop and think about how much you’ve learned so far by reading this. Genuinely, you’ve done an excellent job, and you should be super proud! You now know about loops, lists, variables, strings and integers, you know how to open files and write to files… you’ve genuinely levelled up!
Now keep reading – because this is the moment you’ve been waiting for.
TIME TO ACTUALLY START GENERATING CONFIG!
There’s two parts to the actual config generation. The first part is on line 12, which creates the individual address book entry. This is the first real line in the for loop. Let’s remind ourselves what it is. As always, the pic is clickable to make it bigger and more readable.
![]()
If you’re brand new to Python, at first glance that long line of code might look daunting. But now that you know about variables, and about calling things from a list, I bet you can have a fairly good guess at what it does.
First we see file1.write(). Do you remember this command from earlier?
file1 = open('results.txt','w')
We defined a variable called file1, then used the open() function to open a text file, and gave ourselves write access to that file. Here, file1.write() means “Write anything inside the brackets to the results.txt file”.
The first bit inside of the brackets is easy. We’re just outputting the text “set security address-book global address RESTAURANTS_“. But what about this next bit?
str(spreadsheetData[item][1].replace(' ', ''))
First let’s look at the “spreadsheetData[item][1]” piece. This is calling our lists of lists. Do you remember earlier when I pointed out that the variable named item is the number of times we’ve run the loop so far? To be precise, the number starts at numerical 0, so the code “spreadsheetData[item][1]” starts off meaning “spreadsheetData[0][1]” – in other words, “starting at numerical 0, get item 1 out of list 0”. And as we see from this output from the IDLE shell, this is what [0][0] and [0][1] refer to:
>>> spreadsheetData[0][1]
'The Pizza Shack'
>>>
>>> spreadsheetData[0][0]
'98.32.173.82'
>>>
So, to summarise: “spreadsheetData[item][1]” gets turned into “spreadsheetData[0][1]“, because this is the first time doing this loop. Then ultimately, spreadsheetData[0][1] gets turned into the text “The Pizza Shack”. Nice!
The next piece of code gets rid of the white spaces in that text:
replace(' ', '')
You could also do replace(‘ ‘, ‘_’) if you wanted to replace the spaces with underscores. In my code, “The Pizza Shack” becomes “ThePizzaShack“.
Interestingly, it turns out that replace() isn’t a function: it’s a method. A method is like a function, except that it works directly on a value, for example something in a variable.
There’s one piece I’ve not mentioned yet: the str() at the start of all this.
Do you remember earlier when I mentioned that text (what Python calls a string) is treated differently from pure numbers? The purpose of str() is to turn the contents of whatever’s in the bracket into a string. Now, let’s be clear: you and I can see that ThePizzaShack is text. That’s because you and I are smart! Well done us! But Python needs to be told this explicitly.
So, to bring it all together, “str(spreadsheetData[item][1].replace(‘ ‘, ”))” takes the name of the company, gets rid of spaces, turns it into a string, and inserts it into our line of config. Which means that now, so far, our line of config looks like this:
set security address-book global address RESTAURANTS_ThePizzaShack
Going back to the line of config:
![]()
You’ll see after this that there’s a plus sign, and then an underscore in quotes. Which means our config now looks like this:
set security address-book global address RESTAURANTS_ThePizzaShack_
We’re slowly getting there! What’s after the next + sign?
str(item + 1)
Aah, interesting: whatever number is in the item variable has 1 added to it, and the resulting number is then converted into a string. So, again to break it down, if we were on the very first run-through of this loop, the variable item would contain the number 0. What’s 0 + 1? That’s right: two hundred thousand! Wait, sorry, no, let me check again…. one. It’s one. 1 is the answer.
So, now we have the number 1. This is a pure number – an integer, in other words. But in Python, we need this to be a string, otherwise we won’t be allowed to include it in our text-based output. Python sees a difference between the number 1 and the text “1”.
In fact, that’s exactly what the quotes mean. Let’s use the type() function on the IDLE shell to see what different data types we have:
>>> type(1)
<class 'int'>
>>> type('1')
<class 'str'>
>>> type("1")
<class 'str'>
Single-quotes or double-quotes: for our purposes here, both do the same thing – they turn the characters you type into a string.
How does our config look now?
set security address-book global address RESTAURANTS_ThePizzaShack_1
Almost there! What’s left in this line of code?
+ ' ' + str(spreadsheetData[item][0]) + '\n')
Okay, so the first bit adds a single space. Easy! And we can immediately see what the next bit does: it calls the first part of the list on the current line, which as we saw earlier is where the IP address is stored. And again, we’re making sure it’s a string by using the str() function. The final bit, the ‘\n’ piece, is Python’s way of pressing return on the keyboard. We’re saying “end of the line! Start a new line of text now please!”
After all that, this line of code:
![]()
gives us this line of config:
set security address-book global address RESTAURANTS_ThePizzaShack_1 98.32.173.82
PUTTING OUR ADDRESS BOOK ENTRY INTO AN ADDRESS-SET
The rest of the script is one big long if statement. We look to see what number is currently in the variable item, and depending on if it’s bigger or smaller than two other numbers, we take a certain action.

Is item less than or equal to 999? If so, our new address book entry is going to get added to an address-set called Customer_RESTAURANTS_1. This puts the first 1,000 addresses into the address-set, from 0 to 999.
Is item more than 999, but less than or equal to 1999? If so, it’s going to get added to an address-set called Customer_RESTAURANTS_2. And so on, and so on.
Looking at the code that generates the config for the address-sets, you might notice that we once again see “RESTAURANTS_” at the start of the name, and then the familiar “str(spreadsheetData[item][1].replace(‘ ‘, ”))” piece. What we’re basically doing here is creating the address book name a second time. We don’t need the IP this time: the name is enough, with space removed of course, and with RESTAURANTS_ at the start of it. By generating just the name of the address book entry, we have the code we need to create this line of config:
set security address-book global address-set Customer_RESTAURANTS_1 address RESTAURANTS_ThePizzaShack_1
And that’s it! Now that we’ve made the address book entry, and added it to the address-set, the script loops to line 2 on the spreadsheet (or [1] as Python would call it!), and does it all over again, and again, and again, until the end of the spreadsheet.
DID IT WORK?
When we run this code, we’ll find our results.txt file is full of beautiful pre-made configuration. Want to see the result for yourself? Click here!
Let’s skip down to line 2000, because I want to show you something. Remember, my code generates a line for the address book entry itself, and a separate line putting it into an address-set. The first address-set is just called Customer_RESTAURANTS_1. But after 1000 addresses are added in, we should then start putting things into Customer_RESTAURANTS_2. 1000 address book entries & address-set entries will generate 2000 lines of code – and line 2001 should be the first address book entry that then goes into Customer_RESTAURANTS_2. Am I right? Let’s skip there and find out:

YES! It worked!!
I put a final print(‘All done!’) at the end, on line 29 of my code, just as a sign for me that the script has completed successfully. Even though it’s only making 12,000 lines of config, it still makes me smile so much that the config is created faster than the blink of an eye.
HOW COULD THIS SCRIPT BE IMPROVED?
There’s a few ways that I know this code could be improved. For example, using multiple elif statements isn’t very scalable. It would be great to be able to import a spreadsheet of any length, and have it loop around regardless of the number of lines, automatically making new address-sets as it goes.
It would also be great to be able to import any CSV file, not just the one I’ve named. And indeed, imagine if that script could automatically detect where the IPs are and where the location name is!
A thing I’d love it to be able to do is to make the number at the end of the address book object name a bit more meaningful. At the moment it just goes up by one each time it loops. But imagine if it could actually count how many times that particular location has appeared so far, and have separate counts for each location.
And one final thing that would be brilliant would be if it could log onto the SRX and see what addresses are already defined on there, to check that there’s no duplication of address book entries, or to make that advanced numbering scheme even more intelligent.
What I will say is that I showed my code to two pals who didn’t know much about coding at all, and they were actually able to understand it from reading it. In my short time using Python, I find that some code is very efficient, but at the cost of readability. Other code is very readable, but also much longer than it needs to be.
There’s not necessarily a right or wrong answer on which is best (unless the code is very processor intensive, in which case efficiency is certainly best!), and I’ll leave you to make up your mind on that. In any case, I definitely welcome improvements to my script. If you do comment with new code, please tell us what the code is doing. If you use functions that will be new to people, let us know what they do. Let’s all learn together!
THAT’S IT!
Was this post useful to you? Have you written any blogs yourself where you teach complete beginners how to use Python for networking? Do you just want to say hi? Whatever your reason please do leave me a comment. And of course, I’d love you to share it on your social media of choice, or email it directly to colleagues who might find it helpful. The more people that read my blog, the more inspired I am to write even more posts.
If you’re on Mastodon, follow me to find out when I make new posts. (2024 edit: I’m also on BlueSky nowadays too. I was once on Twitter, but I’ve given up on it, on account of… well, I don’t need to finish that sentence, do I.)
And if you fancy some more learning, take a look through my other posts. I’ve got plenty of cool new networking knowledge for you on this website, especially covering Juniper tech and service provider goodness.
It’s all free for you, although I’ll never say no to a donation. This website is 100% a non-profit endeavour, in fact it costs me money to run. I don’t mind that one bit, but it would be cool if I could break even on the web hosting, and the licenses I buy to bring you this sweet sweet content.
Thank you for reading, and see you next time!


Nice work Chris, Just posting an updated version along with the results
https://pastebin.com/teqPbezh – code
https://pastebin.com/N1mrcJL1 – Results (first X number of lines as limitation on pastebin)
A few notes on what I changed to help.
1 – We use a with open, this makes sure that if anything goes wrong while trying to write to the file it will auto close the file (closing files is important sometimes and you missed that key bit I think)
2 – We use the dictionary variable type, this allows us to use Key and value pairs. e.g:
“Names”: [“bob”, “Chris”, “jane”]
“Ages”: [5,10,15]
Now I’m not saying a Value has to be a list it can be any other variable type (I think) but in this case we can use a dictionary Key to store the Branch names e.g “Burrit-oh” and then within that use a list (Just like you did) to store the Addresses.
Because we now have unique lists for each Branch we can then number each Branches IP address instead of globally numbering them! You can also start to group the IP sets by Branch name rather than a set of 7 Global address sets.
3 – When breaking into the for loop over each spreadsheet item, we quickly assign the variables to temp vars so we can easily reference them later which can just help readability.
4 – Finally, when printing/writing out we use the Format function which allows us to create formatted strings using named variable sections. Note: If you don’t name them you can just specify vars in the order you want to populate them!
Amazing! thank you so much for this brilliant feedback, and for the code and the breakdown. Incredibly useful, I’ve no doubt in my mind that the community will get a great deal from it.
Here’s a question: in your code you’ve made address-sets for each restaurant franchise. Junos has a limitation of 1024 addresses per address-set. How would you stop a certain franchise from putting 1025 sites or more into an address set?
The Juniper website says “There is a limit to the number of address objects that a policy can reference; the maximum number of address objects per policy is 1024.”. I ASSUME this means that you could have 1,024 address-sets in a policy, regardless of how many total addresses are in the address-set, but I’d have to lab it up to find out. That’s some homework for the weekend! If you can indeed do that then I think your solution is great, because you can just put each group into the one policy.
Great post, thanks Chris!
Aside from the improvements you mention, another usability improvement would be (I imagine) to have address group objects per restaurant chain – so if a particular restaurant group leaves your organisation, it’s much easier to get rid of it from your config – although, of course, arguably that’s similarly easy to do by re-running and re-importing the config after editing the ex-customers out of the .csv.
However, operationally, it may be easier (and less “risky”) to be able to enable and disable customer-based groups of IP addresses, rather than a generic container of 1,000 IP addresses.
You could further “nest” some of these in container address-sets to reduce the length of some of your policy statements, but there is then a risk of exceeding the 1024 IP address limit (https://www.juniper.net/documentation/en_US/junos/topics/topic-map/security-address-books-sets.html). In any case, you probably *want* per-customer rules. The interesting case then comes with a customer with >1024 locations/IPs!
Of course, in many cases, larger companies will have netblocks, which (in my reading of the documentation) count as one address object. You’d have to be a very large company to have more than 1024 address blocks (or one that was very late to the Internet game, or reliant on a commercial ISP for a NATd address per site, etc!).
Another “sanity checking” thing would be to ensure IP addresses are valid, and that the restaurant names don’t contain any characters that might make Junos have a hernia – some regex would probably crack that (and is useful python [and Junos] learning).
Absolutely! I’ve found in the past that if there’s a blank space at the end of the IP then it can royally screw with scripts, so some kind of error checking there would definitely be handy.
And yeah, it’s tricky to know what to do about grouping restaurant groups up. You’re bang on that it’s easier to manage if that entire franchise were to leave, but it’s also trickier to manage from a 1024-address-per-address-set perspective. I feel like whatever I’d choose to do would end up being wrong somehow!
Nice post. One of the things you learn as you get into coding is version control, forgive me if this is well known already to you. I mention this as you’re not yet sharing the code via a well known collaborative authoring site such as Gitlab or Github. It’s a recommended best practice and very handy, examples here:
https://github.com/Juniper/py-junos-eznc
https://networkzblogger.com/2018/10/03/juniper-config-backup-on-gitlab/
HTH.
Hi Chris,
Great write up, seems like an excellent tool to have handy in the toolbox and could be readily adapted to similar tasks.
You’ve inspired me to put down my snacks and have a shot at an ASA version!
Cheers,
Matt
Nice! Good luck Matt, really happy to hear it’s inspired you to give it a go!
This is by far the best python introduction I have seen. It would be nice to read on what else you have learnt since this post. I thoroughly enjoyed reading.