

IS-IS and Unnumbered Ethernet Interfaces in Junos
I was reading an excellent older post on Ivan “Pepper-and-Jack” Pepelnjak’s blog recently, about creating unnumbered Ethernet interfaces – in other words, Ethernet interfaces that don’t have their own dedicated IP address, and instead borrow the IP address of the loopback interface.
His posts gave Cisco IOS configuration and verification. I thought it would be helpful for folks if I did the same for Junos.
See, I’m quite a helpful person in real life. For example, the other day I saw an old man struggling to carry his shopping as he crossed the road. I helped the man by going through his bags, and eating all the delicious heavy cakes and pastries that I saw in there. Well, you know how heavy a chocolate croissant can get. The man gave me a look that an amateur would read as angry, but that I recognised as a look of gratitude. “Thank you for relieving me of the burden of these sweet treats”, he said to me with his furious eyes. “You’re a good person. A very good person.”
WAIT – UNNUMBERED ETHERNET INTERFACES?
In the olden days of serial interfaces, unnumbered interfaces were an easy concept to understand.
Serial interfaces are, quite literally, point-to-point. There’s no broadcast, no multi-access. Traffic goes out of one physical interface, and enters one, and only one, next-hop.
Therefore, if you can create a protocol adjacency over that interface, then you don’t necessarily need an IP address on the interface. If R1 knows it can get to some remote destination via the serial connection to R2, then it’s enough to encapsulate the packet in whatever protocol the interface uses, and then punt the packet down that interface.
Ethernet is a bit more tricky to understand, because it uses ARP to discover the device at the other end of the cable. That’s true regardless of whether you have a direct point-to-point cable between two devices, or whether there’s a multi-access switch bridge in the way. If the Ethernet interfaces between R1 and R2 don’t have an IP address at all, let alone an IP address in the same subnet, then how does ARP work? How does R1 talk to R2?
ARP BETWEEN DIFFERENT SUBNETS
The answer comes from two facts. First, both interfaces borrow the IP address of their loopback interface. Second, two devices don’t need to be in the same subnet for ARP to work.
For example, suppose R1 has a loopback of 192.168.1.1/32, and R2 has a loopback of 192.168.1.2/32. The two devices are connected with an unnumbered Ethernet connection. R1’s Ethernet interface borrows R1’s loopback IP address, and R2 does the same for its loopback.
Theoretically, R1 can now send an ARP request out of this interface that says “My IP is 192.168.1.1, and here’s my MAC address. Does anyone know 192.168.1.2’s MAC address?”
I say theoretically, because R1 still needs some way of knowing that 192.168.1.2 exists in the first place.
There’s two solutions to this. The first is to use static routes. Read Ivan’s post to understand the details on that.
The second option is to use IS-IS. If your unnumbered Ethernet links are point-to-point, then it turns out that the whole thing just works automatically in Junos! Let’s take a look.
THE TOPOLOGY
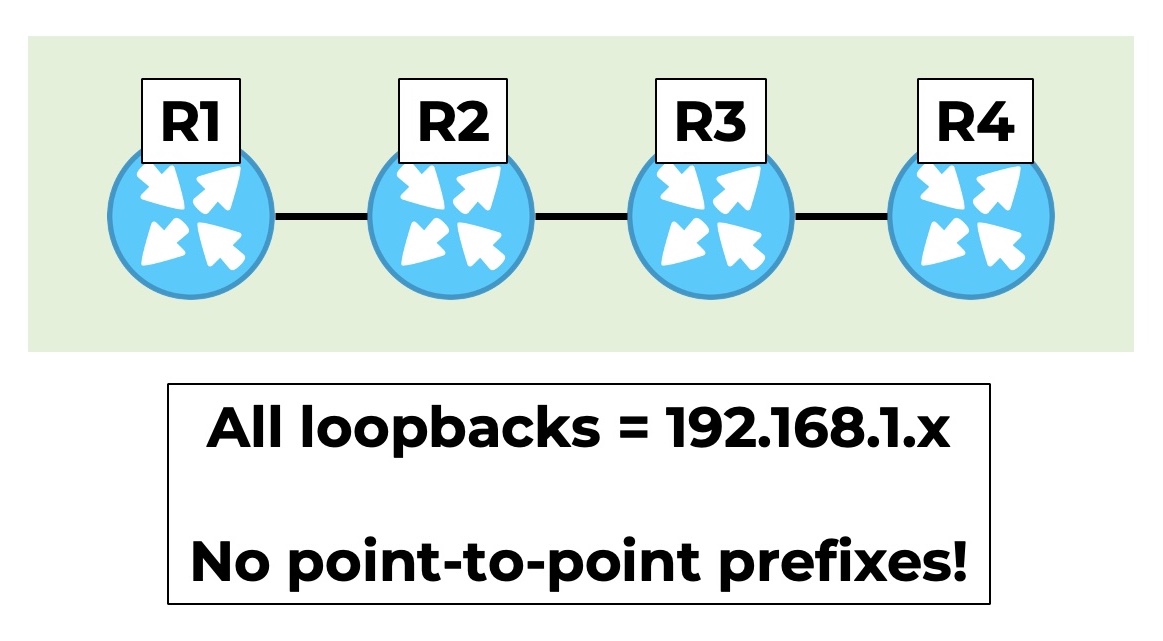 In this picture you can see four routers, R1 to R4, each with a loopback of 192.168.1.x, where x is the router number. If only the real world was this easy!
Normally at this stage I’d explain my super-nice IP scheme that I always used for point-to-point links. But of course, this time they don’t have IPv4 addresses. Very nice, very clean.
I’m running Junos vMX 21.4R1.12 in my lab, though I should imagine these commands are available on many older versions.
PART 1: CONFIGURE THE LOOPBACK INTERFACE
You might know already that Junos calls its loopback interface lo0 (that’s a lower case L). Let’s add the following config to R1:
set interfaces lo0 unit 0 family inet address 192.168.1.1/32
This is the address that all Ethernet interfaces are going to “borrow”.
While we’re here, let’s give R1 an ISO address, for IS-IS. If you don’t understand what this address means, then that might mean you haven’t read my guide to IS-IS. Give it a click. You might like it!
set interfaces lo0 unit 0 family iso address 49.0001.0000.0000.0001.00
The loopback interfaces of R2, R3, and R4 are similarly configured with their own addresses. In fact, from now on I’m just going to show you the config on R1, so I’ll leave you to remember that the other routers are also getting similar config applied to them. Can you handle the responsibility? I bet you can. You seem very brave, if you don’t mind me saying so.
PART 2: CONFIGURE ETHERNET INTERFACES AS UNNUMBERED
This starts off like a normal Ethernet interface config – but instead of an IP address, we tell it to use the address on the loopback:
set interfaces ge-0/0/0 unit 0 family inet unnumbered-address lo0.0
While we’re here, let’s also enable the ISO family so we can run IS-IS, and let’s enable MPLS too, for a test we’ll do later on in this post:
set interfaces ge-0/0/0 unit 0 family iso
set interfaces ge-0/0/0 unit 0 family mpls
Good stuff so far. Well done team!
PART 3: CONFIGURE IS-IS
Here’s three best practices that I like to enable, even when I’m just mucking about in my lab:
set protocols isis level 1 disable
set protocols isis level 2 wide-metrics-only
set protocols isis reference-bandwidth 100g
For this particular task, those three statements are not needed at all – I just feel happier knowing I’ve enabled them. If you’re not sure what that config does, then I’m sure you’ll enjoy my guide to IS-IS. I wrote it just for you! Give it a read sometime.
On R1, I’ve enabled IS-IS on my new Ethernet interface, as a point-to-point interface (as opposed to a broadcast interface, which would be the default in IS-IS for this interface type):
set protocols isis interface ge-0/0/0.0 point-to-point
And finally, we enable IS-IS on the loopback interface as well:
set protocols isis interface lo0.0
PART 4: VERIFY THE IS-IS ADJACENCY
Yep – it works! Even though we have no IPs on the physical interfaces, and even though we haven’t configured any special ARP stuff, R1 can see R2.
root@R1> show isis adjacency detail

R2
  Interface: ge-0/0/0.0, Level: 2, State: Up, Expires in 21 secs
  Priority: 0, Up/Down transitions: 1, Last transition: 00:00:05 ago
  Circuit type: 2, Speaks: IP, IPv6
  Topologies: Unicast
  Restart capable: Yes, Adjacency advertisement: Advertise
  IP addresses: 192.168.1.2
This makes sense when you remember that IS-IS adjacencies aren’t formed at the IP layer. As such, the unnumbered aspect of the interfaces doesn’t cause any problems at all for IS-IS.
PART 5: VERIFY THE IS-IS DATABASE
You may remember that the IS-IS database doesn’t bind prefixes to specific links. Instead, the database is more like a node announcing “here’s me, here’s my name and system ID, here’s the nodes I’m connected to, and here’s the prefixes I know about”.
For example, on R1 we can look inside the full IS-IS database to see what R3 looks like, topologically. You can see below that R3 has a connection to R2, it has a connection to R4, and it also knows its own loopback IP.
root@R1> show isis database R3 detail

IS-IS level 1 link-state database:

IS-IS level 2 link-state database:
R3.00-00 Sequence: 0x4, Checksum: 0x152, Lifetime: 1106 secs
   IS neighbor: R2.00                         Metric:      100
   IS neighbor: R4.00                         Metric:      100
   IP prefix: 192.168.1.3/32                  Metric:        0 Internal Up
PART 6: VERIFY CONNECTIVITY
Somewhat amazingly, the configuration above (along with the equivalent config on the other three routers) is all you need for full connectivity. It all works!
root@R1> traceroute 192.168.1.4
traceroute to 192.168.1.4 (192.168.1.4), 30 hops max, 52 byte packets
 1  192.168.1.2 (192.168.1.2)  3.224 ms  2.502 ms  2.395 ms
 2  192.168.1.3 (192.168.1.3)  3.697 ms  4.045 ms  3.415 ms
 3  192.168.1.4 (192.168.1.4)  44.338 ms  5.699 ms  5.567 ms
At this stage, you may wonder how this is possible. Yes, IS-IS has advertised this information. But how does ARP work? For example, how does R1 know that it can send an ARP request out of its ge-0/0/0 interface for R2’s loopback, considering that the links are all unnumbered?
The routing table reveals the answer to this question.
PART 7: VERIFY THE ROUTING TABLE
Looking inside the inet.0 table, we see that R1 has learned the loopback IPs of every node in the network. Give it a read, and pay close attention to R2’s loopback, 192.168.1.2:
root@R1> show route table inet.0

inet.0: 4 destinations, 4 routes (4 active, 0 holddown, 0 hidden)
+ = Active Route, - = Last Active, * = Both
192.168.1.1/32     *[Direct/0] 00:04:41
                    >  via lo0.0
192.168.1.2/32     *[IS-IS/18] 00:02:27, metric 100
                    >  to 192.168.1.2 via ge-0/0/0.0
192.168.1.3/32     *[IS-IS/18] 00:02:02, metric 200
                    >  to 192.168.1.2 via ge-0/0/0.0
192.168.1.4/32     *[IS-IS/18] 00:01:36, metric 300
Do you see something of a circular logic? It says that to get to 192.168.1.2/32, you go via 192.168.1.2.
However, this is actually fine. Thanks to the IS-IS database, R1 knows that 192.168.1.2 is R2, and it knows that R2 is directly connected, via via ge-0/0/0.
Nevertheless, surely some kind of ARP needs to happen? For example, R1 needs to be able to send an ARP out saying “who owns 192.168.1.2”.
Indeed, it does need to happen – and it happens automatically. Junos just sorts the ARP request out for you.
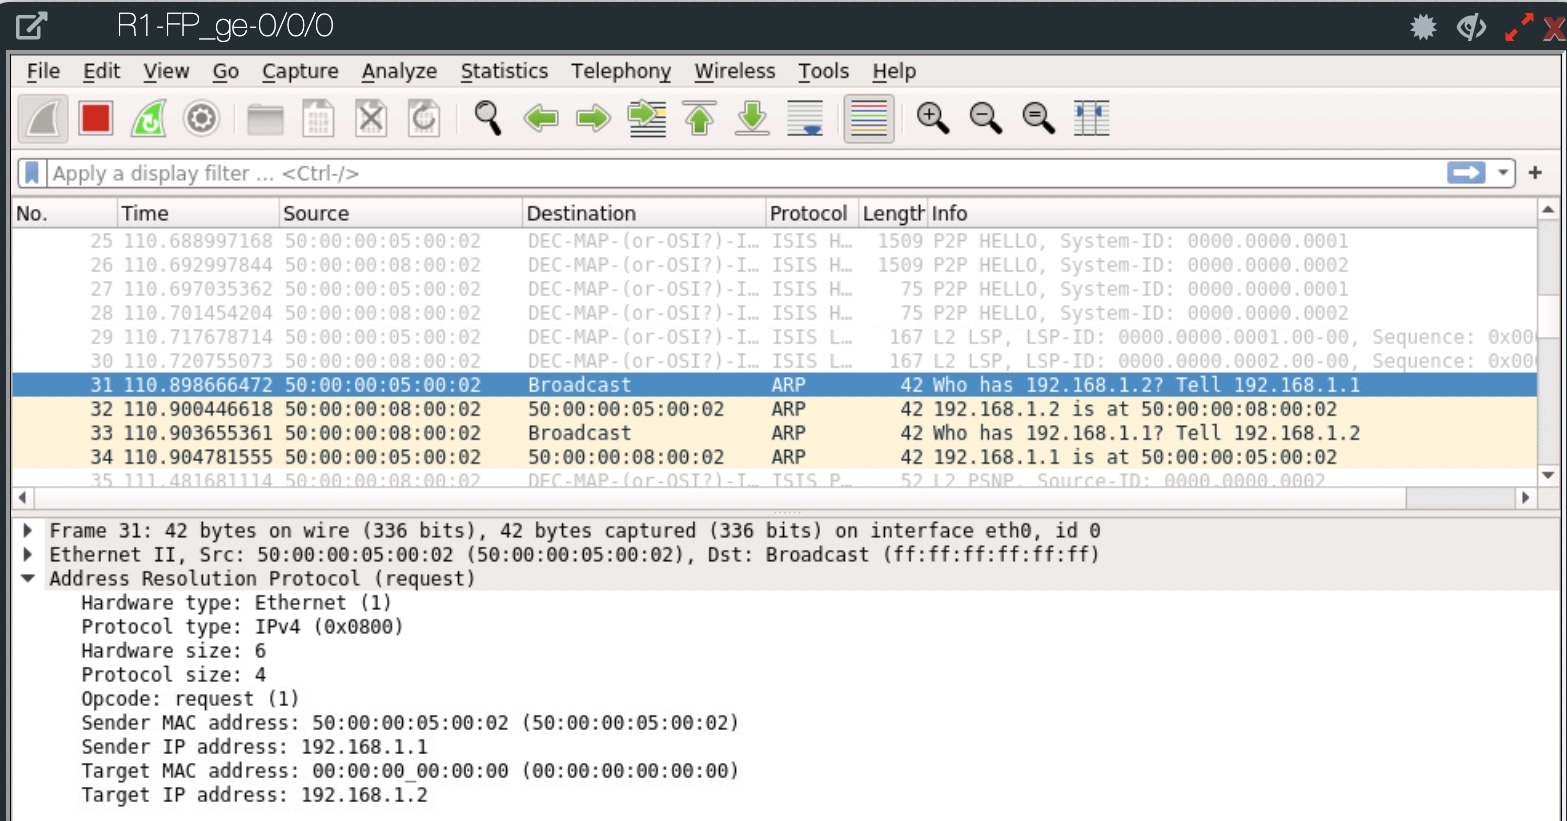
As you can see from the screenshot below, once the IS-IS adjacency has formed, the two routers advertise their link-state PDUs to each other (packets 29 and 30).
Then, as soon as R1 knows that 192.168.1.2/32 is directly connected to R2, it seems that R1 is smart enough to just send out an ARP request for it (packet 31), to which R2 replies (packet 32). Then, packets 33 and 34 are R2 requesting R1, and R1 replying. Notice the Sender IP and the Target IP in the payload below:
So far, this is fantastic. We can actually run an entire core network without needing to worry about an IPv4 addressing scheme for Ethernet point-to-point links. But if you’re from the service provider world, you might well be thinking “but what about RSVP LSPs?”. So, let’s take a look.
PART 8: TESTING RSVP-MPLS
Let’s turn MPLS and RSVP on all boxes. I add this config to R1:
set protocols mpls interface ge-0/0/0.0
set protocols rsvp interface ge-0/0/0.0
If your Ethernet links don’t have IP addresses on them, you might wonder whether you can create RSVP-signaled MPLS label-switched paths. After all, by default these LSPs refer to IP addresses on the physical interfaces along the path. Is it possible to create an LSP, even without those IPs?
Observe, this answer: absolutely!
RFC 3477 defines the ability for unnumbered links. If you were to look at R3 in the traffic engineering database, you’d see that it still knows its connections to R2 and R4, but the local and remote interface IPs are just 0.0.0.0.
root@R1> show ted database R3 detail

TED database: 4 ISIS nodes 4 INET nodes 0 INET6 nodes
NodeID: R3.00(192.168.1.3)
  Type: Rtr, Age: 495 secs, LinkIn: 2, LinkOut: 2
  Protocol: IS-IS(2)
   192.168.1.3
    To: R2.00(192.168.1.2), Local: 0.0.0.0, Remote: 0.0.0.0
      Local interface index: 333, Remote interface index: 333
    To: R4.00(192.168.1.4), Local: 0.0.0.0, Remote: 0.0.0.0
      Local interface index: 332, Remote interface index: 332
This is fine – RSVP just uses the loopbacks at either end of the link as the source and destination.
To prove this, below I’ve made an LSP from R1 to R4, and I’ve set a strict path all the way. I don’t have to create a strict path – I’m just doing this to show that it works:
set protocols mpls label-switched-path R1_TO_R4 to 192.168.1.4
set protocols mpls label-switched-path R1_TO_R4 primary STRICT_R2_R3_R4

set protocols mpls path STRICT_R2_R3_R4 192.168.1.2 strict
set protocols mpls path STRICT_R2_R3_R4 192.168.1.3 strict
set protocols mpls path STRICT_R2_R3_R4 192.168.1.4 strict
After committing the config, the LSP comes up with no problems:
root@R1> show mpls lsp ingress

Ingress LSP: 1 sessions
To              From            State Rt P     ActivePath       LSPname
192.168.1.4     192.168.1.1     Up     0 *     STRICT_R2_R3_R4  R1_TO_R4
Total 1 displayed, Up 1, Down 0
And zooming in on the Record Route Object, we can see the hop-by-hop path just shows the loopback IPs of the devices.
root@R1> show mpls lsp detail | find RRO
    Received RRO (ProtectionFlag 1=Available 2=InUse 4=B/W 8=Node 10=SoftPreempt 20=Node-ID):
          192.168.1.2(link-id=332 Label=299776) 192.168.1.3(link-id=333 Label=299776) 192.168.1.4(link-id=332 Label=3)
(Don’t be confused by the fact that R2 and R3 both ask to receive the same label. This happens a lot when you lab things up. Both devices were turned on at the same time, and run the same version of Junos – and therefore, they start allocating MPLS labels from the same starting point.)
THAT’S IT!
Kind of neat, eh? This all started from a conversation with a pal about interesting ways to avoid having to re-IP your network during times of merger and acquisition. Hey: if you’re not using point-to-point IPs in the first place, it sure makes the task a h*ck (heck) of a lot easier when you need to merge with another network. Even if you have to renumber your loopbacks, that’s still easier than additionally having to renumber all your point-to-point links.
It turns out that this doesn’t work in Junos for multi-access interfaces. It seems to work in Cisco IOS with no extra tweaking, as you can see on Ivan’s mighty posts.
I suspect it is possible in Junos with some careful static routes and some careful route redistribution – but I also suspect that it’s a very rare situation when someone would want unnumbered multi-access Ethernet interfaces. Which is possibly why the Junos coders didn’t make it happen by default. If no-one’s asking for it, why bother?
So, I’ll leave that as an exercise for you to play with, if you’re curious. Perhaps you might write a blog about it yourself, if you get it working?
Thanks very much for reading my posts! If you liked it, I’d love you to share it on your favourite media of choice, whether it be the one that sends unsolicited job spam, the one that has gone full fascist and breaks 16 times a day, the one that you need to be an ultra-nerd to get working, or the one where your grandparents share racists memes. They’re all great choices! I love the information superhighway in the year 2023.
If you’re on Mastodon, follow me to find out when I make new posts. (2024 edit: I’m also on BlueSky nowadays too. I was once on Twitter, but I’ve given up on it, on account of… well, I don’t need to finish that sentence, do I.)
And hey: if you’re new here, have a browse through my old posts! There’s tons of free learning for you here.
Thank you for reading! Love you! See you soon! Bye! Bye then! Okay bye!


