
Junos: IS-IS Study Notes, Part 2 – LSPs and Message Types
This is part two of my Sweet Sweet Guide to IS-IS, for people studying towards their Juniper JNCIS-SP and JNCIS-ENT certifications – and for people who just enjoy learning awesome new things! You know: cool people, like you. That’s you! You’re a cool person! Hey, it’s not every day a website gives you a random compliment, just for “logging on” and “surfing” my “web pages”. You’re very welcome.
Be warned though: I could also insult you at any minute. In this way I keep you constantly on edge, and constantly in my power.
Forget I said that though: if you’ve not read part one yet, stop! Click here and read this, and then come back. Don’t worry: I’ll wait.
Done? Marvellous! In that Part 1 you learned the basics of IS-IS. You learned what a level is, what an LSP is, and you also learned how to deploy a very basic configuration.
Now let’s take our knowledge, and our love, to the next level.
In this post you’ll learn about IS-IS adjacencies, the messages that are sent, what an LSP looks like.
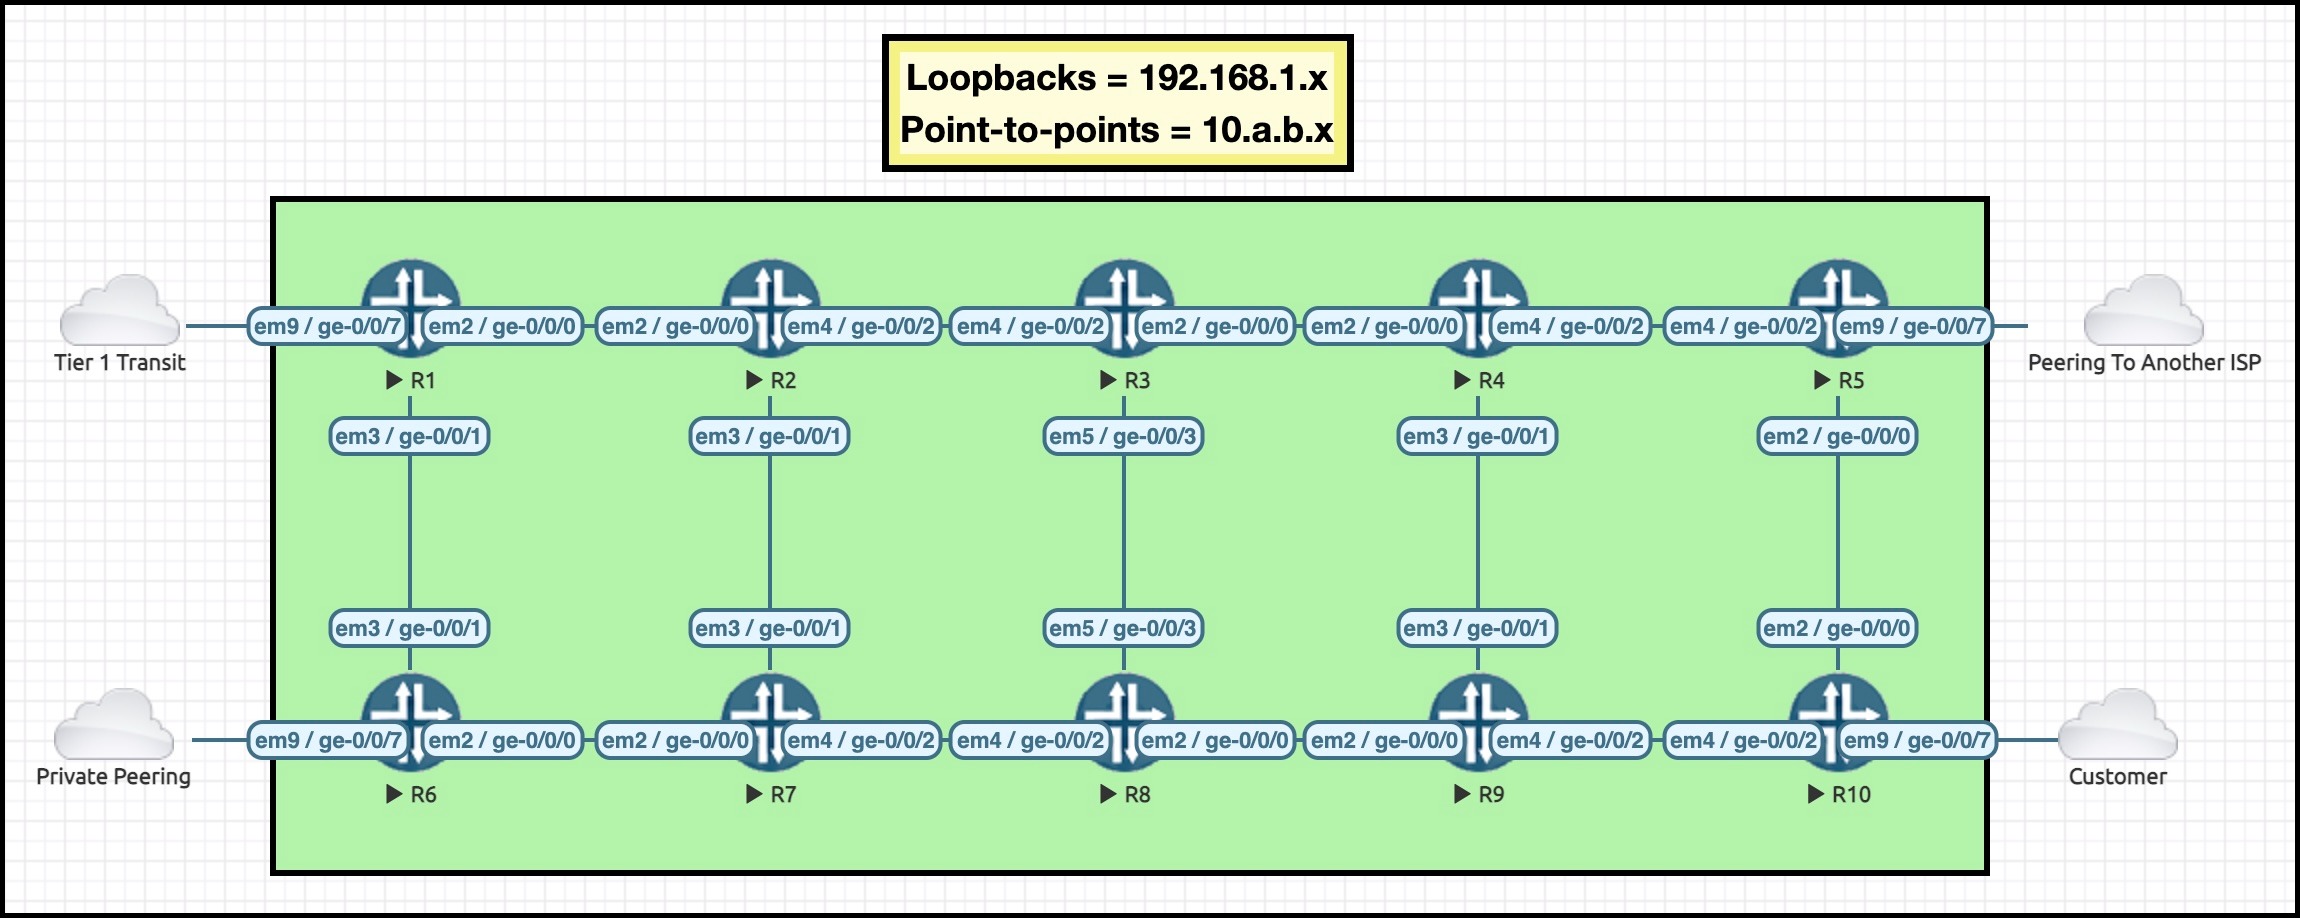
Here’s the topology we’re using in this lesson. You can click this to open it in a new tab, if you like:
IS-IS ADJACENCIES
Just like how OSPF has neighbors, IS-IS has adjacencies.
Don’t believe me? Then check this out:
root@R1> show isis adjacency
Interface             System         L State        Hold (secs) SNPA
ge-0/0/0.0            R2             2  Up                   25
ge-0/0/1.0            R6             2  Up                   26
Man it’s so good how IS-IS tells you the hostname of the box you’re connected to.
You can use the detailed version of that command to see all kinds of information—some of which will make sense to you now, and some of which will make sense after you’ve finished this series of blog posts.
root@R1> show isis adjacency R2 detail
R2
  Interface: ge-0/0/0.0, Level: 2, State: Up, Expires in 23 secs
  Priority: 0, Up/Down transitions: 1, Last transition: 00:01:05 ago
  Circuit type: 2, Speaks: IP, IPv6
  Topologies: Unicast
  Restart capable: Yes, Adjacency advertisement: Advertise
  IP addresses: 10.1.2.2
  IPv6 addresses: fe80::5200:ff:fe0e:2
If you use extensive then you’ll see up/down logs. Very handy!
Unlike OSPF, IS-IS transitions to a full adjacency as soon as hellos are exchanged – NOT when Link-State PDUs are exchanged. This means that if both routers see each other in their Hello messages, the adjacency is up. In a moment you’ll see a packet capture of what that looks like.
There are six adjacency stages, but really you only need to know about Initialising, Up, and Down.
- New
- One-Way (This one happens for like a split second)
- Initialising (You may see this one briefly)
- Up
- Down (when there’s an area mismatch, hold time expired, or authentication failure)
- Reject (also for when authentication doesn’t match – it cycles between Down and Reject).
Adjacencies are maintained with regular hello messages. In a moment you’ll see what a hello message looks like.
Different vendors use different hello and hold times, but that’s okay, because if two routers disagree then it doesn’t cause an international geo-political crisis like it does in OSPF.
Instead, they just agree to use the smallest number. Wow! What a nice and friendly protocol. Maybe there’s a lesson for us all to learn there, about friendship and giving and kindness.
On point-to-point interfaces, Juniper send hello messages every 9 seconds, with a hold time of 27 seconds. This changes to 3 and 9 for LAN interfaces. That’s right: there’s only two kinds of interface in IS-IS! Again, much more simple than OSPF.
What kind of things need to match for an adjacency to come up? Very little, actually. But let’s come back to that, because you need to know a bit more about areas and levels first. The MTU needs to match at both ends – but as you’ll see later, IS-IS has a very clever way of checking the MTU.
WHAT DOES AN LSP LOOK LIKE? AND WHAT IS A TLV?
You’ll remember from Part 1 that LSP stands for Link-State PDU. LSPs are like the jigsaw puzzle pieces that you can put together to create a topology map of the network.
Every router generates an LSP for itself, describing its IPs and what it is connected to. This LSP gets flooded throughout the network, so that every router has every LSP, every jigsaw puzzle piece, to build the full topology.
LSPs contain tons of useful information, such as what area the router is in (we’ll come back to that), what other routers the router connects to, what IPs are configured on its interfaces, and what the “metric” (or “cost”) is to get to them.
Let’s take a moment to look at the high-points of an LSP. In Junos you can look at the IS-IS database by simply typing “show isis database”. This command will just show you all the routers in the network. In the output below you can see that there are ten routers in the network – and unlike OSPF, it lists them by name! How good is that?
root@R1> show isis database
IS-IS level 1 link-state database:
  0 LSPs

IS-IS level 2 link-state database:
LSP ID                      Sequence Checksum Lifetime Attributes
R1.00-00                        0x31   0x8dd8     1162 L1 L2
R2.00-00                        0x32   0x3c15      477 L1 L2
R3.00-00                        0x31   0xc663      814 L1 L2
R4.00-00                        0x30   0xeb1f      660 L1 L2
R5.00-00                        0x2f   0xe909      514 L1 L2
R6.00-00                        0x2d   0x7990      757 L1 L2
R7.00-00                        0x2e   0xa032      920 L1 L2
R8.00-00                        0x2e   0x4f5b      737 L1 L2
R9.00-00                        0x2e   0xbec5      769 L1 L2
R10.00-00                       0x30   0xe77a     1011 L1 L2
  10 LSPs
To see the Link-State PDU of any particular router, you can use the “detail” or “extensive” version of that command, along with the router’s name. Extensive shows you literally everything, while detail just shows you the neighbors and the IPs and metrics, which is usually what you’re most interested in.
Let’s see what the high-points of R1’s LSA look like:
root@R1> show isis database R1.00 detail

IS-IS level 1 link-state database:

IS-IS level 2 link-state database:

R1.00-00 Sequence: 0x30, Checksum: 0x8fd7, Lifetime: 579 secs
   IS neighbor: R2.00                         Metric:      100
   IS neighbor: R6.00                         Metric:      100
   IP prefix: 10.1.2.0/24                     Metric:      100 Internal Up
   IP prefix: 10.1.6.0/24                     Metric:      100 Internal Up
   IP prefix: 10.1.101.0/24                   Metric:      100 Internal Up
   IP prefix: 192.168.1.1/32                  Metric:        0 Internal Up
   V6 prefix: 2001:db8::1/128                 Metric:        0 Internal Up
What I love about this is that it’s SO READABLE. So little fuss!
First of all, you see that there are two database – one for level 1, and one for level 2. This is like how an OSPF area border router will have two topologies. The fact that this level 1 database is empty means that this router is only in level 2.
After that you see “R1.00-00”. Don’t worry about the four zeros in the name for now, we’ll explain them later. What matters is what’s underneath it. Notice that it shows you R1’s two neighbors (R2 and R6), and it shows you the IPv4 and IPv6 prefixes configured on R1 too, along with the relevant metrics.
Again, compare this to the ludicrously difficult OSPF database, with its four link types and it thousand kinds of nonsense. Isn’t this clean? Isn’t it pretty? So good!
THE FOUR MESSAGE TYPES IN IS-IS
In your OSPF studies you will have spent a great deal of time learning about OSPF headers, OSPF messages, and the maaaaany different types of Link-State Advertisement.
IS-IS is way simpler.
First of all, there are only four message types in IS-IS:
- Hello messages
- LSP Messages
- Complete Sequence Number PDUs – a complete list of all the LSPs a router knows about
- Partial Sequence Number PDUs – a list of all the LSPs a router doesn’t have. The neighbor can then send them over, so that the link-state database is complete.
Wow. That’s pretty easy right?
Technically speaking, I just lied to you. Because in fact, there are different versions of those messages for level 1 and level 2, and sometimes there are different versions depending on the interface type – but they’re all identical, other than the fact that they’re for different levels or interfaces. They’re so similar that you don’t need to think of them as “different”. If you understand those four messages, then you understand IS-IS.
IS-IS MESSAGES ARE MORE RELAXED THAN OSPF MESSAGES
What about the contents of these messages?
When you studied OSPF, you learned that OSPF LSAs have a very strict format. They always look the same, and if a router ever receives anything different then the router will immediately explode into flames (I expect), or at the very least it will reject the LSA, and possibly tear down the adjacency. This initially made it difficult to extend OSPF with other functionality.
By contrast, IS-IS messages are far more “chillaxed to the max” than OSPF LSAs.
The reason for this is that IS-IS messages are actually quite flexible, in that the information in an LSP, or any of the other messages that you’ll soon learn about, doesn’t have to be in any set order – and the information doesn’t even need to be understood by the receiving router!
Instead, there’s a basic short header that is always the same, followed by a variety of pieces of information that can be in any order.
These chunks of data use a format called TLVs, which stands for Type Length Value. It’s a method that many protocols use to advertise information, where each piece of information is split up into three sections:
- The Type of information being advertised (this is just a number – each piece of information has a number associated with it);
- The total Length of the information;
- And then the actual data itself (the Value).
Now that you know that, let’s take a look at a Link-State PDU.
THE IS-IS MESSAGE HEADER
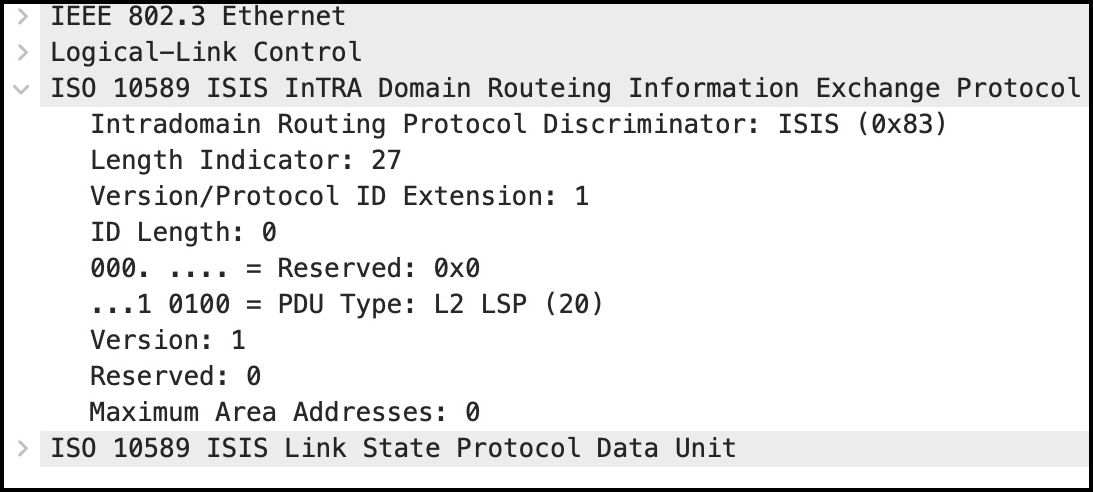
Every message starts with an IS-IS header, like this one here.
Notice that the very final line of this screenshot says that this is an LSP. We’ll look at that in a moment. For now, let’s see what’s in an IS-IS header.
If you read it line by line, there’s not much to look at – you see the length, the version number, another length, some flags, another version (lol), yada yada.
The most interesting thing is the PDU Type – notice that this is an “L2 LSP”. That’s what I mean about how there are technically different kinds of LSP, one at L1 and one at L2. In reality though, they’re completely identical.
By the way, notice that the Ethernet headers are actually old-style Ethernet, made up of the “IEEE 802.3 Ethernet” header and the “Logical-Link Control” header.
Did you notice as well that there is no IP header? Instead, there’s an Ethernet header, and then we go straight into the IS-IS PDU.
In other words, IS-IS as a protocol operates at layer 2, not at layer 3.
Some people argue that this makes IS-IS more secure than OSPF, because you can’t remotely flood another router with IS-IS messages. You have to be directly connected to another device in order to send it IS-IS messages.
Right. With that out of the way, let’s look at the good stuff.
A PACKET CAPTURE OF A LINK-STATE PDU
Before I show you a packet capture of an LSP, I want to show you how I configured R1’s loopback. The most important part is that the ISO address starts with 49.0001, which is the area that the router is in (we’ll come back to that), and then 0000.0000.0001 is the router’s unique “system ID”. Remember that ISO router addresses also end in 00:
root@R1> show configuration interfaces lo0
unit 0 {
    family inet {
        address 192.168.1.1/32;
    }
    family iso {
        address 49.0001.0000.0000.0001.00;
    }
    family inet6 {
        address 2001:db8::1/128;
}}
By the way, if you want to play along at home, you can download the packet capture here. These screenshots are of packet 44.
 Let’s start with the header of the LSP. Each message has its own tiny header, in addition to the “main” IS-IS header).
It’s basically made up of some checksums and sequence numbers, along with the LSP-ID, which is just the system ID we configured on the loopback! The very last number in an LSP-ID is usually 00, like it is here. If it’s anything else then it means the LSP was fragmented, because it was too big to fit inside one PDU.
The sequence number goes up by 1 every time the LSP is changed, or re-advertised because the lifetime counted down to zero.
After that short LSP header, you get a big flood of information – but don’t be put off! Read over all of these lines carefully, one at a time, and you’ll see that a lot of them are actually very understandable.
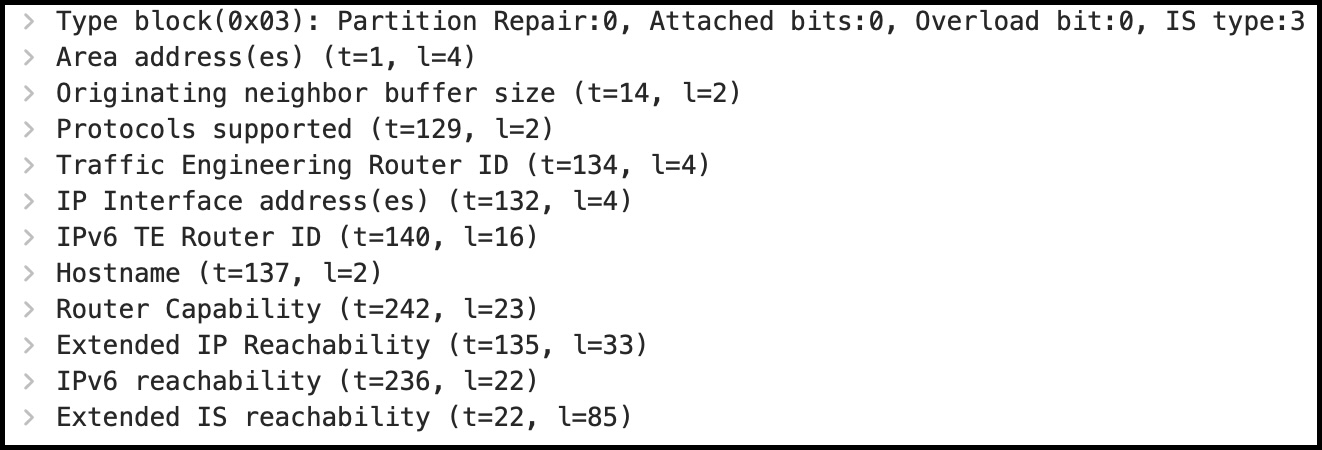
Each of these is a TLV. Some of them might have odd names, but many of them make immediate sense. For example, did you spot the Hostname TLV? Let’s open it up:
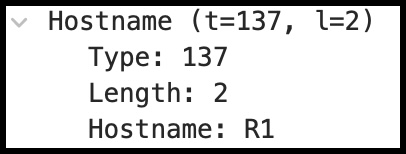
Lol, it’s literally as easy as that! Turns out that the Hostname TLV is type 137 and it’s two bytes in length, but you don’t care about that – what you care about is that the hostname is R1. And what’s cool is, this TLV could appear anywhere in this packet. The order doesn’t matter.
If you opened up the “Protocols supported” TLV, you’ll see that the router supports IPv4 and IPv6. Gone are the days when you need to turn on an entire second version of OSPF just to run IPv6! IS-IS just does it.
When that packet was generated, R1 only had an IS-IS adjacency to R2. Very quickly though, the adjacency to R6 comes up. Take a look at packet 91 in the packet capture, and you’ll see an updated version of R1’s Link-State PDU, that mentions the fact that R1 is connected to two other routers (remember that IS-IS called a router an “intermediate system”):
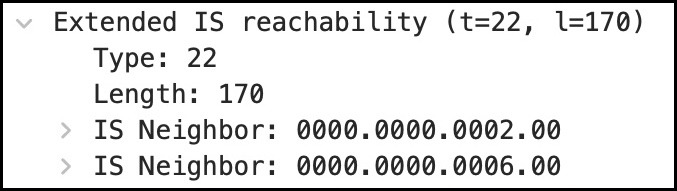
“IS reachability” means “I can reach these routers”. The “extended” bit is interesting – we’ll come back to that when we talk about metrics.
It’s almost ridiculous how easy this all is to read when you compare it to OSPF. The TLV lists neighbors by their system ID – but remember that each router also advertises its hostname, so when you look at this on the CLI, Junos can piece it all together and just show you the name of your neighbours. I expect other vendors do the same thing.
The “Extended IP reachability” is very similar – it’s literally just a list of IPs that are connected to the router, and their cost. The screenshot below shows that R1 is advertising four prefixes. Notice that I’ve opened up the 10.1.2.0/24 prefix, to show you that the details contain the metric, the prefix length, the prefix itself – all stuff you’d expect to see.
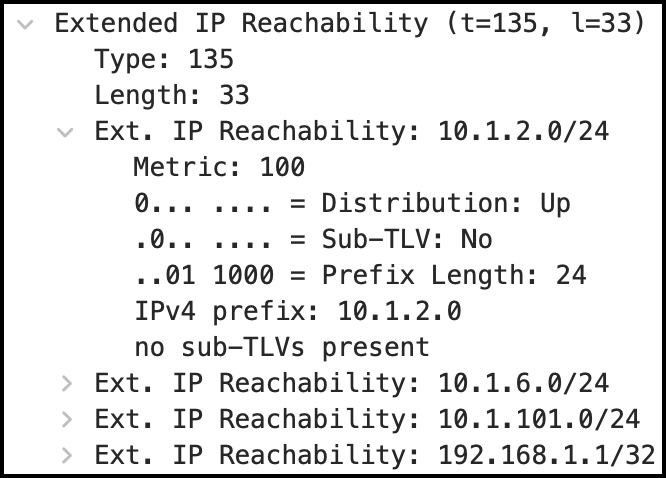
“Distribution: Up” means that if this ever gets advertised into Level 1, it will not be re-advertised back up to Level 2. That’s how loops are avoided, my guy!
Damn, that was pretty easy to read when you compare it to looking at an OSPF LSA, right? No obscure terminology to remember, no weird quirks, no guff about transit/stub/virtual/point-to-point for you to memorise. The IS-IS LSP just lays it out in a very readable format. I love u, is-is tee el vees.
HELLO MESSAGES
Just like OSPF, IS-IS sends out Hello messages. These messages are used to initially discover neighbors, and then to keep the adjacency alive once it’s up.
IS-IS Hello Messages are sent out to a multicast MAC address every 9 seconds by default in Junos, on point-to-point interfaces. Other vendors may do it differently.
Fun fact: these messages are also called IIH, or IS-IS Hellos.
Hello message have their own unique header, which is a little bit different to an LSP header. As well as the System ID that you’ve already seen, this header also contains the Holding Time (what OSPF calls the dead interval), which is how long to wait before declaring the neighborship dead. You can see here that it’s 27 seconds, which is three times nine. Quick maths!
In this particular hello, you can see that the system ID indicates that it was sent by R2. Can you see those elements in this screenshot? And can you also spot that this is a “Level 2 only” hello message?

There’s three kinds of Hello: Level 1 LAN, Level 2 LAN, and point-to-point. Again, this is what I mean about there technically being more messages than in OSPF, but only because there’s different kinds of Level 1 and Level 2. All three are basically identical.
Interestingly, if a link is point-to-point, then it’s possible for the one Hello message to represent both Level 1 and Level 2! They use a special type of “Level 3” to mean both levels. Don’t be confused if you ever see that a link is in level 3. There isn’t some kind of magical super-backbone that only secret elder wizards of the internet get access to. There isn’t! I don’t know anything about it, nothing at all I tells ya. I’ve said too much.
The Hello message contains some sweet TLVs, that you’ve already seen like the “Protocols Supported” TLV which shows that the router supports IP,, and the IP Interface Address TLV.
There’s also two new TLVs.
First, you can see a TLV called the Point-to-point adjacency state, which mentions R1 by its system ID. This is how R2 indicates that it has found R1. You can also see that it reports that the status of the adjacency is currently in “Initializing” mode. SO EASY TO READ!
Second, you can also see something called the Area Address TLV. We will talk about areas soon. For now, you can see that the area is indeed 49.0001, just like we configured it.
HOW DOES IS-IS DETECT MTU MISMATCHES?
You may also spot a load of padding TLVs in that Hello message.
Just like OSPF, the MTU has to match in IS-IS. However, rather than advertising an explicit MTU, IS-IS pads the Hello message up to the size of the MTU.
If the receiving router has a smaller MTU, it won’t be able to accept the Hello message.
IS-IS requires an MTU of 1492 at a minimum, and the Hello is padded accordingly. There’s no need to pad any other messages, because if the router can’t accept the Hello then the adjacency won’t form in the first place.
Kind of a neat trick! This stops routers from misreporting their MTU. Instead of just believing a number, the router tests the MTU on the wire.
COMPLETE SEQUENCE NUMBER PDU (CSNP)
When two routers – sorry, Intermediate Systems! – become neighbors – sorry, become adjacent! – they swap their knowledge of the network. They COULD do this by flooding all the LSPs they know about to each other, but that would be pretty wasteful if it turned out that a router knew most, or even all, of the LSPs already.
As such, they don’t send the full contents of the IS-IS database. Instead, they just send a summary, in a message called a CSNP, or Complete Sequence Number PDU.
This is similar to OSPF’s Database Description packets – it’s literally just a list of all the LSPs that a router knows about, along with their sequence number.
If the receiving router sees one that it’s missing, it can then request it by sending a Partial Sequence Number PDU (PSNP). Or, if it has one that the neighbor is missing, it can just send it. Similarly, if the sequence number in the CSNP is different to the version the router has, it can either request or send the latest version as appropriate.
I haven’t shown the sequence number in this screenshot below, but you would click any of these drop-down arrows to see it. You can see from the Source-ID that R1 sent this CSNP message, which contains all ten routers in our famous ten-route topology.

Think of a CSNP like an index, or the contents page in a book. If you don’t know what a book is: a book is a bit like a movie, except that some trees had to die for it to be made. And if you don’t know what a tree is, think of a tree as like a kind of haunted granddad that sucks moisture from the ground.
PARTIAL SEQUENCE NUMBER PDU (PSNP)
Once the routers have swapped CSNPs, they can check to see if there are any missing in their own databases. They compare their own list of known LSPs against the CSNP received from their neighbor. If a router sees an LSP is missing, or if it sees that a neighbor has a newer version, it requests it with a PSNP – the P standing for Partial.
I didn’t do a screenshot of this, but if you downloaded that packet capture from earlier then you can find many of them in there. It’s very simple though: it’s just a smaller version of the CSNP, with a list of LSP-IDs and LSP Sequence Numbers. The router can then reply by sending the full LSP that the LSP-ID represents.
THAT’S IT FOR NOW!
That’s it for part 2. How are you finding it? I hope these posts are useful to you. I’ve got to say, when I started studying IS-IS I thought I’d hate it, based purely on the “weird” addresses that I didn’t understand. But then, as I started studying it, I’ve ended up preferring it over OSPF any day of the week.
Go grab a cup of coffee, then come back for part 3, where we’ll learn about interface types, broadcast interfaces, pseudonodes, and the DIS, or Designated Intermediate System. Click here for part 3!
If this post was helpful to you, I’m always grateful if you share it on social media, Twitter, LinkedIn etc. It’s always fun when more people get to hear about my posts, and I’m grateful for you sharing it.
If you’re on Mastodon, follow me to find out when I make new posts. (2024 edit: I’m also on BlueSky nowadays too. I was once on Twitter, but I’ve given up on it, on account of… well, I don’t need to finish that sentence, do I.)
And if you fancy some more learning, take a look through my other posts. I’ve got plenty of cool new networking knowledge for you on this website, especially covering Juniper tech and service provider goodness.
It’s all free for you, although I’ll never say no to a donation. This website is 100% a non-profit endeavour, in fact it costs me money to run. I don’t mind that one bit, but it would be cool if I could break even on the web hosting, and the licenses I buy to bring you this sweet sweet content.


Very useful info . Thank you
very useful info
Thankyou
I like your sense of humor! It makes reading through this material a lot more fun.