

MPLS Segment Routing, Part 2: Junos Config!
Welcome to Part 2 of my introduction to MPLS segment routing! It’s so nice to see you again. How are you? I’ve missed you very much. Did you buy me a present? …oh. No, that’s fine! No no, it’s… no, I wasn’t expecting anything, I was just being silly. What? This box with a ribbon on it? Oh that’s nothing, that’s for someone else. Ignore that. No honestly it’s fine! It’s fine.
Anyway, forget I said any of that: in Part 1 of this blog series you learned some basic segment routing theory. Now it’s time to roll up our sleeves and put it into practice.
In this post I’m going to teach you how to configure segment routing with Junos. In particular, I’ll show you how easy it is to configure segment routing as a replacement for LDP. Your reward is that your network will have one less protocol to run. Well worth it, if you ask me.
It goes without saying that the information in Part 1 is prerequisite knowledge for understanding this post, so be sure to give that a read if you haven’t yet done so. No really, don’t skip it. Go and read that first if you haven’t already. Good news though: it’s the best post you’ve ever read in your entire stinking life – apart from this post, that is!!!!!! Haha, great stuff.
Also, although I personally like SR-MPLS as a replacement for LDP, I am definitely not recommending that you make this decision in your production network. All protocols and technologies have positive and negative elements. You should understand both options, and make the choice for yourself.
A REMINDER OF THE TOPOLOGY
As usual, we’re using my Famous Ten-Router Lab.
What makes it famous, you ask? How about the fact that was the inspiration for the film Toy Story 3. That do anything for you? Probably not. I know you all too well by now. You’ve grown cynical with age. When you were young, you would have been delighted to meet the inspiration for Toy Story 3. But now? Now look at you. I bet you hardly even blinked when you read that. You should have a word with yourself mate.
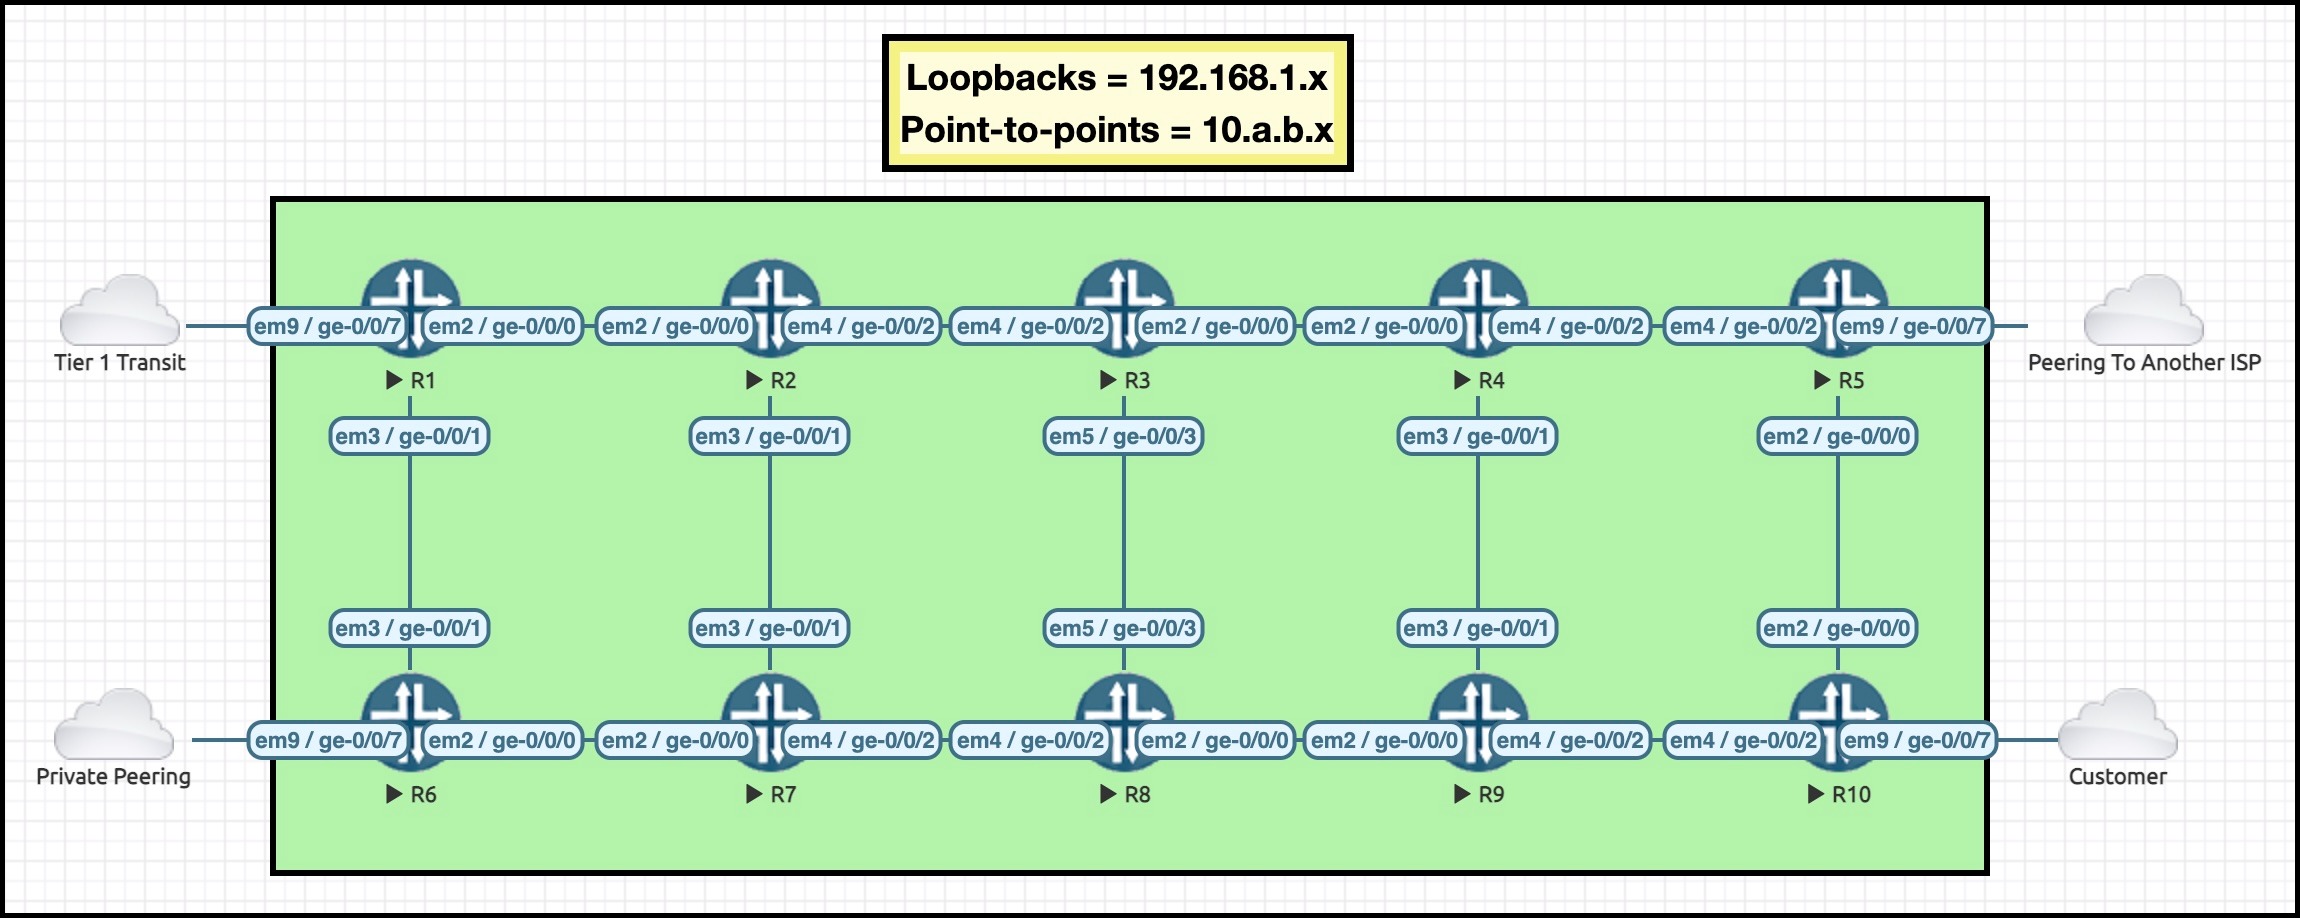
If you’re a long-time reader, then you’ll have this topology burned into your brain. But if you’re new around here, then you might want to click that pic to open it in a new tab, so you can refer back to it whenever you need to.
As the diagram says, all loopback IPs are 192.168.1.x. For example, R5’s loopback is 192.168.1.5.
As for the point to point scheme, all links use a /24. These additional IPs give us huge flexibility to use an addressing scheme of 10.a.b.c, where a is the lowest numbered router, b is the largest numbered router, and c is the particular router at that end of the link. For example, the connection between R3 and R8 uses 10.3.8.0/24. R3’s end is 10.3.8.3, and R8’s end is 10.3.8.8. Thanks to this IP scheme, you can look at any interface IP, and immediately know what router you are on, and what you’re connected to.
THE BORING STUFF – INITIAL SETUP
This post uses IS-IS. However, all the configuration is identical for OSPF. Simply replace set protocols isis with set protocols ospf when it comes to the segment routing stuff.
To set the groundwork, you need enable MPLS in both the data plane and control plane. Also, enable either IS-IS or OSPF. Might as well configure it with point-to-point links too. Any core interface will need these three commands:
set interfaces ge-0/0/2 unit 0 family mpls
set protocols mpls interface ge-0/0/2.0
set protocols isis interface ge-0/0/2.0 point-to-point
If this is a fresh lab with no IS-IS config at all, do a set protocols isis level 1 disable, to keep things clean.
If you’re labbing along at home, you might like to add set protocols isis reference-bandwidth 100g and set protocols isis level 2 wide-metrics-only, too.
One final thing. For reasons that I do not understand and cannot find answers for, on my vMX I had to also explicitly configure the chassis to be in enhanced-ip mode, even though it is already in that mode. Check it out:
root@R7> show chassis network-services
Network Services Mode: Enhanced-IP
It’s in that mode already. That’s without any config.
And yet, if you don’t explicitly configure it, your commit will fail when you try to configure a segment routing global block.
[edit]
root@R7# commit check

[edit protocols isis source-packet-routing]
  'srgb'
    can't config SRGB
error: configuration check-out failed
(If you don’t remember what the SRGB does, it’s not too late to go and read Part 1!)
No idea why this happens, and not a terribly helpful error message. The only mention of this on the information superhighway is a few scrappy forum posts.
Either this is a cosmetic bug, or there’s some 5000 IQ thing going on here that I don’t understand. Either way, before you begin, configure this one command, and then reboot:
set chassis network-services enhanced-ip
THE FUN STUFF – A BARE-BONES SEGMENT ROUTING CONFIG
Theoretically, “turning on” segment routing for MPLS is as simple as typing this one single command:
set protocols isis source-packet-routing
This command triggers Junos to generate and advertise adjacency SIDs. Do you remember them? They’re the segment IDs that are generated on each link that has an IGP adjacency.
For each IS-IS adjacency, Junos will generate one segment ID for IPv4, and one for IPv6. It then advertises these SIDs via IS-IS itself. Thanks to these SIDs alone, it is theoretically possible for an external controller to program a box with the exact hop-by-hop path for an LSP, building stacks of labels as appropriate, and for that controller to change the label stack as the topology changes.
You need to do a bit more work to use segment routing for shortest-path routing, but for now let’s see what this one line of config has done.
VERIFYING YOUR CONFIG
You can verify adjacency SIDs by looking at the details of an adjacency.
Choosing R4 as an example, let’s see what adjacency SIDs it has allocated for its link to R5:
root@R4> show isis adjacency detail R5
R5
  Interface: ge-0/0/2.0, Level: 2, State: Up, Expires in 23 secs
  Priority: 0, Up/Down transitions: 1, Last transition: 01:09:26 ago
  Circuit type: 2, Speaks: IP, IPv6
  Topologies: Unicast
  Restart capable: Yes, Adjacency advertisement: Advertise
  IP addresses: 10.4.5.5
  IPv6 addresses: fe80::5200:ff:fe0b:4
  Level 2 IPv4 Adj-SID: 21
  Level 2 IPv6 Adj-SID: 22
It looks like R4 has decided that its connection to R5 has an IPv4 adjacency SID of 21. There’s a separate SID for IPv6, too.
You learned in Part 1 that this adjacency SID doubles up as the MPLS label itself. To verify this, let’s check R4’s mpls.0 table, and see what entry it has for label 21:
root@R4> show route table mpls.0 label 21

mpls.0: 14 destinations, 14 routes (14 active, 0 holddown, 0 hidden)
+ = Active Route, - = Last Active, * = Both
21                 *[L-ISIS/14] 00:02:22, metric 0
                    >  to 10.4.5.5 via ge-0/0/2.0, Pop
21(S=0)            *[L-ISIS/14] 00:02:22, metric 0
                    >  to 10.4.5.5 via ge-0/0/2.0, Pop
Yep! It’s working! 10.4.4.5 is R5’s interface on the R4-R5 link.
This means that if a particular router can somehow get a packet to Router 4, then label 21 will tell R4 to pop that label, and then forward the packet to R5.
Hey, check out how those labels are being learned: the protocol is “L-ISIS” (Labeled IS-IS).
HOW DOES IS-IS ADVERTISE SEGMENT IDs?
On R1, I’m going to look at R4’s IS-IS Link-State PDU. Why am I checking this on R1? For no other reason than to emphasise that this information is learned by every router in the network.
The detail command below shows you most of what you need. You can use the extensive version of this command to see absolutely everything in the Link-State PDU.
As you read the output below, keep an eye out for the adjacencies to R3, R5, and R9, along with their “Adj-SIDs”. There’s also a “flags” section, which I’ll tell you about in a moment.
root@R1> show isis database detail R4

IS-IS level 1 link-state database:

IS-IS level 2 link-state database:
R4.00-00 Sequence: 0x10, Checksum: 0x292b, Lifetime: 731 secs
   IS neighbor: R3.00                         Metric:       10
     P2P IPv4 Adj-SID:      25, Weight:   0, Flags: --VL--
     P2P IPv6 Adj-SID:      26, Weight:   0, Flags: F-VL--
   IS neighbor: R5.00                         Metric:       10
     P2P IPv4 Adj-SID:      21, Weight:   0, Flags: --VL--
     P2P IPv6 Adj-SID:      22, Weight:   0, Flags: F-VL--
   IS neighbor: R9.00                         Metric:       10
     P2P IPv4 Adj-SID:      23, Weight:   0, Flags: --VL--
     P2P IPv6 Adj-SID:      24, Weight:   0, Flags: F-VL--
   IP prefix: 10.3.4.0/24                     Metric:       10 Internal Up
   IP prefix: 10.4.5.0/24                     Metric:       10 Internal Up
   IP prefix: 10.4.9.0/24                     Metric:       10 Internal Up
   IP prefix: 192.168.1.4/32                  Metric:        0 Internal Up
   V6 prefix: 2001:db8::4/128                 Metric:        0 Internal Up
There we have it: adjacency SIDs are advertised in IS-IS!
So what are those flags about? And what about the weight?
R4.00-00 Sequence: 0x10, Checksum: 0x292b, Lifetime: 731 secs
   IS neighbor: R5.00                         Metric:       10
     P2P IPv4 Adj-SID:      21, Weight:   0, Flags: --VL--
     P2P IPv6 Adj-SID:      22, Weight:   0, Flags: F-VL--
You don’t need to memorise these, but it’s nice to know what’s going on:
- The F flag means Family. When it’s not set, it’s an IPv4 Adj-SID. When it is set, it means it’s an IPv6 Adj-SID.
- The V flag stands for value. This isn’t a very intuitive flag. What it really means is that the SID is an MPLS label when this flag is set, and it’s an index that can be used to calculate the label (like a node SID) when it isn’t set.
- The L flag means that this value only has local significance. Hey – this comes back to the explanation of global and local segments in the previous module!
There’s three other flags you may sometimes see:
- B means that traffic on this link is eligible for local protection (b for “backup”). You can actually create two IPv4 SIDs on a link – one that offers local protection and one that doesn’t. In times of link failure, you might only want your most important traffic to fall over immediately to a backup path, while your less important traffic experiences downtime until a new best path is calculated.
- S is for “interface set”. It’s possible to bundle interfaces up into interface-sets, for unequal-cost load-balancing over the interfaces in the set. Pretty sweet!
- In fact, that’s what the “weight” in the output refers to. If one interface had a weight of 1, and another interface had a weight of 4, then 20% of traffic would go out of the “weight: 1” interface, and 80% of the traffic would go out of the “weight: 4” interface.
- P means persistent, ie the label always stays the same, even across reboots. You’ll see this when you manually configure an adjacency SID.
Okay, so we’ve created adjacency SIDs. But how are they used?
One answer is if you turn on TI-LFA (that is, topology-independent loop-free alternate – SR’s method of local repair. Your router can use these adj-SIDs to create a path that can route around any loop in the topology.
Another answer is when you configure traffic-engineered LSPs, whether they be with an explicit SID stack, or an explicit hop-by-hop IP path, or a path that Junos calculates for you, or a path that an external controller calculates for you.
All of that is to say that you configuration so far has not created any LSPs. Rather, you have enabled the building blocks that other features use to create LSPs.
But if you’re thinking of using SR as a replacement for LDP, there’s no need for a controller, or a stack of labels, or any kind of manual path. Let’s take a closer look.
HOW TO CONFIGURE A NODE SID
If you want SR to automatically create LSPS that simply follow the metrically-best path, you only need a few extra lines of configuration.
First, you need to assign node SIDs to each device. Second, you need to assign the block of labels. Third… actually, there is no third. That’s it!
In Part 1 you learned that each router in the network gets given a unique number to identify it. This is the “Node Segment Identifier”, or node SID.
The output you just saw listed a few adjacency SIDs, but there was no mention of node SIDs. Let’s fix that.
For this lab I’m going to configure an IPv4 and IPv6 Node SID on each box. Below is the config on R5. Similar config is added to each box, with the numbers changed of course to reflect their Node SID.
Notice that it’s configured under the protocols isis source-packet-routing hierarchy (replace isis for ospf if you like making bad choices, which I’m guessing you do judging by the clothes you’re wearing), and within that it’s under the node-segment hierarchy.
set protocols isis source-packet-routing node-segment ipv4-index 405
set protocols isis source-packet-routing node-segment ipv6-index 605
This lab uses the same Node SID numbering convention that we used in Part 1. For example:
- R1’s IPv4 Node SID is 401
- R3’s IPv6 Node SID is 603
And so on.
The above configuration is committed, and all node SIDs are advertised via IS-IS/OSPF, just like an Adjacency SID. In a moment we’ll verify this. First though, let’s quickly remind ourselves about the Segment Routing Global Block.
A QUICK REMINDER ON THE SRGB
Now, when it comes to using segment routing for shortest-path routing, in Part 1 you saw that SR has a cool trick that makes things at least 69 times more efficient.
You may know already that an LDP-speaking router advertises individual MPLS labels for each router in the network. If there were 500 routers in the topology, there would be 500 individual label advertisements, one for each node. Urgh, what a tedious process!
By contrast, segment routing just advertises a block of labels, and then lets every router work out the correct label to use based on the node SID that they’re trying to get to.
This is a brilliant efficiency. Instead of sending 500 individual advertisements, segment routing just sends one single extra piece of information in IS-IS.
This block of labels is called the SRGB, the Segment Routing Global Block. You have two options with it:
- The first is to choose the block yourself. You saw in Part 1 that this gives you a huge advantage, because it means that every router in the network can use the same block, and so will therefore also use the same label to get to any node in the network.
- But interestingly, you don’t have to choose a block yourself. The second option is to just let Junos choose it for you. Let’s see what that looks like.
VERIFYING NODE SIDs
Check it out: back on R1, we can see that R1 has learned the two node SIDs associated with R5 – one for IPv4 and one for IPv6.
But notice as well that Junos has chosen a block of labels for you!
root@R1> show isis database detail R5

IS-IS level 1 link-state database:

IS-IS level 2 link-state database:
R5.00-00 Sequence: 0x10, Checksum: 0x729f, Lifetime: 1178 secs
  IPV4 Index: 405, IPV6 Index: 605
  Node Segment Blocks Advertised:
    Start Index : 0, Size : 4096, Label-Range: [ 272, 4367 ]
   IS neighbor: R4.00                         Metric:       10
     P2P IPv4 Adj-SID:      21, Weight:   0, Flags: --VL--
     P2P IPv6 Adj-SID:      22, Weight:   0, Flags: F-VL--
{snip}
Well how about that: It looks like R5 has automatically allocated MPLS labels 272 to 4367 for mapping to Node SIDs. That’s 4,096 MPLS-SR transport labels in total, my guy!
If you’re happy with that, then your config is done, and your network can now do shortest path routing.
But of course, you and I have standards. We are not happy with this. Not one bit. So, let’s configure our own SRGB label block – and use the same block on every single router.
(Yes, I know “SRGB label block” is redundant, like ATM machine or PIN number. Sue me. (Please don’t sue me.))
CONFIGURING THE SEGMENT ROUTING GLOBAL BLOCK
The configuration below is added to all ten routers:
set protocols isis source-packet-routing srgb start-label 800000
set protocols isis source-packet-routing srgb index-range 9000
Like a lot of things in networking, the theory takes a lot of explaining – but the configuration is super simple.
Don’t worry just yet about how I chose that block in particular, because in a moment I’ll show you how to choose a block, and how to do it safely, without clashing with any labels currently in use.
VERIFYING THE SRGB ADVERTISEMENTS
Let’s see what R1 sees R5 advertising now:
root@R1> show isis database detail R5

IS-IS level 1 link-state database:

IS-IS level 2 link-state database:
R5.00-00 Sequence: 0x14, Checksum: 0xffa2, Lifetime: 1154 secs
  IPV4 Index: 405, IPV6 Index: 605
  Node Segment Blocks Advertised:
    Start Index : 0, Size : 9000, Label-Range: [ 800000, 808999 ]
{snip}
There you go: R5 is still advertising its two node SIDs, and in addition R5 also now says that it’s starting label is 800000, and that there are 9000 labels available in total.
This same configuration has been added to all routers, which means that every router in the network has exactly the same SRGB.
Each router advertises this in IS-IS. As such, every router now knows the following two crucial pieces of information about every other router in the network:
- Every other router’s Node SID
- Every other router’s block of labels that we allocated for shortest-path routing to other nodes.
With that in mind, what label do you think R1 will push onto a packet, when the intent is to get to R5 via the shortest path? With all of this information, calculating the MPLS label is easy, thanks to the highly complicated mathematical calculation you learned about in Part 1:
- R1’s MPLS label for R5 = Starting label + Node SID
- R1’s MPLS label for R5 = 800000 + 405
- R1’s MPLS label for R5 = 800405
Nice! Now let’s check our work.
VERIFYING THE INET.3 TABLE
Do you remember how turning on LDP in Junos creates an automatic full-mesh of label-switched paths to every LDP-speaking router’s loopback?
Well, turning on node SIDs in segment routing does exactly the same thing!
Check it out: R1 now has an inet.3 entry to all nine of the other routers in our lab. If you take a look at the labels it pushes onto the packet for each remote PE, you’ll see the advantage of choosing your SRGB manually.
root@R1> show route table inet.3

inet.3: 9 destinations, 9 routes (9 active, 0 holddown, 0 hidden)
+ = Active Route, - = Last Active, * = Both

192.168.1.2/32     *[L-ISIS/14] 00:25:25, metric 10
                    >  to 10.1.2.2 via ge-0/0/0.0
192.168.1.3/32     *[L-ISIS/14] 00:06:47, metric 20
                    >  to 10.1.2.2 via ge-0/0/0.0, Push 800403
192.168.1.4/32     *[L-ISIS/14] 00:06:47, metric 30
                    >  to 10.1.2.2 via ge-0/0/0.0, Push 800404
192.168.1.5/32     *[L-ISIS/14] 00:06:47, metric 40
                    >  to 10.1.2.2 via ge-0/0/0.0, Push 800405
192.168.1.6/32     *[L-ISIS/14] 00:25:25, metric 10
                    >  to 10.1.6.6 via ge-0/0/1.0
192.168.1.7/32     *[L-ISIS/14] 00:06:46, metric 20
                       to 10.1.2.2 via ge-0/0/0.0, Push 800407
                    >  to 10.1.6.6 via ge-0/0/1.0, Push 800407
192.168.1.8/32     *[L-ISIS/14] 00:06:46, metric 30
                    >  to 10.1.2.2 via ge-0/0/0.0, Push 800408
                       to 10.1.6.6 via ge-0/0/1.0, Push 800408
192.168.1.9/32     *[L-ISIS/14] 00:06:46, metric 40
                    >  to 10.1.2.2 via ge-0/0/0.0, Push 800409
                       to 10.1.6.6 via ge-0/0/1.0, Push 800409
192.168.1.10/32    *[L-ISIS/14] 00:06:46, metric 50
                    >  to 10.1.2.2 via ge-0/0/0.0, Push 800410
                       to 10.1.6.6 via ge-0/0/1.0, Push 800410
First of all, you can see in red that I’ve highlighted R5, whose Node SID was 405. And look at the label: 800405. Congratulations! You dun gud maff!
Now look at the entry for R10. There’s two equal-cost paths: one to R2, and one to R6. And yet both of these routers are expecting to receive the exact same label when traffic should be forwarded to R10 via the shortest path! That’s the beauty of choosing your own block of labels. Everything is easy to predict. It’s still fairly easy if you leave the router to choose its own label block, but it’s even easier if you set the label block yourself.
In fact, to emphasise the point, let’s go to R6 and see what it does when it receives a packet with label 800410:
root@R6> show route table mpls.0 label 800410

mpls.0: 36 destinations, 36 routes (36 active, 0 holddown, 0 hidden)
+ = Active Route, - = Last Active, * = Both

800410             *[L-ISIS/14] 00:09:56, metric 40
                    >  to 10.6.7.7 via ge-0/0/0.0, Swap 800410
Lol – it “swaps” it to the same label, and then sends it to R7. In other words, the transport label stays the same across the entire network – and all because you use a consistent label block everywhere!
As you can see, you now have a full mesh of LSPs in your inet.3 table. BGP will automatically use these to resolve its protocol next-hops. As such, if R5 advertised a BGP prefix with R5 itself as the next-hop, R1 could receive this prefix, and send traffic to R5 using the shortest-path LSP that you’ve created.
HOW TO AVOID A LABEL BLOCK THAT IS ALREADY IN USE
When I was first learning SR-MPLS, one thing that really confused me was how exactly you’d go about choosing the label block you want to allocate to your node SIDs. What if you choose a block of MPLS labels that’s already in use?
For example, let’s say you chose label block 800000 to 808999 like in this example. Indeed, a lot of documentation and books that I’ve read on this stuff seem to start their label block at 800000 for some reason, which is why I also used it in this blog post. I don’t know if it’s just a random number, or if there’s actually some multi-vendor reason for choosing it.
Well, anyway, long-time Junos users may know that some versions of Junos also start allocating pseudowire VPN labels from 800,000.
Through all of my reading, I was constantly screaming some questions in my mind:
- Does this mean that you’d get a commit error for trying to use a reserved block?
- Or does it commit, but cause silent problems?
- Do you get any kind of warning in the logs?
- If there aren’t any pseudowires yet, do they just start from label 809000?
- Do existing pseudowires get given new labels instead?
- Are the pseudowires torn down and rebuilt?
- Or does it just make janky things happen?
Any of those could have been possibilities in my mind.
I might be mistaken, but I don’t think this question is addressed anywhere. Like, anywhere. Which is odd, because I know from talking with many engineers that almost all of them had this question when they heard about label reservation for the first time.
After some labbing myself, I’ve concluded that the answer is that if you choose a label block that is already in use then you won’t break any existing MPLS applications – but SR-MPLS won’t work properly. I’ll show you how I worked this out in a moment.
Luckily though, it’s easily fixed with a brief bit of downtime.
The solution, as far as I can tell, is one of two options. The first is to reboot your device. This is the option that I recommend. Yes, it causes some extra downtime – but you’re doing this change in a maintenance window anyway, and a reboot is clean.
Doing this will clear any existing dynamic MPLS label allocations. When the device comes back up, your SRGB is fully reserved. Any MPLS VPN applications will not try to allocate labels from this block
The other option is to deactivate and reactivate MPLS, so that new labels are generated instead. When you do a “deactivate protocols mpls”, chances are that you will need to deactivate a few other things for the commit to work. For example, you can’t have an active “protocols l2circuit” stanza if your MPLS config is deactivated.
So, all you need to do is something like this:
deactivate protocols mpls
deactivate protocols l2circuit
deactivate routing-instances
deactivate protocols isis source-packet-routing
Commit that, then “rollback 1” and commit again. This will clear any allocated labels. Your SRGB, your segment routing global block, will then be reserved in whatever Junos process it is that dishes out labels. Only then will other MPLS applications be allowed to request labels – and (as far as I can tell) other MPLS applications will never be assigned labels from within that reserved block.
HOW TO TEST CLASHING LABELS
In case you’re interested, let me show you how I found out that clashing labels are indeed possible.
I made an RSVP label-switched path between two routers. Then, after a bit of “playing with my labels” (if you know what I mean!!!!!!!!!) I brought up a pseudowire between them too. On R1, this pseudowire happened to use an incoming VPN label of 21.
Perfect! This was my chance to add this extra config to R1:
set protocols isis source-packet-routing srgb start-label 16
set protocols isis source-packet-routing srgb index-range 9000
set protocols isis source-packet-routing node-segment ipv4-index 1
set protocols isis source-packet-routing node-segment ipv6-index 2
A starting SRGB label of 16, and a block of 9000 labels.
You can see that I also changed R1’s Node SIDs 1 and 2. Similarly, I changed R2 to Node SIDs 3 and 4. R3 was changed to Node SIDs 5 and 6, and so on.
Aah, Node SID 6. That’s the one we’re interested in. 16 + 6 = 21. Will this cause a label clash?
As the output below shows, there was indeed a clash. Label 21 would have been used by L-ISIS for R3’s IPv6 Node SID, and there was a route entry for this in the mpls.0 table – but the L2Circuit route has a numerically lower route preference, and so it wins.
root@R1> show route table mpls.0 label 21

mpls.0: 37 destinations, 38 routes (37 active, 0 holddown, 0 hidden)
+ = Active Route, - = Last Active, * = Both
21                 *[L2CKT/7] 00:13:31
                    >  via ge-0/0/9.0, Pop       Offset: 4
                    [L-ISIS/14] 00:09:10, metric 30
                    >  to 10.1.2.2 via ge-0/0/0.0, Swap 21
In other words, the answer to “what happens if you have clashing labels” is the same as “what happens if you learn an IP prefix from two different sources”. They both go into the RIB (routing information base), then one is chosen as a winner, and the winner is written to the FIB (forwarding information base).
This is easy enough to spot in a small ten router lab with not much going on – but good bloody luck spotting that in a network of 500 devices and thousands of labels!
The good news is that if you do configure SR with clashing labels, it looks like it won’t break any existing MPLS applications, because of SR-MPLS’s numerically higher route preference. The entries will go into mpls.0, but they’ll never be used.
In any case, it’s clearly a best practice to enable SR during a downtime window.
NODE SIDS ARE A KIND OF PREFIX SID
In Part 1 you briefly learned that there’s another kind of SID called a Prefix SID. As the name suggests, this is a kind of segment that can represent a specific prefix on a router.
Interestingly, it turns out that Node SIDs are actually Prefix SIDs, but with one single flag set to identify it as being a Node SID. This actually kind of makes sense when you think about the fact that a Node SID is really an advertisement of your router’s loopback. IP address.
You can see this by looking in the IS-IS database. On R1 I’m looking at R5’s info again, this time using the extensive version of the command to drill down into the TLVs themselves. I’ve deleted a LOT of lines here, to just show you the important bit:
root@R1> show isis database R5 extensive

R5.00-00 Sequence: 0x16, Checksum: 0xfba4, Lifetime: 993 secs
  IPV4 Index: 405, IPV6 Index: 605
  Node Segment Blocks Advertised:
    Start Index : 0, Size : 9000, Label-Range: [ 800000, 808999 ]
{snip}

  TLVs:
{snip}
    IP extended prefix: 192.168.1.5/32 metric 0 up
      8 bytes of subtlvs
      Node SID, Flags: 0x40(R:0,N:1,P:0,E:0,V:0,L:0), Algo: SPF(0), Value: 405
    IPv6 prefix: 2001:db8::5/128 Metric 0 Up
      8 bytes of subtlvs
      Node SID, Flags: 0x40(R:0,N:1,P:0,E:0,V:0,L:0), Algo: SPF(0), Value: 605
The N=1 flag is the thing that turns a Prefix SID into a Node SID.
As for the rest of the flags… well, that’s a story for another day.
The fact that this is a Node SID indicates to Junos that it should make an entry in its inet.3 table, for BGP next-hop resolution. Junos wouldn’t do this to regular Prefix SIDs, but it will do it for Node SIDs.
QUICK TROUBLESHOOTING TIP
One final thing, to end this long post. If you find that labels aren’t being allocated, type this command:
show isis overview | match Allocation
Typing this command is a quick way to see if you need to reboot! If you see “SRGB Block Allocation: Success” then you’re golden. But if you see a failure, then you probably configured enhanced-ip but didn’t reboot. The config will commit, but labels won’t yet be allocated. The reboot will do the trick.
THAT’S IT!
Can you believe how easy it is to replace LDP with SR-MPLS? It’s literally just a case of assigning Node SIDs, and optionally choosing a label block. That’s it! Wow. Seems to me that it’s definitely worth having a think about this in your own network.
We’ve only just scratched the surface of SR-MPLS, and there’s plenty more to show you. Perhaps in the future I’ll write about the BGP color community, manual label stacks, controllers, Anycast SIDs, and even how you can use SR-MPLS to travel back in time to when you were young, and the world seemed magical and full of possibility. Although that does require an extended license, and I’m not sure if I can afford it.
For now, I hope you enjoyed this post! If you did, follow me on Twitter if you want to find out when I make new posts. (2024 edit: I’ve given up on Twitter since, well, you know. But I’m Mastondon and BlueSky. I don’t post often, but I definitely will post there whenever I write new blog posts!)
If you fancy some more learning, take a look through my other posts. I’ve got plenty of cool new networking knowledge for you on this website, especially covering Juniper tech and service provider goodness.
It’s all free for you, although I’ll never say no to a donation. This website is 100% a non-profit endeavour, in fact it costs me money to run. I don’t mind that one bit, but it would be cool if I could break even on the web hosting, and the licenses I buy to bring you this sweet sweet content.
And of course, if you enjoyed it then you’d make my world if you shared this post on your favourite social media platform. The more readers I get, the more I’m inspired to write even more posts.
Thanks for reading! See you next time!


What to do if the commit fails after configuring the srgb on the vsrx next gen?
I’m afraid I don’t know the answer to that one. Sorry!
simple and wonderful. Chris! though you have shown your leaning towards SR-MPLS but I would still like to ask. Actually, would like to know your opinion.
If I am going to build a green field network with less than ten locations; where each location is going to have redundant PEs. Two of those locations will host redundant P routers. All the remaining POPs will connect to both main locations (Ps).
The requirement is to provide layer 2 services to connect AZs of a small cloud and some layer 3 VPNs.
1) Would you suggest to go with SR-MPLS or SRv6?
2) Can TE be provided without an orchestrator in SR-MPLS?
Thank you!
With questions like this, I need to be careful to not stray too much into answering in such a way that it constitutes professional services. However, if you ask my personal opinion, then – bearing in mind that you are 100% responsible for the choices you make in your network, and that my personal opinions do not constitute any kind of formal and legal advice – I would say that I personally don’t like SRv6 for security and complexity reasons, and that I would always choose SR-MPLS unless I had a very specific reason to choose SRv6 (which I wouldn’t, because of security reasons – but I do concede that there are some extremely large networks that might prefer it).
In regards TE – it depends what you want to do, but in broad terms the answer is yes. In modern Junos you can create static paths on the CLI by creating an explicit stack of MPLS labels that should be pushed, and you can create a static path by defining a list of IP hops. As for dynamic paths, you can run CSPF to calculate a path that avoids certain admin groups. If you need bandwidth reservations and priorities then you pretty much need an orchestrator, because there has to be something that keeps track of the bandwidth reservations globally. You can also turn on On-Demand Next-Hops that automatically calculates a CSPF path to any learned BGP protocol next-hop.
As of today, there’s a brand new version of the Junos Segment Routing course, which has been renamed Junos Segment Routing for MPLS. The old version was one day long. My new version is four days long. Ask your friendly account manager if you have any training credits that could be used to attend it – you’ll see that I cover TE in a looooot of detail. 🙂
Hey Chris! hope you are great.
can you help in answering that if it is possible to have a bfd session to detect forwarding path failure or the failure of SR-MPLS LSP? Like we can have a dynamic bfd session for an LDP LSP between ingress PE and egress PE.
Hello!
In regards BFD for LDP between ingress and egress, I must say that I’ve only ever seen it used for LDP-signaled pseudowires. However, I get the feeling that maybe you’re talking about using BFD specifically to monitor LDP-signaled transport LSPs, and asking whether SR-MPLS offers an equivalent of that – whether SR offers the ability to run BFD for end-to-end monitoring of the shortest-path LSPs that are automatically created. If I’ve understood you correctly, then I’m afraid I don’t know.
What I can tell you is that there’s a newer protocol called Seamless BFD that you can use to monitor the status of a traffic-engineered LSP (what SR calls an “SR policy”). It’s worth looking up how it works. In my personal opinion (not legally binding though, lol), everyone should run S-BFD on any traffic-engineered SR policy that contains a manually-defined path of hops.
It’s possible that there’s some syntax available to use S-BFD to monitor automatically-created shortest-path LSPs too, but I’m afraid I don’t know about it.
Yes, you understood correctly. I could not find any such thing in any documentation anywhere. Found Seamless BFD though in Cisco; gonna give it a read. Thanks.
Hi Chris,
This was very helpful so thank you for putting this together. I just wanted some clarifications to make sure I am understanding it correctly:
Let’s say we have in your topology the R1->R5 connection and vice versa.
Like you mentioned at R1, 192.168.1.5/32 has 800405 pushed onto it as seen in the inet.3 table. The mpls.0 table on R5’s side would show Swap 800405? What would the mpls.0 table show at the route’s origin?
Also, do you know if I could send a static route with specified label from R1->R5 and see the same Push [Label #]?
Just curious about a few scenarios 🙂
Thanks!
Hi there Aneeta!
Not quite. I think my post would be improved if I added in a step that shows prefix resolution, because then we can follow the labels step-by-step along the way. I’ll do my best to write that content soon.
In the mean time, I’ll answer here. Let’s follow the full process in our segment-routed network:
– Let imagine that R5 learns the prefix 172.16.10.0/24 from some external neighbor. Now suppose that R5 uses BGP to advertise the prefix to R1, whether it be a direct advertisement or a route reflector. For the sake of simplicity, let’s say it’s an IPv4 unicast prefix (as opposed to a VPN prefix).
– R1 receives the BGP advertisement, and tries to work out how the prefix should be resolved. The BGP protocol next-hop is R5 (192.168.1.5 – R5’s loopback IP). So, R1 looks in both the inet.0 and inet.3 tables to see if there’s a route to 192.168.1.5.
– The winner is the SR-MPLS route in R1’s inet.3 table, because it has a numerically lower route preference. This route says “If you want to get to R5, send the packet to R2 with an outer label of 800405”. This is the combination of R2’s global SR label block (which starts at 800,000) and R5’s node SID (405). All this info is stored in R1’s inet.0 table for the prefix 172.16.10.0/24.
– At a later time, R1 receives a packet from a customer. The packet is destined to 172.16.10.200. R1 looks in the inet.0 table, and finds the route with all the info above. As such, R1 sends the packet to R2 with a transport label of 800405.
– R2 receives the packet with label 800405. R2 looks in the mpls.0 table to see how to process tihs packet. R2 has already calculated in advance that SID 405 is an instruction to send traffic down the shortest path to R5 – which in this case means sending the packet to R3. Because we’re very clever and cool, we also configured R3 to have an SRGB of 800000. As a result, the label is “swapped” to the same label – 800405 – and sent to R3.
– R3 receives the packet with label 800405, and does exactly the same thing again. The packet is sent to R4, which is the shortest path to R5.
– R4 receives the packet with label 800405. R4 looks inside its mpls.0 table to see how to process this packet. At this stage, one of two things happens. If you’re running implicit-null behavior, then the label 800405 is popped, and the packet is sent to R5 with no label. If you’re running explicit-null, then label 800405 is swapped to label 0, and sent to R5, who will then pop that label and process the payload.
The key with all of this is that label 800405 is a transport label to get the packet to R5. The label is used by all the transit routers on the path, but not by R5 itself. R5 doesn’t need a transport label, because R5 is the destination of this path. R5 knows how to process traffic destined to 172.16.10.200, so R5 can just process the IP packet in the usual way.
Does that help? Let me know if it’s still unclear. These are big topics, so please let me know if you want clarity on it.