
MPLS Segment Routing, Part 1: The Theory (Beginner’s Guide)
Do you ever stop to think about how an MPLS label is really an instruction? An instruction for the receiving router to perform some kind of forwarding action with the packet it has received? Do you ever think about that?
Well, I don’t. I NEVER think about it.
Do I look like a nerd? No. No I do NOT look like a nerd. I’m a jock. I’m a sports jock that never thinks about things like how MPLS labels are like an instruction. Have you really come to my blog, my sacred website, just to accuse me of being the kind of person who spends his time thinking about how MPLS labels are like an instruction? This is an outrage. I’m going to sue to you, there’s no doubt about it. I’ve spent literal decades building up my jock persona, only for you to ruin it within ten seconds. You’re going to pay, and pay very heavily indeed.
But hey, forget I said any of that: this post is a beginner’s guide to MPLS segment routing (or SR-MPLS, as Timothée Chalamet doesn’t call it). “Wow, that sounds really good.” You’re correct!
You can use SR-MPLS for similar reasons that you would use LDP and RSVP – to create label-switched paths (LSPs). However, the way that segment routing goes about making those paths is very different! And over these next two posts, I’m going to teach you the high points of it all.
In this introductory post I’ll to show you some of the basic theory, where you’re going to learn all about how an MPLS label is really like a kind of instruction. This is a concept that I think about a lot. And I mean a LOT.
Then in Part 2 (which you can read here when you’re ready) I’ll show you how you can easily use Timothée Chalamet (sorry, I mean SR-MPLS) as a replacement for LDP to create an automatic full-mesh of shortest-path LSPs. You’ll see both the config and the verification steps, and I get a feeling that you’re going to like what you see! By the end of it all, I’m pretty sure you’ll be itching to turn off LDP, and turn on SR-MPLS.
You’ll need some baseline MPLS knowledge to understand these two posts – but I’ll do my best to bring you along for the journey, no matter what your current level of understanding. Time to dive deep into some very cool tech!
I reckon this post will take you about 30 mins to read, if you read it slowly. I hope you’ll find it worthwhile though, because there’s some cool new knowledge in this post for you to learn!
WHAT THE H*CK (HECK) IS SEGMENT ROUTING?
Sorry for using swear words in that sub-title there.
Segment routing for MPLS can be used to create MPLS label-switched paths between two routers. You know: the kind of LSPs that let you do things like a BGP-free core, and MPLS VPNs.
By the way, you may wonder why I keep saying SR-MPLS, or MPLS segment routing, rather than just segment routing. I’ll answer that question properly at the end of this post.
For the moment, I’ll just say that segment routing doesn’t limit you to using MPLS labels in the data plane – there’s some other options, too. However, these posts are going to focus on using SR for MPLS. When you see me say “segment routing”, please assume that I’m talking specifically about segment routing for MPLS.
Also, I wish I knew how to make WordPress not put a new opening quote at the start of each paragraph when I use this feature.
Segment routing is also sometimes called SPRING, which stands for Source Packet Routing In Networking. The “source routing” refers to the fact that the source router (which really means the ingress router to an LSP) decides the end-to-end path. This is as opposed to LDP or regular IP routing, where the path is decided on a hop-by-hop basis.
Just like RSVP, you can create specific traffic-engineered LSPs. Just like LDP, you can enable shortest-path LSPs. And just like both, you can create backup “local repair” paths that can be used immediately in times of link or node failure.
One thing segment routing can’t do is bandwidth reservations. The reasons for this will become clear soon. However, if you use an external controller to build your LSPs, then this controller can do the bandwidth reservations in its own memory, and make sure that LSPs are rerouted when needed.
Okay, fine. But how is using segment routing different to using LDP or RSVP?
SEGMENT ROUTING USES IS-IS/OSPF DIRECTLY
There’s a few answers to that, and perhaps the best place to start is to say that segment routing isn’t a protocol in the same way that RSVP or LDP are protocols. There is no “segment routing protocol” that two routers talk to each other to exchange MPLS labels.
Instead, label information is advertised directly inside IS-IS or OSPF!
When a connection from one router to another is advertised, an MPLS label is advertised at the same time. When a router itself is advertised, label information is advertised along with it.
Did you see how I changed between saying “label” and “label information” there? That was deliberate. To be more precise, sometimes it’s a label, and sometimes it’s a number that is used as the basis of calculating a label. More on that later.
In any case, IS-IS/OSPF take care of advertising all of this info, so that every router either knows or can calculate exactly what label every other router expects to receive, in order to forward traffic in a certain direction, or toward some end destination. When you read Part 2 you’ll peak inside the IS-IS database, and you’ll see exactly what this looks like.
Already this is excellent, because it means you have one less protocol to run between your routers. As soon as OSPF or IS-IS are up, your label-switched paths are also up.
By the way, this is the reason that SR-MPLS can’t do bandwidth reservations. RSVP signals its LSPs and can reserve bandwidth along the path. However, in SR-MPLS, there are no reservations. You can get a potentially huge decrease in state (memory/CPU/bandwidth usage) – but there are features such as bandwidth reservations that might be worth the additional state.
SEGMENT ROUTING “DOES LABELS DIFFERENTLY”
Another big difference is how SR-MPLS creates its LSPs in the first place. The way that traffic engineering works is different to RSVP, and the way that shortest path routing works is different to LDP!
Let’s start with shortest path routing. Just like LDP, there is one transport label which is “swapped” hop by hop, and popped by the penultimate router.
The difference in segment routing is that it’s possible to configure things in such a way that the exact same transport label is used at every hop! You will soon see how this works—but for now it’s enough to say that a) you reserve an entire block of labels on each router specifically for this purpose, and b) if you reserve the same block on each router, then each router will calculate the same label for the shortest path to any other router in the network.
(Don’t worry—choosing the block to reserve is much easier than it sounds, and I’ll talk you through it in Part 2.)
As for traffic-engineered paths, even this works differently, because LSPs are not signaled like they are in RSVP. After all, there is no segment routing protocol. All of this information is advertised in IS-IS (the correct choice) or OSPF (the coward’s protocol).
If there is no signaling like in RSVP, then how are traffic-engineered paths made?
Segment routing is able to use the topology information in IS-IS/OSPF, inspect the label information associated with each piece of the topology, and use this to push an entire stack of labels onto a packet, such that the ingress router knows exactly which label each hop along the way expects to receive, if traffic is to be forwarded in a certain direction!
Each hop will receive a packet with a stack of labels, inspect the top label, work out what to do with the packet, pop that label, and forward the packet to the next router, for the process to happen all over again.
If you can’t visualise that, then “hold” your “horses”, because in a moment I’ll show you exactly what it looks like. Wow, I’m so good and nice to you! Wow.
SEGMENT ROUTING USES SEGMENTS, FOR ROUTING
What does the word segment mean in segment routing?
You’re probably familiar with the concept of “segments” thanks to your history of eating oranges. However, this post has nothing to do with oranges. It’s actually a distraction that you brought up oranges in the first place, and I think you owe me an apology for wasting my time there.
Instead, a segment is an instruction to forward traffic in a certain way. Thing of it like this:
- OSPF or IS-IS build the topology. They learn the routers, the connections between those routers, and the metrics on those connections.
- Segment routing then generates segments (instructions) to forward traffic over that topology in a certain way.
Examples of segment instructions are things like “forward this packet out of this specific interface, to this specific neighbor”, or “forward this traffic down the shortest path to this remote router”.
SEGMENT ID (SID)
Each segment in the network is given a “Segment ID” or SID for short.
Pause here to become very familiar with the acronym SID, because you’re going to hear it a lot when talking about segment routing. In SR-MPLS, the SID is a number that is associated with the segment (in other words, the instruction). Sometimes this number is the MPLS label directly, and sometimes it is a number that you can use to calculate the label.
As it happens, almost anything can be given a Segment ID number, including:
- An entire router (or “node”, as SR calls it)
- A link (specifically, any link with an IS-IS/OSPF adjacency on it)
- A individual link in a LAG bundle
- A prefix on a router
- A prefix that exists on two or more routers, where you’re happy for the traffic to go to whichever router is closest (cool people call this “anycast”)
- Your parents (not true)
- And more! (true)
All of these segments can have MPLS labels associated with them. It’s the combination of all of these SIDs, these segment IDs, that allows a router to specify a precise path for an LSP, by building the stack of MPLS labels that I mentioned a moment ago.
For example, a stack of labels may include some node SID labels, which will just route the packet along the metrically-best path to that node, and they may also include some adjacency SIDs (the SIDs that represent links with an adjacency on them) that will tell a hop precisely which link to forward the traffic out of.
In doing so, you can define a very precise path through a network, without the need for every router to agree in advance to take part in the path.
This is a bit like how an RSVP LSP can include loose and strict hops. The strict hops have to be directly connected, but the loose hops can get there however is best.
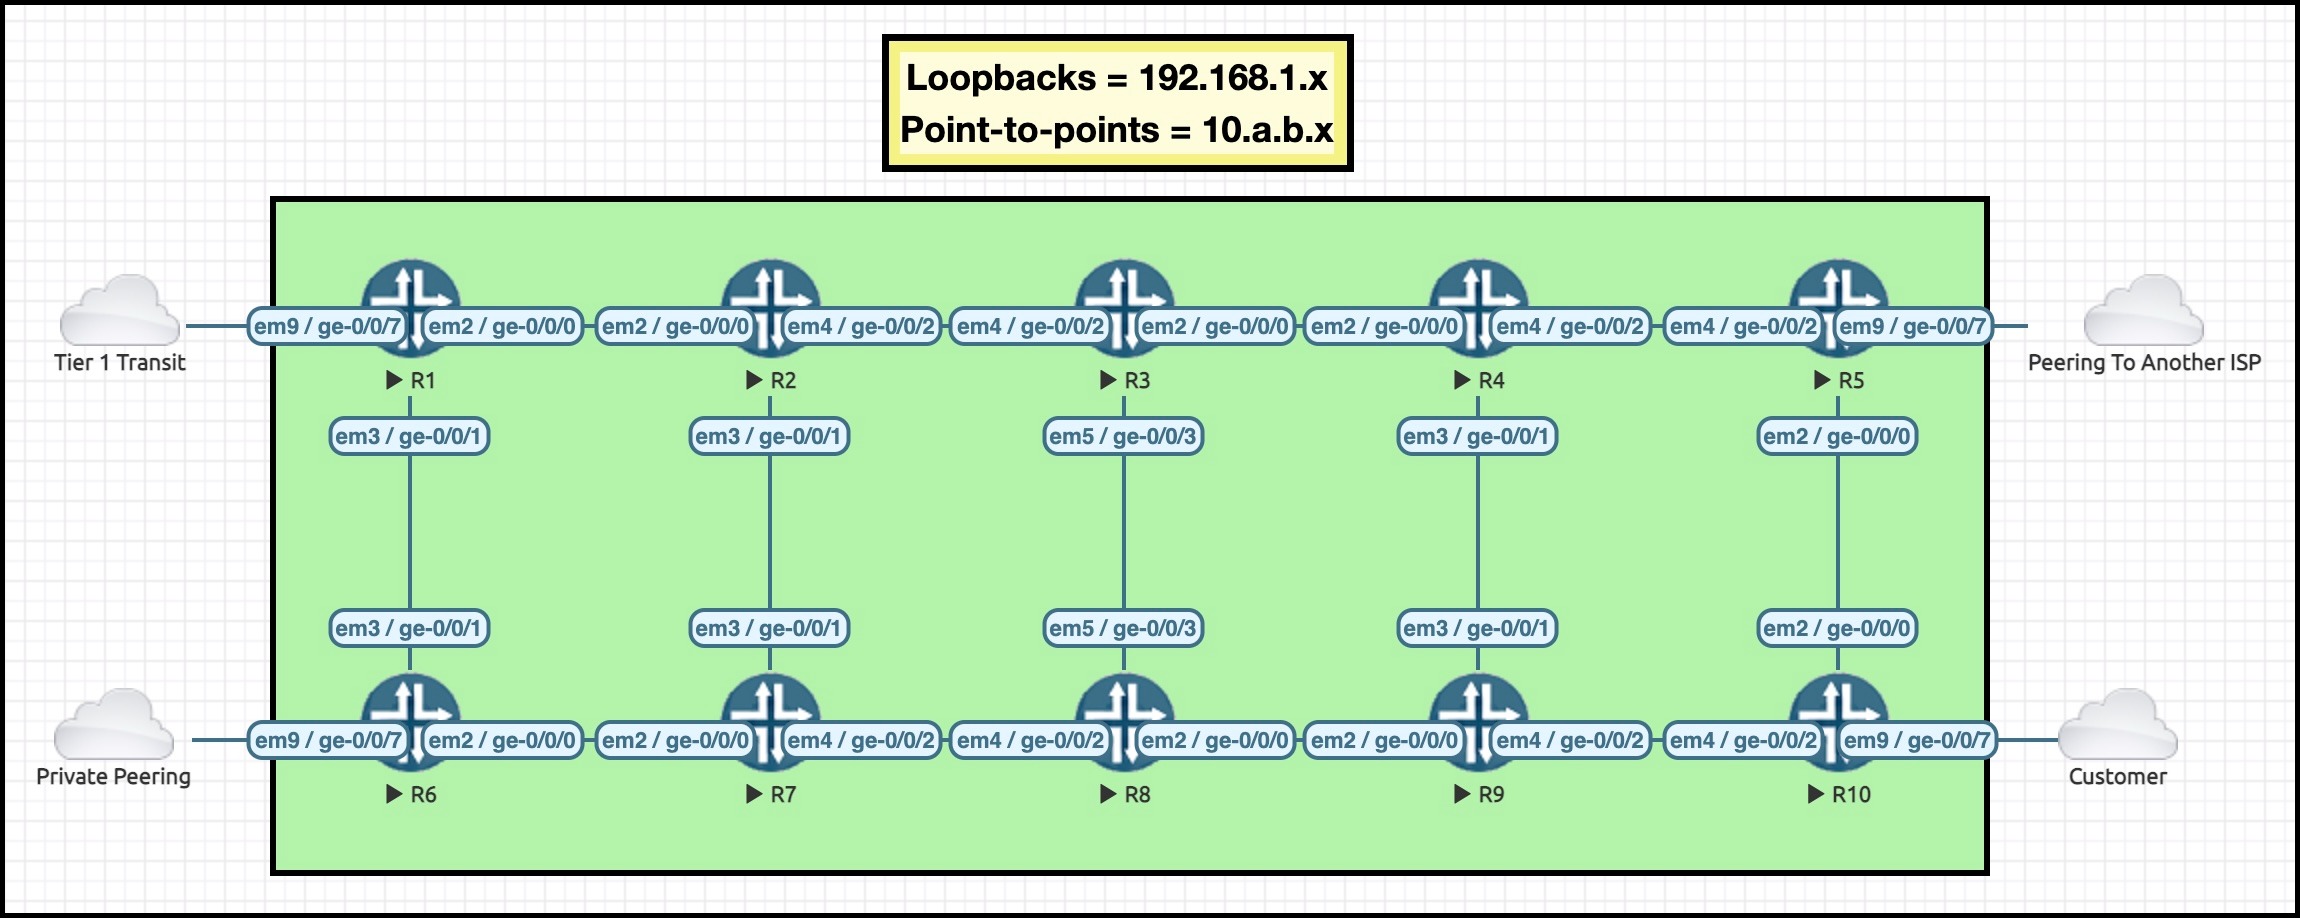
I’m going to introduce you to the proper names of a few of the segment types you just learned about. As I introduce you to them, I’m going to reference some routers in my Famous Ten-Router Lab. What makes it famous? Oh I don’t know, how about the fact that it was voted “Most Handsome Network 2022” by none other than Good Housekeeping magazine?
You might like to click this pic to open it in a new tab, for easy reference as you continue reading:
NODE SIDs
Segment routing refers to a router as a “node”. When you assign a segment ID to a node, it’s called a node SID.
A node SID is nothing more than a number, a unique identifier. These node SID numbers are then advertised throughout the network, so that each router knows the number, the Node SID, associated with each router.
By the way, in segment routing, one segment ID is assigned for IPv4, and another separate segment ID is assigned for IPv6. For example, in our network here, R3 might have an IPv4 node SID of 403, and an IPv6 node SID of 603.
Some documentation doesn’t make it clear that there are different SIDs for each address family. I’ve often seen documentation use the phrase “node SID” or “adjacency SID” to really mean the IPv4 version. Be alert when you’re reading around this topic!
NODE SIDs ARE USED TO GENERATE LABELS
You use Node SIDs when you want to perform shortest path routing.
Whenever a router receives an MPLS label associated with a particular Node SID, this label is an instruction for the router to forward the traffic towards that Node SID, following the metrically-best path.
However, these Node SID numbers are not MPLS labels in themselves. Instead are the the basis for generating a label.
The idea in segment routing is that each router reserves a block of MPLS labels for shortest-path forwarding. This can happen automatically, or you can choose it yourself. Don’t worry, it’s WAY easier than it sounds, and in Part 2 I’ll show you how to choose a block of labels for production.
To define a block of labels, you state your starting label, and then the label block size. So for example, you might choose starting label 800000, and use a label block size of 9000. That gives you labels 800000 to 808999 to use for shortest path routing.
Each router is going to use IS-IS or OSPF to advertise their block of labels. In doing so, the router indicates to the rest of the network, “This is the block of labels that I am using for shortest path forwarding. If you want to send traffic to a particular node SID, add the node SID number to my starting label block, and then use that as the label number when you send the packet to me”.
CALCULATING THE CORRECT SHORTEST-PATH LABEL
For example, if R1’s starting label was 800000, and R3’s IPv4 node SID was 403, then R1 would want to receive label 800403 when the intention is to send traffic down the shortest path toward R3.
It really is as simple as adding two numbers together!
THE SRGB LABEL BLOCK
There’s a name for this label block: it’s called the Segment Routing Global Block, or SRGB for short.
The word “global” is massively misleading. It doesn’t mean that the labels have global significance.
Instead, it means that node SIDs have global significance, which means that every router in the network understands how to calculate a label towards a node.
This is as opposed to adjacency SIDs, which you’ll come onto in a moment. These are the SIDs that routers locally allocate for forwarding traffic to neighboring routers. These SIDs only have local significance.
Node SIDs are an example of a global SID. There’s a few other examples too, that you’ll come back to another day. For now, the point is that the SRGB, the segment routing global block, is used to calculate MPLS labels for global SIDs.
Some vendors have the concept of an SRLB, L meaning local. This is a block of labels for local segments, such as adjacencies. Junos doesn’t have a dedicated SRLB. Instead, it allocates labels out of the massive pool of labels allocate for any dynamic allocation.
WHAT IF YOU HAVE THE SAME SRGB ON EACH ROUTER?
There is nothing stopping you from individually configuring the same label block on each router in the network.
For example, imagine that every router uses a label block starting at 800000.
Now imagine that R2 receives a packet labeled with 800405 – in other words, send this IPv4 packet down the shortest path to R5). If you look at the network diagram from earlier, this mean that R2 will send it to R3, who will send it to R4, who will send it to R5.
R2 forwards the packet towards R3 – and sends the packet with the exact same label of 800405! This label has exactly the same meaning on R3, which is to forward this packet down the shortest path to R5.
That’s pretty cool for troubleshooting, right? It means that if you choose the same label block on every router, then every single router will expect the same label for a particular Node SID. If you plan your SRGB and your Node SIDs carefully, then you’ll be able to look at a particular label and know exactly what it’s doing.
That’s very different to LDP, where the label is totally random at each hop.
Funnily enough, when you look on the CLI, you’ll see that when R2 receives label 800405, it “swaps” it to label 800405 before it sends it to R3. Yep: it swaps it to the same label! This makes sense though, when you remember that a swap operation is really a combined pop and push operation.
DIFFERENT LABEL BLOCKS ON DIFFERENT ROUTERS
However, using the same label block everywhere isn’t mandatory.
For example, you might have a multi-vendor environment where, for some reason, certain blocks of labels are reserved. In this case, you have the freedom to use different blocks of labels on each router. You’re not restricted. Everything still works, because every router knows what label block every other router is using.
So for example, imagine that R4 is by a different vendor, and for some reason it doesn’t allow you to allocate the same block of labels. No worries: you can just choose a different block.
Let’s imagine that you choose to allocate labels starting from 400000 on R4. Here’s what would happen, from R1 to R5:
- R1 would push label 800405 and send the packet to R2
- R2 would swap the label to 800405 and send the packet to R3
- R3 knows that R4 is using a different label block, so it swaps the label to 400405 before sending to R4. Same math, different starting block!
- And then R4 does penultimate-hop popping before sending the packet to R5.

Either way, the result is shortest path forwarding. You’ve successfully replaced LDP with segment routing!
To return to the idea of manually allocating labels – you can choose pretty much any starting label you like, because when you configure SR for the first time, you will (or at least, you should) combine this work with a reboot. Or, at the very least, you should deactivate and reactive MPLS. This will clear out any labels currently in use.
As such, you don’t need to worry about using a “reserved block” or anything. If a block is genuinely reserved, you’d get a Junos commit error, so you can just relax my guy!
ADJACENCY SIDs
When you turn on SR-MPLS, Junos (and I assume other vendors too, but I’ll leave you to do that research) automatically assigns a segment ID to each IS-IS/OSPF adjacency – in other words, there is a SID that acts as an instruction to forward traffic to a specific neighboring router, out of a specific interface.
Funnily enough, it’s called an adjacency SID.
Once again there’s an adjacency SID for IPv4, and another for IPv6.
To be clear, the SID is created thanks to the IS-IS or OSPF adjacency. That is to say, if you had five physical interfaces on a router, but only four of them were running IS-IS/OSPF, you’d end up with four Adjacency SIDs for each IP address family. The fifth link wouldn’t have a Segment ID by default.
When you learned about node SIDs, you saw that the node SID number is used to calculate the MPLS label.
Adjacency SIDs are a bit different, because the SID itself is also the actual MPLS label that the router expects to receive. Your router generates a label/SID for each adjacency, and then these labels are advertised through the network via IS-IS or OSPF.
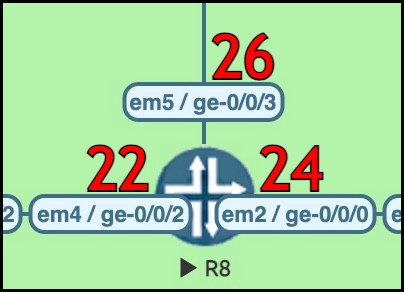
So for example, in this diagram on the left, R8 has generated IPv4 Adjacency SIDs for its three links, and these SIDs are also MPLS labels. If R8 receives a packet with a label of 24, R8 will pop that label, and then send the packet out of its interface towards R9. If it receives a packet with label 26, the label is popped and sent up to R3.
Every router does this, for each of its adjacencies – and once again, these numbers are advertised in IS-IS or OSPF. Thanks to your IGP of choice, every router in the network will know the precise label that each router expects to receive, if traffic is to be forwarded out of a particular interface. It’s thanks to this information that an ingress router is able to build that stack of labels that we mentioned earlier.
The idea of local segments might make more sense now. All of the other routers are aware of these segments – they are advertised throughout the network, after all – but they only have meaning to R8. Only R8 can receive label 24 as an instruction to pop the label, and send the remaining packet to R9.
In that respect, don’t get confused about the word global. Some people assume it refer to information being advertised globally. As you can see though, global/local are more to do with the meaning of the segments.
Speaking of which, you now know enough to see what the stack might look like.
A STACK OF LABELS, FOR TRAFFIC ENGINEERING
Imagine that R1 wanted a packet to get to R10 via the precise path of R1-R2-R3-R8-R9-R10. Let’s suppose that in this example, you did not want the packet to deviate from this exact path.
In RSVP, R1 would have to signal this path, get every router to agree, bring the path up, and then maintain that path through some kind of refresh message. In addition, each router in the path uses up memory to remember that the LSP exists. Scale this out to hundreds of LSPs, perhaps even thousands, and you can appreciate that RSVP requires a lot of additional state.
By contrast, in segment routing, R1 already knows the labels that each router expects to receive, when traffic needs to be forwarded out of a specific link to a specific neighbor. As such, R1 can just look in its IS-IS/OSPF database and find the adjacency SID from R2 to R3, from R3 to R8, and so on. R1 can then push each of those labels onto the packet, to indicate the precise path that the packet should take.
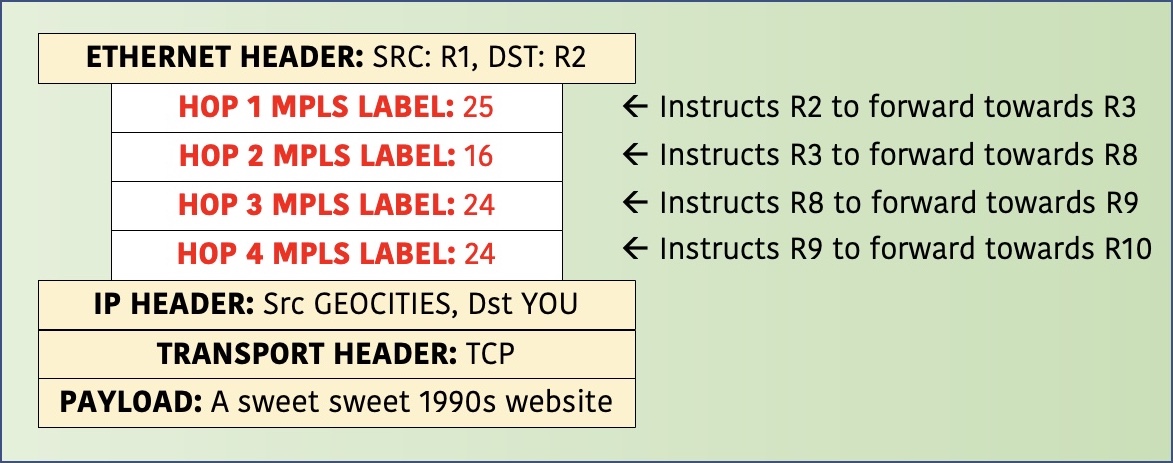
Below you can see what the final packet looks like. By the way, these MPLS labels/SID numbers come from my actual lab of ten Junos routers. In Part 2 you’ll find out how to see these numbers for yourself. For now, you’re just gonna have to #trust me that they’re real.
Goddamn that’s a nice subtle green gradient. Real nice.
Anyway, R1 will push this label stack onto the packet, then send this packet to R2, who would see label 25, pop it, and forward the packet to R3 with just a three-label stack.
R3 will receive this packet, look at the new top label of 16, pop it, and forward it to R8. R8 does the same on label 24, popping it and sending the packet to R9.
By the time it reaches R9, the packet has just one single label of 24. There is penultimate-hop popping here, because R9 will pop the final label of 24 before forwarding to R10.
You surely noticed that R8 and R9 are using the same label. That’s fine – remember these labels are generated by the local router, and only have meaning to that router. Once again, we see why these are described as local segments. R1 has awareness of them, and this is how R1 was able to create this label stack. However, they only have local meaning to the specific router that advertised them.
So then, if R1 wanted to create that precise LSP, it no longer has to “request” that the LSP be brought up, like it would in RSVP. Instead, R1 already knows everything it needs to send the traffic a specific way, thanks to the information received in IS-IS or OSPF.
POTENTIAL PROBLEMS WITH LARGE LABEL STACKS
Now, it’s true that this stack of four labels could create problems of its own. For example, a very large label stack could use up bandwidth on an interface. This is especially problematic with voice packets, which are already very small. Ideally, we wouldn’t use up most of our bandwidth with labels!
Another potential problem is load balancing. Many devices cannot accurately load-balance if there are too many labels on a packet.
Yet another potential problem is that some devices can only push a small number of labels onto a packet.
These problems highlight the fact that SR-MPLS is not an obvious replacement for RSVP in all networks. Some networks will benefit from moving to SR, some will benefit from staying with RSVP, and some may benefit from a mix of both. The point here is that LDP, RSVP, and SR-MPLS are all valid and excellent choices, depending on what you want to achieve. As Russ White often says, “If you haven’t found the trade-offs, you’ve not looked hard enough.”
HOW DO YOU CREATE A STACK OF LABELS?
You may look at that stack of labels and wonder to yourself: how exactly is this stack built? What do you, as an engineer, have to do in order to “create” that stack? How do you create a traffic-engineered SR-MPLS LSP?
There’s five main answers to that.
If you like tedious work, you could define an endpoint (in other words, an egress router, the destination of your LSP), and then define each label in the stack explicitly, by digging through the IS-IS database and working out which label to use. This has all the drawbacks of building an entire network out of static routes. If a link goes down, then your LSP breaks. There’s also no guarantee that the labels will stay the same over reboots or IGP flaps.
This option is made easier by configuring manual and persistent adjacency SIDs on each interface. Still, this is a very laborious option.
The second answer is to define an explicit list of IP hops, and then let your device translate it for you. This is far less tedious. It’s still a manual process – but if you need a precise path, this is a great choice.
The third option is to define an endpoint, and then let your network OS calculate the path for you. The nice thing about this option is that you can add many of the same traffic engineering constraints as you learned about with RSVP, such as admin groups. Your router then calculates the required label stack, and pushes it manually.
The fourth option is even more dynamic, in that you can define an entire range of endpoints, and then only build LSPs to BGP next-hops in that range. For example, if you defined 192.168.0.0/16 as your block, and then you received a BGP prefix with a protocol next-hop of 192.168.1.5, your router could build an on-demand LSP to R5. You can even apply TE constraints to any LSPs that are dynamically built using this method.
The final option is to introduce an external controller into the mix, where you could request LSPs from Router A to Router B, and perhaps add some constraints into the mix. The controller could then program the LSPs directly into the data plane of your routers, building the stack of labels required.
In Part 2 of this blog post series you’re going to learn how to easily use SR as a placement for LDP, and you’ll see that there’s no controller needed at all for this use-case. No controller, no label stack – just four lines of config, and a single label end-to-end.
SRv6
One final thing!
All of this post so far has focused on using MPLS labels to create your segment-routed paths. However, there are other options available.
One such example is SRv6, which uses a stack of IPv6 addresses to route the traffic. This stack of addresses is contained in a special header called the SRH – the Segment Routing Header.
In this system, SRv6 is not necessarily carrying IPv6 traffic. The payload can be anything. Instead, the stack of IPv6 headers performs the same task as the stack of MPLS labels. A router receives a packet with a stack of IPv6 headers, inspects the top “label”, and forwards the traffic accordingly.
In other words, rather than using one single IPv6 address to identify the end destination, you can instead use multiple IPv6 addresses, to define not only the specific path you want to take, but even the action that should be taken with the traffic when it reaches its destination.
SRv6 has some big differences to SR-MPLS. The obvious one is using IPv6 instead of MPLS. Another example is that these IPv6 addresses are not popped when they reach the end of the segment. Instead, the entire stack stays on hop by hop.
Another difference is that it’s very complicated. You’ll see a lot of blog posts by SRv6 advocates saying that SRv6 is actually really easy. You’ll also see these same posts saying that MPLS is legacy, without really saying what that means. In any case, they must all just be far more clever than me, because I look at SRv6 and it blows my mind how many additional complications it brings. Perhaps I’m just stupid.
In any case, for this exact reason, I recommend studying SR-MPLS first, because there’s so many new features and services to know about in segment routing.
As you study it, you’ll learn the many additional features that SR-MPLS offers – features like:
- Flex algo (which creates multiple logical topologies within your main topology)
- BGP classful transport (which creates tunnels between networks)
- The BGP color community (which can bind a prefix to a specific LSP, in a situation where you have multiple diverse LSPs between a source and a destination)
- TI-LFA (Topology-Independent Loop-Free Alternate – SR’s method of creating local repair paths that provide 100% coverage of your network whenever an alternative path exists)
- And more!
Don’t worry if you don’t know what any of those terms mean yet – you will in time. The point is that there’s a lot to learn, and you’ll give yourself an advantage by learning them using the MPLS data plane you’re familiar with.
Then, once you’ve learned those concepts, it won’t be too hard to learn them with stacks of IPv6 addresses instead of stacks of MPLS labels.
THAT’S IT FOR NOW!
That’s a lot to take in, so don’t be shy to read this post a second time if you need to.
When you’re happy that you know the theory, click here to read Part 2 where I show you how to configure and verify segment routing in Junos as a replacement for LDP. Sweet!
If you want to be among the first to find out when I publish new posts, follow me on Twitter. I’ll always share my new stuff there, plus very regular networking nonsense.
If you fancy some more learning, take a look through my other posts. I’ve got plenty of cool new networking knowledge for you on this website, especially covering Juniper tech and service provider goodness.
It’s all free for you, although I’ll never say no to a donation. This website is 100% a non-profit endeavour, in fact it costs me money to run. I don’t mind that one bit, but it would be cool if I could break even on the web hosting, and the licenses I buy to bring you this sweet sweet content.
And hey: if you enjoyed this post, I’d love you to share it on your favourite social media platform of choice, or maybe email it directly to pals and colleagues who might enjoy it. And if you didn’t enjoy this post, then be sure to write to your local politician, and demand that I be punished by being given £5,000,000 and unlimited holidays.
There’s certainly much more to tell you about segment routing. There’s tons you can do with it, and we’ve only scratched the surface. But for now, I hope you’ve enjoyed this introduction. See you next week!


Loved your Segment Routing article – thank you so much for making nice light reading and not falling to sleep.
Thanks for the segment Routing article. You made it simple and easy to understand. Excellent!
Appreciate your contribution.I’ve read some pages about SPRING in IETF documents but It’s so hard to understand.Thank you so much !
Lol I know how you feel!
no one on internet came close to your explanation of Segment routing!
you made it super easy. will follow you on twitter
Thank you for posting these nuggets!
Nice one 🙂 Thank you very much!
Hi,
>> SRv6, which uses a stack of IPv6 headers to route the traffic!
SRv6 uses stack of IPv6 addresses (and not stack of IPv6 headers) to encode SIDs.
More accurately, SRv6 carries current/active SID in the DA field of IPv6 header and carries the rest (next, next-next, ..) SIDs in an extension header called SRH.
Hi Kamran! Oh my goodness, I’m so sorry it took me so long to reply. I’m very bad at keeping up to date with comments. Thank you for this correction. You’re completely correct. I’ve updated the post 🙂
I had so much fun learning SR with this article. I’m more of a security guy (and a routing&switching wanna be engineer), and honestly, I couldn’t understand SR before this post. Thanks again!
Thanks for the work you put in the post, it was very helpful.
One question though: how many elements does the label stack carry in case of SRGB?
You mention explicitly that the SRGB value is swapped with the same value, that is popped and pushed back. I interpret this as the application of the same formal process, resulting in the forwarding packet having the same header as the received one.
Yet, it this procedure is repeated at every node, a single entry in the label stack would suffice. Is it done that way?
Cheers!
“how many elements does the label stack carry in case of SRGB” – Apologies, I’m not sure what this means. Could you write some more about the question please?
“I interpret this as the application of the same formal process, resulting in the forwarding packet having the same header as the received one” – Are you asking if the MPLS header itself stays exactly the same between hops? If so, then the answer to this is no. If you have a consistent SRGB, then the label value is the same between hops – however, the thing we humans call a “swap” operation” is really a combined pop and push operations. Behind the scenes, the incoming MPLS header is removed, and a new MPLS header is pushed. The header contains almost exactly the same info, apart from the fact that the TTL has decremented by one.
“Yet, it this procedure is repeated at every node, a single entry in the label stack would suffice. Is it done that way?” – If your intention is simply to forward a packet down the shortest path toward some remote destination, then yes. Just one single transport label is needed from ingress to egress. Remember to think of a segment as an instruction about how to forward traffic across the topology. In that respect, the only time you need a stack of transport labels is if you’re doing traffic engineering (in other words, sending traffic to specific transit routers along the path to the destination) or inter-domain transport (where the top label gets traffic to some border router, and then one or more bottom labels get the traffic to its destination).
If I haven’t understood you, let me know and I’ll see if I can help more.
Great post indeed. SR made simple.
One question: Is it possible that I use LDP for a VPWS (l2circuit) and use SR-MPLS for an L3VPN?
First, just to be clear, you don’t need to run LDP as a transport protocol in order to transport packets for an LDP-signaled L2circuit. The pseudowire traffic can be transported with LDP or RSVP or SR-MPLS, or any other available option.
With that in mind, it isn’t clear to me why you would want to use LDP as a transport for your VPWS, and SR-MPLS for your L3VPN. If both VPNs are on the same PE then I don’t think it’s possible, because there can only be one active LSP to a destination at a time. Having said that, perhaps you can write more about what you’re trying to achieve, and the reasons behind it?
hey Chris! Thanks for the prompt response. Was not expecting it this early 🙂
Actually, I am thinking about a solution where I don’t need to use BGP for my mission critical layer 2 links. If I move to SR-MPLS, then, I will have to migrate to BGP EVPN. And, if something happens to BGP session due to any mis-configuration or anything, I should retain those layer 2 circuits.
Hmm, I’m afraid I don’t entirely understand the problem. If you used SR-MPLS, can you tell me more about why would you be required to move to EVPN?
The only thing I can think of is the same as in my previous comment, which is to make sure that you understand that “using LDP to signal a pseudowire” is a completely separate thing from “using LDP to create transport LSPs”.
sorry for the confusion and please pardon my lack of understanding. So, if I interpret your statement, what you essentially mean is that I can create a targeted LDP session between 2 PEs to signal my PW while I can still use SR-MPLS for transport LSP between those 2 PEs, correct?
Not at all, don’t apologise! This is complex stuff, and it’s rarely well explained. Plug time: if you take Juniper’s MPLS Layer 2 VPN course (https://learningportal.juniper.net/juniper/user_activity_info.aspx?id=EDU-JUN-ILT-JL2V) then you’ll get access to the Student Guide book that I wrote that explains it all, in what some people might describe as “far too much detail”.
Yes, that’s exactly correct – when you use LDP to create a pseudowire or a VPLS, this is completely separate from the transport protocol that you can choose. You can indeed choose LDP for transport, but you can also choose RSVP, and you can also choose SR-MPLS. It’s like you say – the two PEs create a targeted LDP session between them to exchange VPN information. The transport is totally separate. You just need to keep LDP enabled on your loopback interface (probably “set protocols ldp interface lo0.0”).