

CLEAN UP YOUR ROUTING TABLE! REMOVING POINT-TO-POINT SUBNETS FROM IS-IS, IN JUNOS
A lot of things blow your mind, the first time you learn about them.
For example, did you know that if you gently tap the side of your head for five minutes, coins will fall out of your ear? It turns out that we’re all born with $15 (or the equivalent in your local currency) inside our heads, which our parents put there in case of emergencies. Try it! If it doesn’t work after five minutes, try harder – and remember that it only works if you really believe in yourself.
Another example involves the routing protocol IS-IS. Did you know that it’s possible to tell IS-IS not to advertise the subnets on point-to-point links? You can actually configure it to only advertise the topology itself, your loopback IP addresses, and nothing else.
First of all: wow. Second of all: how does that even work? Third of all: why would you ever want to do that? Fourth of all: doesn’t that break things? And fifth of all: wow.
In fact, although on the surface it might seem like an odd thing to do, it can actually bring tremendous benefit. In this post I’m going to show you how to do this, why it might be useful, and the things you’ll definitely want to consider before actually deploying it.
As always, we’re using Junos to configure it – but the underlying theory is the same whatever your vendor of choice. Let’s do it!
THE TOPOLOGY FOR THIS POST
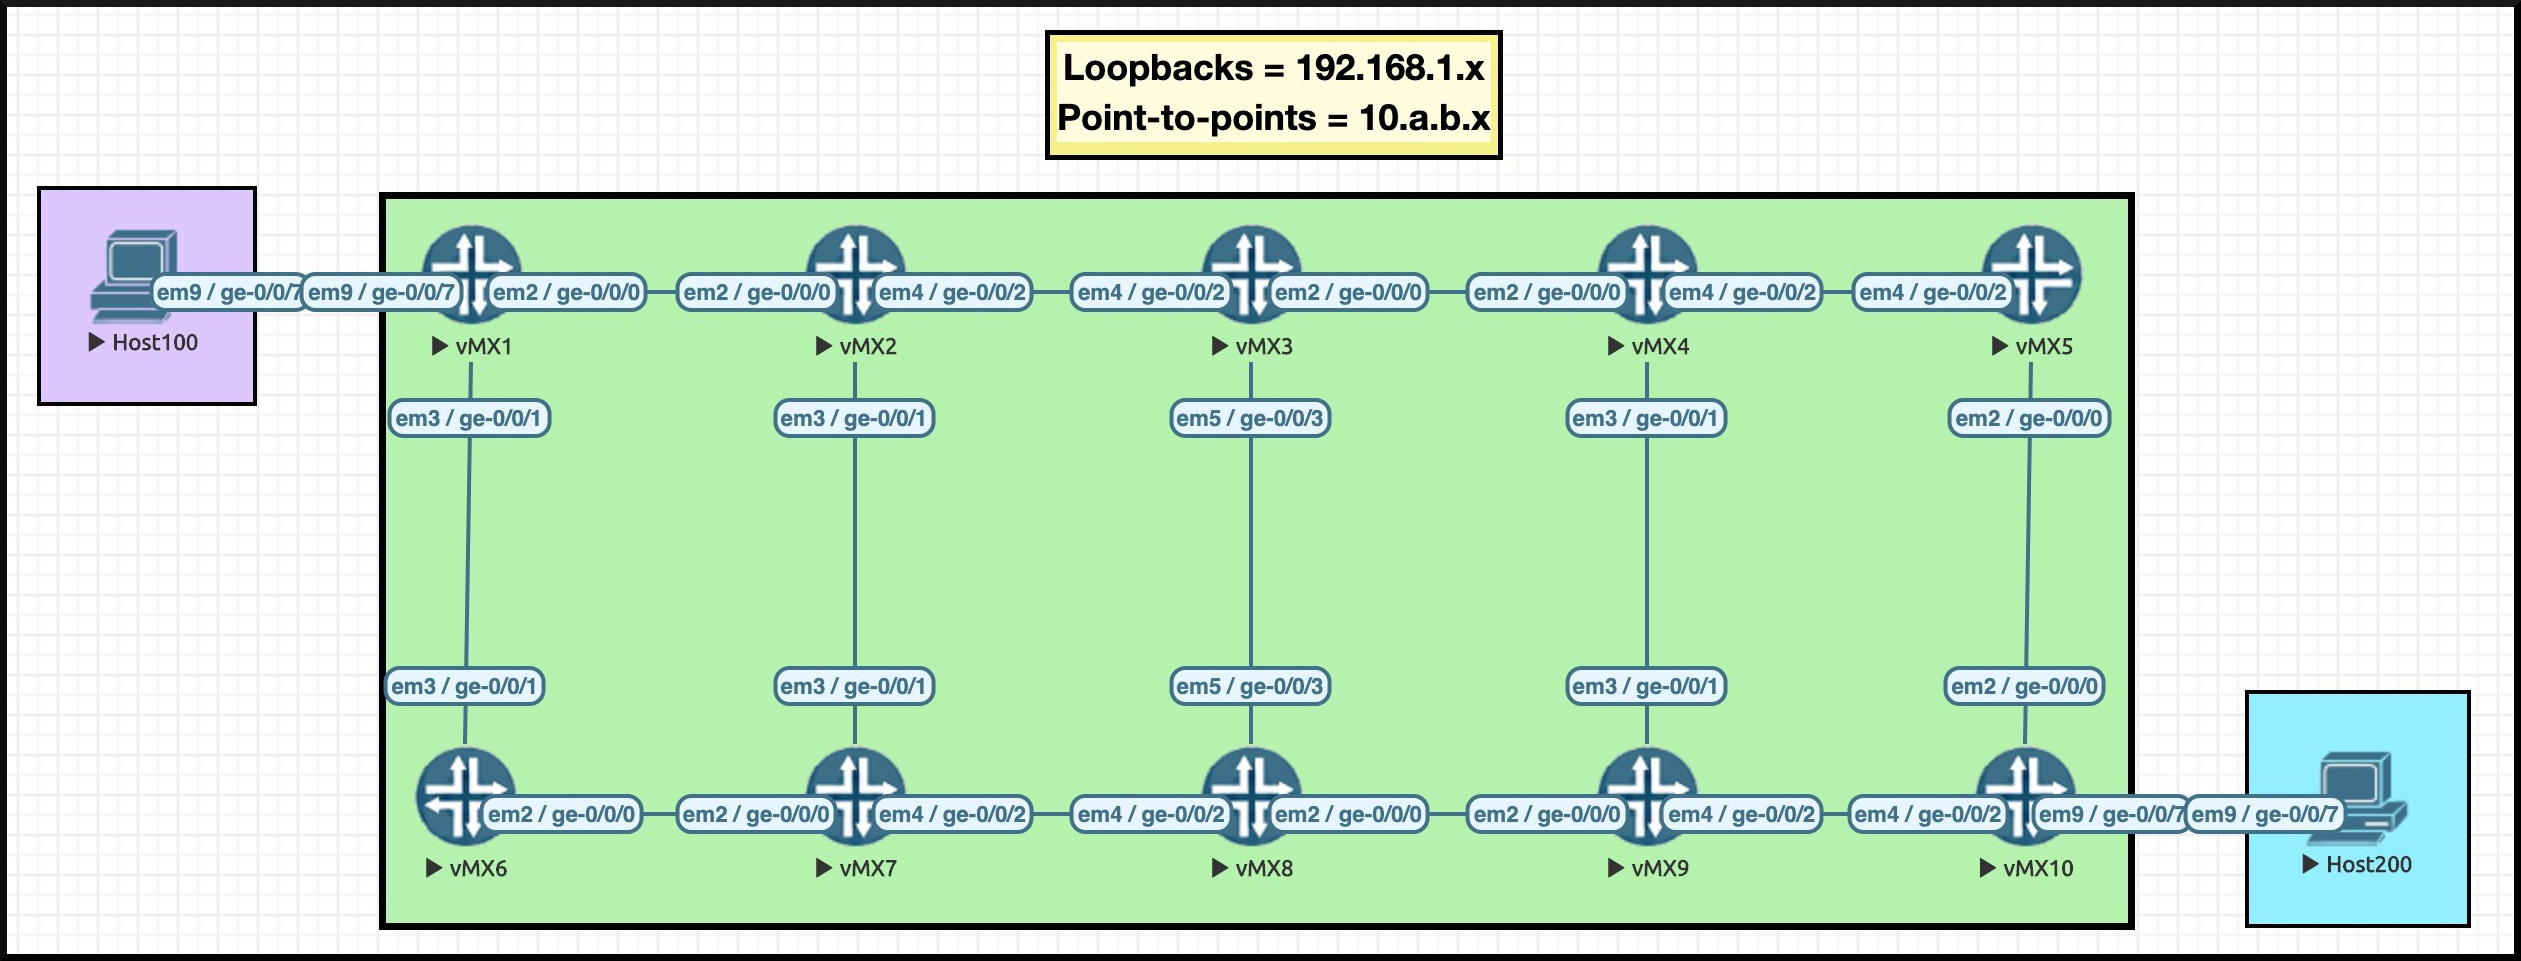
Hey there: it’s the return of The Famous Ten Router Lab!
What makes it famous, you ask? How about the fact that it was a member of Daft Punk from 2003 to 2006? It filled in temporarily for the one who usually stands on the right. Right Punk (or “un Punk du Right” as he is known in his mother tongue) wanted to take a break to explore his love of bamboo weaving. “There’s nothing “punk” about denying your love of weaving”, he told Rolling Stone magazine.
Anyway, forget I said that. You already know what it is: ten routers, with loopback IP addresses that tell you what router number you’re on (eg Router_6 is 192.168.1.6).
What we’re going to do today is remove all of the point-to-point IPv4 ranges from IS-IS, leaving just ten loopback IPs. We’re then going to see how traceroutes work, how pings work, and what things we should consider when deploying this solution.
Normally, IPv4 point-to-point links would either have /30 or /31 subnet masks on them. However, this lab does it slightly differently: they’re all /24s. Why? Because it gives us the freedom to number these links in a way that you can tell what routers they’re connected to. For example, the connection between routers 3 and 8 is 10.3.8.0/24, and in particular the IP on Router_8’s interface is 10.3.8.8.
As you’re going to see though, the actual subnet mask doesn’t matter. All that matters is that we’re removing whatever IP ranges are on the point-to-point links, leaving us just with the loopback addresses.
CONFIGURING IS-IS
This post is not a beginner’s guide to IS-IS. However, luckily for you I’ve actually created one! It’s a three-part series, and you can find Part 1 here.
As such, this post assumes a basic familiarity with how IS-IS works – so let’s jump right in, and look at the configuration. This is taken from Router_2, but all routers are broadly the same:
root@Router_2> show configuration protocols isis | display set
set protocols isis reference-bandwidth 100g
set protocols isis level 2 wide-metrics-only
set protocols isis level 1 disable
set protocols isis interface ge-0/0/0.0 point-to-point
set protocols isis interface ge-0/0/1.0 point-to-point
set protocols isis interface ge-0/0/2.0 point-to-point
set protocols isis interface lo0.0

root@Router_2> show configuration interfaces | display set | match iso
set interfaces ge-0/0/0 unit 0 family iso
set interfaces ge-0/0/1 unit 0 family iso
set interfaces ge-0/0/2 unit 0 family iso
set interfaces lo0 unit 0 family iso address 49.0001.0000.0000.0002.00
What’s going on here?
- Each core interface is enabled for IS-IS, and explicitly configured to be point-to-point links.
- In addition, these interfaces are also configured to talk family ISO.
- The loopback interface is given an ISO address.
- Notice that Level 1 is turned off, so we’re just running Level 2 everywhere.
- Notice too that I’m setting the link metrics to be set based on a reference-bandwidth of 100Gb. This means that 100Gb links have a metric of 1, 10Gb links have a metric of 10, 1Gb links are metric 100, and so on. This overrides the default, where every link has a metric of 10 regardless of the speed. (Lol, it’s fun working with protocols that were designed in the 16th century!)
IS-IS adjacencies are formed, Link-State PDUs are exchanged, and every router shares an exact view of the network. Shortest Path First (SPF) finds the best path to every IP address, and the process is complete.
Let’s take a look at one of these Link-State PDUs.
WHAT DOES AN IS-IS LSP LOOK LIKE?
First of all, can I point out how frustrating it is that LSP can stand for both label-switched path and link-state PDU depending on what the context is.
(By the way, PDU stands for Protocol Data Unit, which if I’m not mistake is also the name of an edgy upcoming HBO crime drama. Keep an eye out for it this fall season.)
In IS-IS, a Link-State PDU is the name for the message a router generates to advertise its link and IP information to the rest of the network. Think of these LSPs like pieces of a jigsaw puzzle. When each router has every LSP generated by every router, it can put the pieces of the jigsaw together to build the entire network map in its hyper-virtual techno-mind.
Let’s try this command on Router_4:
root@Router_4> show isis database
IS-IS level 1 link-state database:
  0 LSPs

IS-IS level 2 link-state database:
LSP ID                      Sequence Checksum Lifetime Attributes
Router_1.00-00                      0x3   0xc1c9     1121 L1 L2
Router_2.00-00                      0x4   0xb8ab     1115 L1 L2
Router_3.00-00                      0x4   0xfa45     1122 L1 L2
Router_4.00-00                      0x4   0x4ad5     1126 L1 L2
Router_5.00-00                      0x3   0x54d5     1124 L1 L2
Router_6.00-00                      0x3   0x7cc3     1122 L1 L2
Router_7.00-00                      0x4   0xe00b     1124 L1 L2
Router_8.00-00                      0x4   0xffc7     1117 L1 L2
Router_9.00-00                      0x4   0x8120     1119 L1 L2
Router_10.00-00                     0x3   0x8927     1089 L1 L2
  10 LSPs
Each of those entries represents one single LSP. We’ve highlighted the LSP generated by Router_7, which we’ll look at more closely in a moment.
Each router generates one single LSP (though there may be multiple LSPs if there are so many IPs and links that it needs to be split over multiple messages – but they still make up one complete set), named after the router itself, with some zeros after it. If all of your links are configured as point-to-point, then this is exactly what you’ll see. You’ll also see something extra if any of your links are not point-to-point, and are instead broadcast interfaces – but that’s a story for another day.
These are just the high points of the database. We can drill into the detail of any one of these LSPs to see its contents. In fact, let’s do that.
Remembering that we’re on Router_4, let’s take a look at Router_7’s LSP. The command below should work on any router, and should give you identical output – after all, the whole point of a link-state protocol is that every router has exactly the same view of the database as any other router.
root@Router_4> show isis database Router_7 detail
IS-IS level 1 link-state database:

IS-IS level 2 link-state database:
Router_7.00-00 Sequence: 0x4, Checksum: 0xe00b, Lifetime: 1016 secs
   IS neighbor: Router_2.00                      Metric:      100
   IS neighbor: Router_6.00                      Metric:      100
   IS neighbor: Router_8.00                      Metric:      100
   IP prefix: 10.2.7.0/24                     Metric:      100 Internal Up
   IP prefix: 10.6.7.0/24                     Metric:      100 Internal Up
   IP prefix: 10.7.8.0/24                     Metric:      100 Internal Up
   IP prefix: 192.168.1.7/32                  Metric:        0 Internal Up
   V6 prefix: 2001:db8::7/128                 Metric:        0 Internal Up
This, right here, is one of the reasons I much prefer IS-IS over OSPF. Look how readable it is! It’s so clean! There’s really only two things that you need to know, and you’ve probably spotted them already.
First, Router_7 has connections to Router_2, Router_6 and Router_8. We’ve highlighted all three of them above. The names of the routers are even in the database! This is in stark contrast to OSPF, where the connected routers would be displayed as a 32-bit number which looks like an IP address, but which doesn’t actually have to be an IP address. It’s a nightmare to read. But IS-IS? Reading its database is super easy.
Second, the IP ranges connected to Router_7 are listed. Notice though that the IP addresses are not associated with their link. For example, the 10.6.7.0/24 range (highlighted) isn’t tied to the link connected to Router_6. Instead, Router_7 is simply saying “I’m connected to these routers. These are the metrics to get to them. Separately to that, I am connected to these IP ranges. These are the metrics to get to them. If you need to any of this, come to me!”
This is again in stark contrast to OSPFv2, which actually does bind IP addresses to links within its advertisements. OSPv3 fixed this, and created separate Link-State Advertisements for the links, and for the IP ranges on those links.
NOTE: I’ve been told, but have no citations to prove it, that a consequences of this in older implementations of OSPF was that if you changed an IP address on a link, then SPF would need to be run again, because as far as OSPF is concerned, the topology has changed. I’m also told that more mature implementations of OSPF are programmed to know that if an OSPF LSA changes, but it’s only the IP address on the link that has changed, then this shouldn’t requires SPF to be re-run, because in reality the topology hasn’t actually changed.
A QUICK LOOK AT THE EXTENSIVE COMMAND’S OUTPUT
One thing that might occur to you is: if this lab is using /24 point-to-point links, then how does a router know what the IP address of its neighbor is?
In actual fact, IS-IS advertises the specific IP address configured on a link, so even if we take all the point-to-point subnets out, that information still gets advertised. This is also true when traffic-engineering information is advertised, so MPLS label-switched paths can still form with no problems.
You can see this with the extensive command, as shown below. I’ve deleted some of the output, and gone straight to the TLV section.
You may be familiar with the term TLV. It stands for Type Length Value. In the output below you can see that there’s a number of different TLVs, each advertising different pieces of the puzzle. There’s a TLV for the router’s hostname, a TLV for the routers connected to it (the “extended neighbor” TLVs), a TLV for the IPv4 addresses (the “IP extended prefix” TLVs), a TLV for the IPv6 addresses (The “IPv6 prefix” TLV), and plenty more. Each TLV is separate, and isn’t bound to any other TLV.
Notice in particular that under the “IS extended neighbor” section, it lists its own IP, and the “Neighbor’s IP address”.
Everything you see below is all part of the Link-State PDU.
root@Router_4> show isis database Router_7 extensive
{snip}

  TLVs:
    Area address: 49.0001 (3)
    LSP Buffer Size: 1492
    Speaks: IP
    Speaks: IPV6
    IP router id: 192.168.1.7
    IP address: 192.168.1.7
    Hostname: Router_7
    Router Capability:  Router ID 192.168.1.7, Flags: 0x00
    IP extended prefix: 10.6.7.0/24 metric 100 up
    IP extended prefix: 10.2.7.0/24 metric 100 up
    IP extended prefix: 10.7.8.0/24 metric 100 up
    IP extended prefix: 192.168.1.7/32 metric 0 up
    IPv6 prefix: 2001:db8::7/128 Metric 0 Up
    Extended IS Reachability TLV, Type: 22, Length: 99
    IS extended neighbor: Router_8.00, Metric: default 100 SubTLV len: 22
      IP address: 10.7.8.7
      Neighbor's IP address: 10.7.8.8
      Local interface index: 335, Remote interface index: 334
    IS extended neighbor: Router_2.00, Metric: default 100 SubTLV len: 22
      IP address: 10.2.7.7
      Neighbor's IP address: 10.2.7.2
      Local interface index: 334, Remote interface index: 334
    IS extended neighbor: Router_6.00, Metric: default 100 SubTLV len: 22
      IP address: 10.6.7.7
      Neighbor's IP address: 10.6.7.6
      Local interface index: 333, Remote interface index: 33
  No queued transmissions
VIEWING THE ROUTING TABLE BEFORE THE CHANGE
To summarise then, the IP ranges configured on a link are quite separate from the topology information itself.
This means that when IS-IS runs the Shortest Path First algorithm to find a best path from A to Z, SPF doesn’t care about the IP addresses on those links. They’re not taken into account when deciding the best path. In the router’s mind, the topology is just a graph, with uni-directional links (or “edges”, as graph theory would call them) to other routers.
When you think of it like that, it actually makes sense that the IP ranges on these point-to-point links shouldn’t matter when running SPF.
With all of that in mind… is there actually a reason that Router_1 needs to know about (for example) 10.2.3.0/24, the link between R2 and R3? After all, R1 knows the loopback IPs of those routers. What value does it bring to store all these point-to-point prefixes in the database, when the topology is all that’s really needed?
Sure, this is a relatively small network – but scale it out to a network of hundreds of routers. That’s a lot of prefixes for each router to store, which you probably don’t have any actual need to keep in you routing tables. When does Router 1, or indeed anyone, actually need to do anything with 10.2.3.3, the IP address on Router_3’s interface?
At this point, you might have thought of a few reasons why you might want to send traffic to this interface. Hold onto those reasons for now. In a moment we’re going to see the configuration which removes the point-to-point prefixes from IS-IS. Once they’re removed, we’ll then see how this affects a few of the use cases you might have come up with, in your mind, via your brain.
Before we do, let’s check Router_1’s routing table before our change, by looking at all the of IP prefixes we’ve learned from IS-IS, that are in the main inet.0 table:
root@Router_1> show route protocol isis terse table inet.0
inet.0: 29 destinations, 29 routes (29 active, 0 holddown, 0 hidden)
+ = Active Route, - = Last Active, * = Both
A V Destination        P Prf   Metric 1   Metric 2  Next hop        AS path
* ? 10.2.3.0/24        I  18        200            >10.1.2.2
* ? 10.2.7.0/24        I  18        200            >10.1.2.2
* ? 10.3.4.0/24        I  18        300            >10.1.2.2
* ? 10.3.8.0/24        I  18        300            >10.1.2.2
* ? 10.4.5.0/24        I  18        400            >10.1.2.2
* ? 10.4.9.0/24        I  18        400            >10.1.2.2
* ? 10.5.10.0/24       I  18        500            >10.1.2.2
* ? 10.6.7.0/24        I  18        200            >10.1.6.6
* ? 10.7.8.0/24        I  18        300            >10.1.2.2
                                                    10.1.6.6
* ? 10.8.9.0/24        I  18        400             10.1.2.2
                                                   >10.1.6.6
* ? 10.9.10.0/24       I  18        500             10.1.2.2
                                                   >10.1.6.6
* ? 192.168.1.2/32     I  18        100            >10.1.2.2
* ? 192.168.1.3/32     I  18        200            >10.1.2.2
* ? 192.168.1.4/32     I  18        300            >10.1.2.2
* ? 192.168.1.5/32     I  18        400            >10.1.2.2
* ? 192.168.1.6/32     I  18        100            >10.1.6.6
* ? 192.168.1.7/32     I  18        200             10.1.2.2
                                                   >10.1.6.6
* ? 192.168.1.8/32     I  18        300            >10.1.2.2
                                                    10.1.6.6
* ? 192.168.1.9/32     I  18        400            >10.1.2.2
                                                    10.1.6.6
* ? 192.168.1.10/32    I  18        500            >10.1.2.2
                                                    10.1.6.6
In total, there are 11 point-to-point IP ranges in this routing table that have been learned through IS-IS. There are 13 point-to-point links in the network in total, but two of them are directly connected, so Router_1 didn’t learn those through IS-IS.
Let’s see how some configuration can significantly reduce this number.
CONFIGURATION
The configuration that achieves this is actually quite simple. We’re going to add an export policy to IS-IS that does three things:
- First of all, it exports anything we’ve learned by IS-IS.
- Second, it exports any IP addresses configured on our loopback interface.
- Third, it rejects everything else.
This means that all point-to-point IP ranges will be rejected. Let’s take a look:
root@Router_1> show configuration policy-options
policy-statement ISIS_NO_POINT-TO-POINT {
    term EXPORT_ISIS {
        from protocol isis;
        then accept;
    }
    term EXPORT_LOOPBACK {
        from interface lo0.0;
        then accept;
    }
    term REJECT_ALL_ELSE {
        then reject;
}}
NOTE: If you happened to be running IS-IS on a LAN, whether actively or passively, then these LAN ranges won’t be advertised with this configuration. However, that’s easy to fix: you just need to add an extra term matching that interface. In other words, you can customise this policy for your own requirements.
Once the policy is made, we simply add it to IS-IS like this:
set protocols isis export ISIS_NO_POINT-TO-POINT
VERIFICATION
Check this out: our configuration has removed all the point-to-point IP ranges, and kept the loopbacks! Every single remote /24 is now gone from Router_1’s routing table, and the total IPs in the inet.0 table is also smaller as a result.
root@Router_1> show route protocol isis terse table inet.0
inet.0: 18 destinations, 18 routes (18 active, 0 holddown, 0 hidden)
+ = Active Route, - = Last Active, * = Both
A V Destination        P Prf   Metric 1   Metric 2  Next hop        AS path
* ? 192.168.1.2/32     I  18        100            >10.1.2.2
* ? 192.168.1.3/32     I  18        200            >10.1.2.2
* ? 192.168.1.4/32     I  18        300            >10.1.2.2
* ? 192.168.1.5/32     I  18        400            >10.1.2.2
* ? 192.168.1.6/32     I  18        100            >10.1.6.6
* ? 192.168.1.7/32     I  18        200             10.1.2.2
                                                   >10.1.6.6
* ? 192.168.1.8/32     I  18        300            >10.1.2.2
                                                    10.1.6.6
* ? 192.168.1.9/32     I  18        400            >10.1.2.2
                                                    10.1.6.6
* ? 192.168.1.10/32    I  18        500            >10.1.2.2
                                                    10.1.6.6
Let’s go back to R4 again, and check out how it now sees R7’s LSP after this change:
root@Router_4> show isis database Router_7 detail
IS-IS level 1 link-state database:
IS-IS level 2 link-state database:
Router_7.00-00 Sequence: 0x5, Checksum: 0x8437, Lifetime: 1018 secs
   IS neighbor: Router_2.00                      Metric:      100
   IS neighbor: Router_6.00                      Metric:      100
   IS neighbor: Router_8.00                      Metric:      100
   IP prefix: 192.168.1.7/32                  Metric:        0 Internal Up
   V6 prefix: 2001:db8::7/128                 Metric:        0 Internal Up
Well, there it is. All the topology info is still there, but the specific /24s are no longer in any LSP of any router. As you can see, only the loopback IPv4 and IPv6 addresses are being advertised.
WAIT: SO HOW DO TRACEROUTES WORK NOW?
The fact that our routers don’t need to hold as many routes is clearly an advantage. However, your mind is no doubt buzzing with concerns and trade-offs.
One of them might be: how do traceroutes work now? We all know that when a router sends a traceroute, it sources the packet form the outgoing interface. If routers no longer know how to send return traffic to that address, doesn’t this break things?
Yep: it sure does!
On Router_1, let’s traceroute to Router_10:
root@Router_1> traceroute 192.168.1.10
traceroute to 192.168.1.10 (192.168.1.10), 30 hops max, 52 byte packets
 1  10.1.2.2 (10.1.2.2)  2.840 ms  2.370 ms  1.904 ms
 2  * * *
 3  * * *
 4  * * *
 5  * * *
 6  * * *
 7  *^C
root@Router_1>
The first hop works because it’s directly connected. The next hop could be either R3 or R7, because they’re both equal-cost next-hops from Router_2. But which is it? Who can say, when our traceroute is failing.
That’s why you’re going to want this extra command if you decide to deploy this design:
set system default-address-selection
This command tells Junos to source all control plane traffic from its loopback. There’s a few exceptions, but almost everything (and in particular, pings and traceroutes) will now come sourced from the primary loopback IP address by default.
What does the traceroute look like now?
root@Router_1> traceroute 192.168.1.10
traceroute to 192.168.1.10 (192.168.1.10), 30 hops max, 52 byte packets
 1  10.1.2.2 (10.1.2.2)  3.038 ms  2.228 ms  1.762 ms
 2  10.2.7.7 (10.2.7.7)  3.024 ms  2.067 ms  2.644 ms
 3  10.7.8.8 (10.7.8.8)  4.301 ms  4.073 ms  3.447 ms
 4  10.8.9.9 (10.8.9.9)  189.247 ms  117.038 ms  4.525 ms
 5  192.168.1.10 (192.168.1.10)  7.742 ms  5.650 ms  5.796 ms
Marvellous! It works. Aah, it turned out it was going via Router_7 all along. That’s the beauty of a nice IP scheme in your lab: I was able to tell this just from looking at the IPs in the traceroute.
Notice by the way that although we removed all remote point-to-point routes from Router_1’s topology, Router_1 still accepts return traceroute packets from IPs that it doesn’t know. As such, the traceroute itself is still perfectly readable.
Also, remembering that we added this new command to every single router in the network, notice that each each hop’s return traceroute packet still comes sourced from its physical interface. This is good: our new command still keeps traceroutes useful!
HAVE I LOST THE ABILITY TO SSH TO THESE IPs?
However, this does raise a second question.
It is a reasonable requirement that if you saw a problem in a traceroute, you would want to SSH to whichever router in the path lives before the potential fault.
However, this is no longer possible. Router_1 no longer knows how to get to any of these source IPs, so SSH will clearly fail. By extension, your management platforms will also no longer be able to get to any of these IPs, because none of the routers in between know how to get to them.
When deciding whether or not this design could be useful to you, a key question to ask yourself is: what is your reverse DNS strategy?
A very good strategy for an internet provider would be to fully automate it, perhaps with a logic like this:
- You could write a script that logs onto each box every day (or hour, or whatever), and finds all the IPs configured on each physical and virtual interface. Alternatively, you could parse through your daily configuration backups.
- Either way, you could then create a reverse DNS naming convention. For example, in this lab, the script might log onto Router_3 and see that 10.3.8.3 is configured on ge-0/0/3.0. You could replace the slashes with dashes to make it DNS friendly, and generate a reverse DNS record that looks something like ge-0-0-3-dot-0.Router_3.networkfuntimes.com.
- You could then write a script that pushes all of these records to your internal DNS server of choice.
With this system, when you run this traceroute you would also see the name of the box, thanks to your box performing reverse DNS for each hop.
Crucially, you will have also set up your DNS server so that SSHing to “Router_3” takes you to 192.168.1.3, which is indeed an IP address that is advertised throughout the network. This hostname is found in all the reverse DNS records, and as such it removes the need for you to have to actually SSH to a specific interface, just because you saw it in a traceroute.
As you can see, a good reverse DNS strategy is essential if you’re going to remove point-to-point links. Even if you see a random interface IP address in a log file somewhere, you can still find out what it reverse-resolves to, and take it from there.
WHAT IF I WANT TO PING A SPECIFIC INTERFACE FOR TROUBLESHOOTING?
Well, aside from the fact that flooding a router with pings will probably result in lots of packet loss through control plane policing, you can still perform those pings from whatever router is directly connected to your interface of choice.
So for example, Router_1 can no longer ping 10.4.5.5 – but if I were to log onto Router_4, I could definitely ping this IP, because Router_4 is directly connected to Router_5.
What you can’t do is ping it remotely. The trade-off of a smaller routing table is that you will have to spend five seconds SSHing to the box in front of the box you want to ping. Is that a bad thing? Only you can decide that.
SHOULD YOU DO THIS IN YOUR NETWORK?
Nowadays in mid-size service provider networks, it is quite common for every single router to be part of one single backbone IS-IS (or OSPF) topology.
The reason for this is that modern hardware can quite happily handle hundreds of devices in its topological database. Olden days text books will warn you about having more than, like, 50 routers in an area, in case the router sets on fire from the sheer quantity of load you’re placing on it. But in the year 2021 (or whenever you’re reading this, future robot person!), even “affordable” hardware can handle pretty big topologies.
This isn’t limitless, of course. There is still a size that will be too big for a particular device. The point is though that in an ISP network of, say, 300 routers, chances are that even the cheaper hardware in the core will be able to handle a topology that big.
However, be sure to know the difference between “being able to handle a big topology” and “being able to handle a big routing table”. It may be that your router is powerful enough, and has a mature enough IS-IS implementation, to be able to handle large topologies. However, it may still have a small routing table and/or forwarding table, in which case it may be very advantageous to remove unnecessary prefixes from the routing table.
In this case, this solution could very well bring value to you. This solution may help your network to scale to an even larger size.
Having said that, there are trade-offs to consider – as is always the case in networking.
Ultimately, you are removing state from your network by doing this, and this state could be useful to you. You may put yourself at a disadvantage by removing it. In fact, it may be the case that the hardware in your network is so modern and powerful that actually, this solution adds no value at all, because even your weakest routers can handle that many routes.
With that in mind, there is no one-size-fits-all answer to the question of whether this solution works for you. The correct thing to do is to look at your weakest routers, look at the topology, look at the size of the routing table, and talk with your vendor to find out whether those boxes are reaching the limit, or whether your network can grow even more. A lot of vendors don’t have a command that simply says “Tell me how much my routing table is full, as a percentage of its total size”. Why not submit a feature request with your vendor of choice to get them to put this in for you?
And in any case, regardless of whether or not this is right for you, I personally think it’s just fun to know that this exists. Stuff like this helps us to more deeply understand how these protocols work under the hood – and that’s always a good thing.
A QUICK NOTE ON IPv6
The eagle-eyed amongst you might have noticed that there are IPv6 addresses on my loopbacks. I’m running IPv6 on my core links, but only link-local addresses. In other words, there are no globally routable IPv6 addresses on any of my physical interfaces.
root@Router_2> show configuration interfaces | display set | match inet6
set interfaces ge-0/0/0 unit 0 family inet6
set interfaces ge-0/0/1 unit 0 family inet6
set interfaces ge-0/0/2 unit 0 family inet6
set interfaces lo0 unit 0 family inet6 address 2001:db8::2/128
And yet, I am able to ping Router_10’s IPV6 loopback from Router_1:
root@Router_1> ping 2001:db8::10
PING6(56=40+8+8 bytes) 2001:db8::1 --> 2001:db8::10
16 bytes from 2001:db8::10, icmp_seq=0 hlim=60 time=42.077 ms
16 bytes from 2001:db8::10, icmp_seq=1 hlim=60 time=5.456 ms
16 bytes from 2001:db8::10, icmp_seq=2 hlim=60 time=6.287 ms
^C
--- 2001:db8::10 ping6 statistics ---
3 packets transmitted, 3 packets received, 0% packet loss
round-trip min/avg/max/std-dev = 5.456/17.940/42.077/17.071 ms
This works for exactly the same reasons that this new “removing-IPv4-point-to-point-subnets” solution works. I’ve not configured routable IPv6 addresses on my point-to-point links, because I don’t need them. All I need is a loopback address, a topology, and the optional “default-address-selection” command. This is enough to give me full IPv6 reachability between all my nodes. Nice!
THAT’S IT!
Do you use this in your own network? Do you like the look of it? Can you think of other things that this solution might break – and can you think of how you might work around it? Whatever your thoughts, let me know in the comments.
Hey there: thank you very much for reading this post! If you liked this post, I’d love it if you shared it on your favourite social media platform of choice. The more readers, I get, the more I’m inspired to write more nonsense for you, and for only you, my dear reader. All of this was done specifically and especially for you.
If you fancy some more learning, take a look through my other posts. I’ve got plenty of cool new networking knowledge for you on this website, especially covering Juniper tech and service provider goodness.
It’s all free for you, although I’ll never say no to a donation. This website is 100% a non-profit endeavour, in fact it costs me money to run. I don’t mind that one bit, but it would be cool if I could break even on the web hosting, and the licenses I buy to bring you this sweet sweet content.
If you’re on Mastodon, follow me to find out when I make new posts. (2024 edit: I’m also on BlueSky nowadays too. I was once on Twitter, but I’ve given up on it, on account of… well, I don’t need to finish that sentence, do I.)
Give me a follow, and watch your life improve by up to 420%.


Oh how I have tried this so many times. What ends up happening is that some box does not allow me to set the source for NTP, RADIUS and at times DNS meaning these services fail as the network has no clue how to route the return traffic.
I wish that router software allowed for setting a loopback as the home address so that all services would bind to it by default.
You’ll be delighted to hear that you can indeed do this: https://www.juniper.net/documentation/us/en/software/junos/transport-ip/topics/ref/statement/default-address-selection-edit-system.html