
JUNOS FOR IOS ENGINEERS: HOW DO YOU CONFIGURE A JUNOS ROUTER?
Welcome to Part 2 in my ongoing series where I teach Cisco IOS engineers how to use Junos: the mighty operating system that powers pretty much every Juniper device, from routers to switches to firewalls. Some people even say that Junos powers the sun itself! Don’t listen to those people though: they’re idiots.
In Part 1 we gave ourselves a challenge to configure both a Cisco and a Juniper router, according to some very specific OSPF requirements. In doing so, we discovered some problems with remembering the logic of how to configure OSPF in Cisco IOS. We then learned how Juniper gets around those problems, thanks to its predictable hierarchy.
We learned how to read a Juniper configuration, and in doing so we saw that Junos arranges things in a consistent order, as opposed to Cisco IOS where OSPF config could be in a few different places within the one configuration file. But although we touched on how to read a config, we only scratched the surface of how to actually configure Junos.
That’s where we pick up our story today. In this post we’re going to add, remove, change, and rollback configuration in Junos – and we’re going to see how we can do it in such a way that mistakes can be spotted and fixed before they cause any problems, and before they even go live.
And hey: along the way we might even find out who our Dad really is! I mean, it’s unlikely – but there’s a chance, right? So let’s do it!
A REMINDER OF OUR REQUIREMENTS
 If you’ve not read Part 1 yet then I very highly recommend that you click here, give it a read, and then come back. And just to be clear: when I say that I “very highly” recommend it, what I mean is that I’m very high as I recommend it.
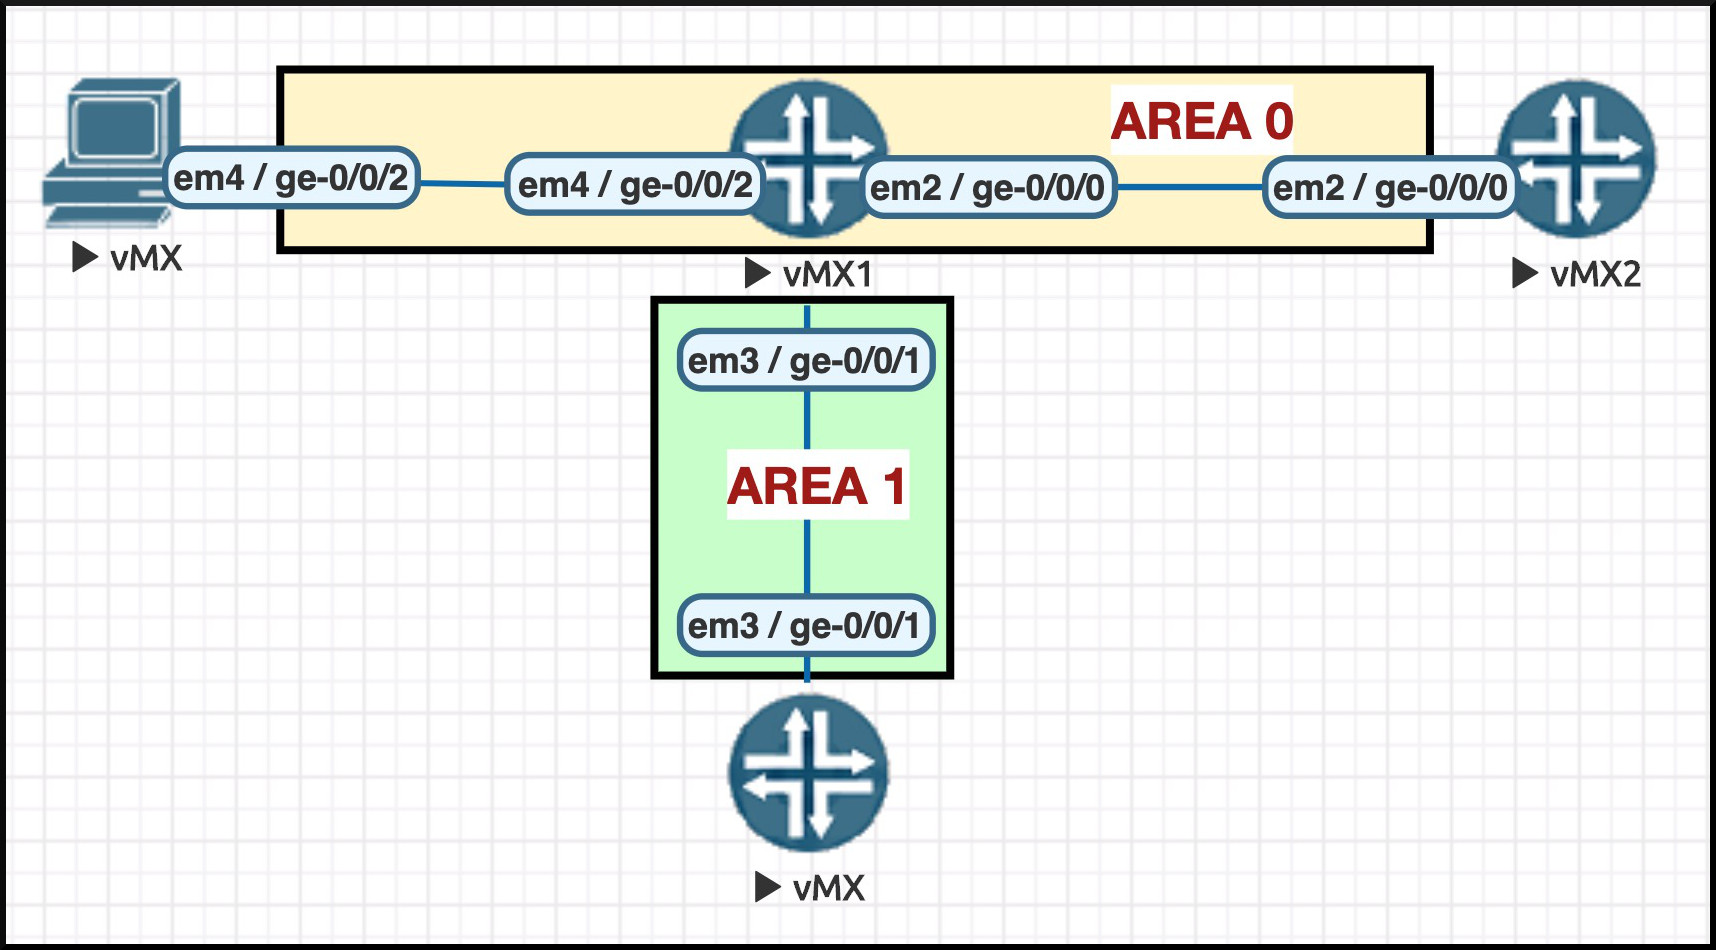
But forget you read that: if you cast your eyes to the right you’ll see a reminder of the topology we’re working with. Then, below you’ll see the requirements we gave ourselves last time:
- Explicitly set the Router ID to be 1.1.1.1 (the IP address of our loopback)
- Configure OSPF directly onto all interfaces, including the loopback
- All interfaces go in area 0, apart from FastEthernet0/1 which goes into area 1
- Configure FastEthernet1/0 and the loopback as passive interfaces
- Make area 1 a stub area
- Change the cost on FastEthernet0/0 to be 25
- Set the reference-bandwidth to 100Gb
We’ll put the Router ID to the side for now, because we covered that in the last post Today, let’s focus on how Cisco and Juniper differ in terms of the configuration files themselves. I’m really excited to tell you about this, because if you’ve only ever used Cisco IOS before then you’re going to really appreciate the benefits Junos brings!
If you have a physical or virtual lab of your own, spin it up and play along. And if you don’t, did you know that Juniper gives you a variety of pre-configured virtual labs that you can spin up and play with, completely for free? Click here to check out the pre-made OSPF topologies at Juniper vLabs!
CISCO IOS: RUNNING-CONFIG AND STARTUP-CONFIG
Before we start configuring OSPF, I want to show you something very important about Junos.
In the Cisco IOS world you’re used to the idea of a router having two separate configurations. One is called the running-config: it’s the current live config on the box. As soon as you go into configuration mode and change something, for example the hostname, then as soon as you press the return key you’ll see the hostname change immediately, right in front of your eyes. In doing so, you’ve created a difference between this running-config, and the startup-config, ie the config that’s saved, the config that will be loaded when the box is booted.
In Cisco IOS your config isn’t saved until you type something like “write“, or ‘copy run start“. You’ve probably been told that an “advantage” of this process, as opposed to the config saving automatically as you go, is that if you’re configuring the box remotely and you make a mistake so catastrophic that you lose access to the box, you can “fix” this by rebooting the box. The changes you’ve made to the running-config are scrapped, and the correct, working startup-config is loaded.
This means that the running configuration can actually be vastly different to the saved configuration, and the two become ever more different with every command you type – until you finally save your work, at which point the running-config is copied to the startup-config, and the two are identical again.
Junos also has two separate configurations – but that’s where the similarity between IOS and Junos ends. In fact, Junos does things very differently indeed. And hopefully, by the end of this post, you’ll agree with me that Junos does it way, way better.
JUNIPER JUNOS: ACTIVE CONFIG VS CANDIDATE CONFIG
Let’s go into configuration mode:
root@Router1> configure
Entering configuration mode

[edit]
root@Router1#
Notice that it’s just “configure“, not “conf t“. In fact, even though the output above says that I typed “configure“, I actually just typed “conf“! Just like IOS, Junos takes the shorter form of the command – but it auto-completes it to the longer form of the word, which is so incredibly lovely when you’re reading through pages and pages of your old previous commands! It’s little quality-of-life things like this that make reading your CLI history so much less stressful.
Just like in IOS, our prompt changes when we go into configuration mode. It changes from > to #. In addition, we also see the word “[edit]” above our router’s hostname. Junos is even kind enough to put a blank line between each set of commands we type, which is hella handy when you’re scrolling through lots of CLI output.
Speaking of the router’s hostname, let’s try changing it so we can see how Junos does it differently to IOS.
In Cisco the command would be something like “hostname Router_1“. In Junos all our config commands start with the word “set“, followed by wherever we want to go in the hierarchy. You learned last time that the “host-name” is found in the “system” hierarchy, and as such our command is this:
[edit]
root@Router1# set system host-name Router_1

[edit]
root@Router1#
Hmm, that’s interesting: we typed a command to change the hostname – but the hostname stayed the same. What gives? Make sure you’re sitting down: the following explanation is going to change the way you do networking forever.
The current, live, running configuration on the box has a special name: it’s called the Active Configuration. However, instead of Junos pushing our configuration changes directly to this live active configuration, Junos instead pushes the change into a thing called the Candidate Configuration.
Every single configuration change you type gets stored in this Candidate Configuration, and all of your proposed changes stay there until you choose to deploy them all at once to your live environment. It is, in a very literal sense, a candidate to become your new active configuration. None of these changes are live, which gives you the chance to make multiple changes before deploying them – and crucially, it gives you the chance to review your changes first, allowing you to correct fatal mistakes before they go live!
CHECKING OUR WORK SO FAR: “SHOW | COMPARE”
Now that we’ve added the configuration to change our hostname, let’s make an extra change, and tell our box what name-server to use to resolve domain names. Then, let me introduce you to the command we use to compare our candidate configuration to the active configuration:
root@Router1# set system name-server 8.8.8.8

[edit]
root@Router1# show | compare
[edit system]
-  host-name Router1;
+  host-name Router_1;
+  name-server {
+      8.8.8.8;
+  }

[edit]
root@Router1#
Did you notice that I didn’t type “show configuration | compare“, but just “show | compare“? When you’re in configuration mode, the “show” command acts a little differently to the way it acts in operational mode.
When you’re in configuration mode, typing “show” on its own actually shows you the entire candidate configuration, combining existing configuration with your new changes. By contrast, using “show | compare” allows you to zoom in on just the pieces of the configuration that are changing.
(It’s super handy to remember that the “show” command acts differently depending on whether you’re in operational or configuration mode. For example, in your lab try typing “show interfaces” in configuration mode. Rather than showing you interface stats (as you’d expect to see from this command in operational mode), you’ll instead see the full configuration of the “interfaces” stanza in the candidate configuration.)
Believe me: “show | compare” will soon become your new best friend. It’s so easy to see what we’re adding and removing! As you can see from the output above, every line of config we’re adding has a plus sign by it. Equally, if any lines are going to be removed from our configuration, you’ll see a minus sign by them.
Now, remember the absolute magic of all of this: that at the moment, none of these changes have been saved. None of these changes have gone live. They all still exist only in the candidate configuration. They are all proposed changes, ready to be made live whenever the heck I feel ready. Maybe I’ll have a sandwich first. Maybe I’ll go on holiday. I’ll make them go live in my own damn time!
And when I am ready, all I have to do is save my changes, at which point the config is pushed from candidate to active. We’ll learn how to do that in a moment. For now though, let’s learn how to correct mistakes.
(Side-note: in IOS, when you’re in config mode you can type something like “do show interface” to access operational mode commands without leaving config mode. The equivalent in Junos is “run show interfaces“.)
CORRECTING MISTAKES BEFORE THEY CAUSE AN OUTAGE
What if I realise that I typed my new host-name incorrectly? There’s three ways to fix it. Three!! What a time to be alive. (Okay, yes, a hostname wouldn’t cause an outage – but what we’re about to learn applies to everything, including all of the many weird and wonderful ways that we can break out network!)
In this particular situation, the first option is simply to type the command again with the correct host-name. In situations where you can only have one of something, like a hostname, re-typing the correct command is enough to overwrite what you previously typed. You’ll notice in the output below that we can correct our host-name like this. When we check the candidate configuration we see that the old, incorrect hostname is gone:
[edit]
root@Router1# set system host-name Router_Chris

[edit]
root@Router1# show | compare

[edit system]
-  host-name Router1;
+  host-name Router_Chris;
+  name-server {
+      8.8.8.8;
+  }

[edit]
root@Router1#
It’s worth nothing that this method doesn’t work with incorrect IP addresses on interfaces, because Junos lets you have multiple IP addresses on an interface – and as such, typing a “replacement” IP address will actually give you two IP addresses on the one interface! That’s quite a different behaviour to what you’re used to in Cisco IOS land, right? In Cisco IOS, typing a new IP address on an interface will simply replace the old address. In a few weeks time we’ll go into more detail on this, when I make a post all about interfaces in Junos.
The second way to correct mistakes is to delete the incorrect config. In the same way that Cisco IOS has the “no” form of every command, in Junos you type “delete“:
[edit]
root@Junos_Router_1# delete system host-name Junos_Router_1
(If you typed this specific command it would leave the device without a hostname, which may or may not be the right way for you to fix your mistake! Still, it shows the point: anything you can “set“, you can also “delete“.)
The third way to fix a mistake is to completely scrap all ofyour changes, and start again. Trust me: when you start doing more complicated things , like writing routing policy or firewall filters, you’ll be doing this a lot. It’s often easier to just scrap everything and start from scratch!
You’re probably wondering whether scrapping all your changes is complicated? Nope: it’s one command. Try typing “rollback“, and see what happens:
[edit]
root@Router1# rollback
load complete

[edit]
root@Router1# show | compare

[edit]
root@Router1#
And with that, all of our proposed changes are gone. When your “show | compare” command comes back with nothing, it means the candidate configuration is exactly the same as the active configuration. It’s as if we never typed anything! No-one need ever find out about our terrible mistakes. From here we can either start again, or just log off and go home. Ask your line manager for the correct course of action here.
Are you starting to fall in love with Junos? I thought you might be.
LET’S ADD OUR OSPF CONFIG IN JUNOS
In Part 1 we already saw what our finished Junos OSPF config will look like. I’ve put it again below, for your convenience. The command I typed below actually shows me the entire contents of our configuration – but notice that I’ve deleted a load of it, so we can skip straight to the bit we’re interested in:
root@Junos_Router_1> show configuration
{I cut about 50 lines of output from here}
protocols {
    ospf {
        reference-bandwidth 100g;
        area 0.0.0.0 {
            interface ge-0/0/0.0 {
                metric 25;
            }
            interface ge-0/0/2.0 {
                passive;
            }
            interface lo0.0 {
                passive;
            }
        }
        area 0.0.0.1 {
            stub;
            interface ge-0/0/1.0;
        }
    }
}
In Part 1 we also got a taste for how we make configuration changes, when we learned that configuring OSPF on an interface is as simple as this:
[edit]
root@Router1# set protocols ospf area 0 interface ge-0/0/2.0 passive
If you compare that command to the hierarchy-style configuration above, you’ll notice that they line up perfectly! In our configuration file we see a top-level “protocols” hierarchy, of which OSPF is a section of it. Area 0 is a section within OSPF, and “interface ge-0/0/2.0” is a section within Area 0. And the finally, the word “passive” is indented under “interface ge-0/0/2.0“.
With one single command we defined area 0; we put interface ge-0/0/2.0 into it; and we made the interface passive. One command! One single, logical, predictable command. And as you can imagine, putting ge-0/0/1.0 into area 1 is just as easy:
[edit]
root@Router1# set protocols ospf area 1 interface ge-0/0/1.0
Did you notice that I didn’t say “area 0.0.0.1“? Just “area 1″? Junos fixes that for us. Nice!
EASILY WORKING OUT WHERE TO ADD CERTAIN PIECES OF OSPF CONFIG
I’ve mentioned a few times that once the hierarchy clicks, it makes guessing the command you need very easy indeed. As an example, let’s take a look at all the interface-specific OSPF options.
You can see below that once you understand the hierarchy, it’s ridiculously easy to work out how to do things like change the hello and dead intervals, or add BFD or authentication, set an interface to passive, change the DR priority, and so much more. For me personally, there are so many things in the output below that would have left me scratching my head if I had to do this in Cisco IOS. By contrast, in Junos we can pretty much guess the command we’d need!
root@Junos_Router_1# set protocols ospf area 0 interface ge-0/0/2.0 ?
Possible completions:
  <[Enter]>            Execute this command
+ apply-groups         Groups from which to inherit configuration data
+ apply-groups-except  Don't inherit configuration data from these groups
> authentication
> bandwidth-based-metrics  Configure bandwidth based metrics
> bfd-liveness-detection  Bidirectional Forwarding Detection options
  dead-interval        Dead interval (seconds) (1..65535)
  demand-circuit       Interface functions as a demand circuit
  disable              Disable OSPF on this interface
  dynamic-neighbors    Learn neighbors dynamically on a p2mp interface
  flood-reduction      Enable flood reduction
  hello-interval       Hello interval (seconds) (1..255)
  interface-type       Type of interface
  ipsec-sa             IPSec security association name
> ldp-synchronization  Advertise maximum metric until LDP is operational
  link-protection      Protect interface from link faults only
  metric               Interface metric (1..65535)
> neighbor             NBMA neighbor
  no-eligible-backup   Not eligible to backup traffic from protected interfaces
  no-interface-state-traps  Do not send interface state change traps
  no-neighbor-down-notification  Don't inform other protocols about neighbor down events
  node-link-protection  Protect interface from both link and node faults
> passive              Do not run OSPF, but advertise it
  poll-interval        Poll interval for NBMA interfaces (1..65535)
  priority             Designated router priority (0..255)
  retransmit-interval  Retransmission interval (seconds) (1..65535)
  secondary            Treat interface as secondary
  te-metric            Traffic engineering metric (1..4294967295)
> topology             Topology specific attributes
  transit-delay        Transit delay (seconds) (1..65535)
  |                    Pipe through a command
HOW TO SPEED UP TYPING “SET” COMMANDS
Even though our list of requirements for OSPF might seem quite demanding, the actual config is fairly small. As such, typing all of this out wouldn’t take too long at all. In terms of the actual words I’d have to type, the end result looks like the output below. I’ve put the “hierarchy” version of the config format underneath, so you can compare the two.
By the way, we’re learning something new from the output below: notice that we can add a pipe at the end of “show configuration“, and add “display set” to see the configuration as a series of “set“commands! That’s right: you have the choice of looking at configuration in the normal “hierarchy” format, or in “set” format – whichever one you prefer.
root@Junos_Router_1> show configuration protocols ospf | display set
set protocols ospf reference-bandwidth 100g
set protocols ospf area 0.0.0.0 interface ge-0/0/0.0 metric 25
set protocols ospf area 0.0.0.0 interface ge-0/0/2.0 passive
set protocols ospf area 0.0.0.0 interface lo0.0 passive
set protocols ospf area 0.0.0.1 stub
set protocols ospf area 0.0.0.1 interface ge-0/0/1.0 ge-0/0/1.0

Junos commands might initially look like they involve a little bit more typing than the equivalent commands in Cisco, and to a certain extent that’s sometimes true – but the trade-off is an incredible readability, and more importantly a very satisfying predictability!
As it happens though, there’s two ways to vastly speed up typing these commands.
You’ll know from Cisco IOS that you can press the up key to go back to your last command. We can do the same thing in Junos, which allows me to avoid having to type type “set protocols ospf” over and over – I can just press up to go to my last command, delete the 2nd half of the text, and type in the new bits. Doing that means that it won’t take too long at all to type all those commands out.
But as it happens, there’s an even easier way of doing it. Instead of “set“, try typing “edit protocols ospf“:
[edit]
root@ Junos_Router_1# edit protocols ospf

[edit protocols ospf]
root@ Junos_Router_1#
Notice that the word “[edit]” has changed to “[edit protocols ospf]“. You’ve just drilled down in the hierarchy! Now you’re here, any “set” commands you type are applied only at this level of the hierarchy – meaning you don’t need to type “set protocols ospf” over and over.
Let me show you what that could look like in practice. In my CLI output below, notice how I navigate around the hierarchy using the “edit” command, along with “up” to go up one level of the hierarchy, and “top” to go to – you guessed it – the top of the hierarch!. Pay attention to the “[edit]” prompt above my hostname, and notice how it changes. Once again I’ll show you the end result, so you can really compare the two:
What we’ve learned here is that if you’re comfortable just using “set” commands, that’s absolutely fine! But if you want to take things a bit deeper, you can use the “edit” command to manipulate the hierarchy as if you were a conductor of a grand orchestra. You’ll especially feel like a wizard when you start to create firewall filters, which are the Juniper equivalent of IOS access lists. These filters allow us to have multiple terms, in the same way that access-lists have multiple lines for different match conditions. And when we come to play with those, being able to zip around the hierarchy is honestly game-changing.
SAVING OUR CONFIG – FOR NOW
We’re going to talk more about saving configurations in next week’s post – because once again, Junos gives us some real power by letting us save in different ways, so much so that it will take an entire post of its own to truly show you that power! For now, just know that you can save your work by typing “commit“.
Remember: until you type this, nothing is saved, nothing is live, nothing is pushed to production. You can make as many changes to the candidate configuration as you like, you can delete individual lines, and you can of course “rollback” all your changes too! In Cisco IOS land this would be impossible: after all, each change goes live as soon as you make it. By contrast, in Junos you can make hundreds and hundreds of changes, fix mistakes – and then “commit” whenever you’re ready, fully confident that things are exactly how you want them to be. How cool is that?!
I’d been using Cisco IOS for the best part of eight years before I first touched Junos. And when Junos actually clicked for me, I couldn’t believe I’d spent eight years thinking it was acceptable to use a network OS that forces you to make config live the moment you press return.
The “commit” command saves your work and keeps you in configuration mode. Alternatively, check out the command below which saves your work and then takes you back to operational mode:
[edit]
root@Junos_Router_1# commit and-quit
commit complete
Exiting configuration mode

root@Junos_Router_1>
And with that, all of our changes are saved: the candidate configuration is pushed to the active configuration. Did it work? Before we saved we had no OSPF configuration on the box. Whereas now, as you can see below, we have OSPF neighbors!
root@Junos_Router_1> show ospf neighbor
Address          Interface              State     ID               Pri  Dead
10.1.2.2         ge-0/0/0.0             Full      2.2.2.2          128    34
10.1.3.3         ge-0/0/1.0             Full      3.3.3.3          128    34
Notice that the “show ospf neighbor” command is really similar to the one you’re familiar with in Cisco IOS – just without the word “ip” in it. In fact, you’ll often find that in Junos. Not always, but often. If you’re on a Junos box and you want to “show” something, try the Cisco command without the word “ip” in it. Chances are it’ll do the job!
THAT’S IT!
There’s so much more I could tell you about saving configurations – but we’ll save that for Part 3 (click here to read it!), so we can really go to town on it.
For example, it turns out that we can actually roll back to any number of previous configurations! We’ll also learn how to see what’s in those older configs – and how to pick and choose the bits we want. We’ll even find out a way to get the box to roll back to the last configuration automatically if we don’t confirm our changes – meaning that if we do indeed take the box down by accident, we only have to wait a single minute for things to go back to a working state. Much better than the Cisco IOS “solution” of rebooting the entire box! Trust me: you won’t want to miss the next post in this series.
If you’re on Mastodon, follow me to find out when I make new posts. (2024 edit: I’m also on BlueSky nowadays too. I was once on Twitter, but I’ve given up on it, on account of… well, I don’t need to finish that sentence, do I.)
And if you fancy some more learning, take a look through my other posts. I’ve got plenty of cool new networking knowledge for you on this website, especially covering Juniper tech and service provider goodness.
It’s all free for you, although I’ll never say no to a donation. This website is 100% a non-profit endeavour, in fact it costs me money to run. I don’t mind that one bit, but it would be cool if I could break even on the web hosting, and the licenses I buy to bring you this sweet sweet content.
If you’re enjoying this series then I’d love love LOVE you to share it on your favourite social media of choice, or even to email it directly to folks who you think could benefit from some IOS-to-Junos pointers. Until then, thank you so much for reading, and see you next time!


This is amazing – thank you so much! Regrettably we’re moving from Juniper to Cisco by the end of the year – so I’ll be reading this to learn it the other way round 🙁 Take care, Chris!
Nooooo that’s a sad story! I hope that you’re able to convince them to be mixed-vendor. Keep on labbing up Junos stuff, so that if a new opportunity comes up then you’ll be able to hit the ground running. Best of luck!