

Junos: IS-IS Study Notes, Part 3 – Interfaces, Metrics, the DIS, and Pseudonodes
Welcome to part 3 in my award-winning (I gave myself an award) series of blog posts introducing you to IS-IS, my favourite interior gateway protocol of them all.
In Part 1 (which you’re probably going to want to read before you start this one) you got the overview of it, including how it’s similar to OSPF, how IS-IS levels are the equivalent of OSPF areas, and how it uses the shortest-path first algorithm. You also saw a really basic configuration.
Then in Part 2 we had a look at how IS-IS forms adjacencies, the four kinds of message it can send, and what a Link State PDU (LSP) looks like – the building blocks of the topology.
You’re a good and diligent student, and your reward is some super cool technology in this post. Today I’m going to show you the difference between point-to-point and broadcast interfaces, and I’m going to show you the IS-IS equivalent of the OSPF designated router.
I’m also going to show you how metrics work. IS-IS and OSPF were both built in the dark ages, and so both of them do metrics in weird ways that we need to change. But that’s fine – you just configure it once, and forget about it. I’ll show you all the “deets” (cool way of saying details I made up) so you’ll be in no doubt at all about it.
Ready? Then let’s do it!
POINT-TO-POINT INTERFACES
There are just two kinds of interface in IS-IS: point-to-point and broadcast.
Just like OSPF, an Ethernet interface will default to being a broadcast interface. If your Ethernet interface is actually point-to-point, you can configure it as such to make things a bit more efficient, because there will no longer be a need for a DIS on the link. I will explain what a DIS is very, very shortly.
The configuration is easy:
set protocols isis interface ge-0/0/0.0 point-to-point
Simple as that!
A REMINDER: OSPF DESIGNATED ROUTERS
On a broadcast network, OSPF elects a Designated Router. This achieves two things.
The first is to make the topology more simple to understand. If you’re not sure why this is, I’ll explain it in a moment when I introduce you to the concept of a pseudonode.
The second is to handle advertising LSAs. In a network of ten routers on a shared LAN segment, all OSPF devices will only become “fully adjacent” with the DR, not with each other. They then send their LSAs to the DR via a special DR-only multicast address, at which point the DR then re-advertises them to all the routers in the network.
This is actually kind of inefficient, because everything has to be sent twice.
This is also part of the reason that non-DR routers on the LAN don’t become fully adjacent with each other. If they did, they would end up exchanging LSAs with each other. By staying in the “2way” state, they never actually exchange LSAs with each other.
This is also why a backup DR is elected. Non-DR routers send their LSAs to a multicast DR-only address – and if there’s only one device receiving them, then it would cause a bit of chaos when a new DR is elected, because everything would need to be re-advertised to the new DR, and then re-re-advertised back to all the non-DR routers.
As such, a backup DR is used. Both the DR and the BDR will become fully adjacent with all non-DR routers, and listen in on all the LSAs. If the DR disappears, the backup DR can immediately take over, because it already has all of the LSAs, and is already fully adjacent with all the other routers.
Pff. Blimey. Okay, let’s see how IS-IS does things more betterer. (Woah, my spell check seems to think that betterer is a word. That’s my kind of spell checker!)
DESIGNATED INTERMEDIATE SYSTEM (DIS)
In IS-IS the DR is called the Designated Intermediate System – which makes sense, because Intermediate System is its name for a router,
The mechanics are a bit different to OSPF.
In IS-IS, a router multicasts its LSPs directly to all the routers on the LAN. They don’t need to be re-advertised by the DIS. Way more efficient! Instead of sending them twice, they are just sent once.
To make sure that every router’s database is correct, the DIS sends out a CSNP, a Complete Sequence Number PDU, every 10 seconds so that all routers can be sure that they do indeed have the latest and greatest information.
For that reason, there’s no need for a backup DIS. All routers take care of sending their own information to the LAN. If the DIS disappears, someone else just takes charge of sending the CSNP.
Just like in OSPF, each router has a priority which is used to elect the DIS. You can see this priority number in the IS-IS Hello packet capture above. The default in Junos is 64 – and just like OSPF, the numerically highest priority wins.
Unlike OSPF, setting a priority to 0 doesn’t stop a router from becoming the DIS – it just means it’s not very likely.
Also unlike OSPF, if a router comes online with a higher priority, it actually does take over the responsibility of being the DIS.
If two or more routers have the same priority, the highest MAC address used as a tie-breaker. To be more specific, the SNPA (Sub-Network Point of Attachment) is the tie-breaker, which includes both MAC addresses and DLCIs on frame-relay circuits, in case you’re from the past.
Changing an interface’s priority is nice and easy. Notice below that it’s done on a per-level basis.
set protocols isis interface ge-0/0/0.0 level 1 priority 100
PSEUDONODES
 Both the DR and DIS has another important function, which is to make the topology more simple for SPF to deal with.
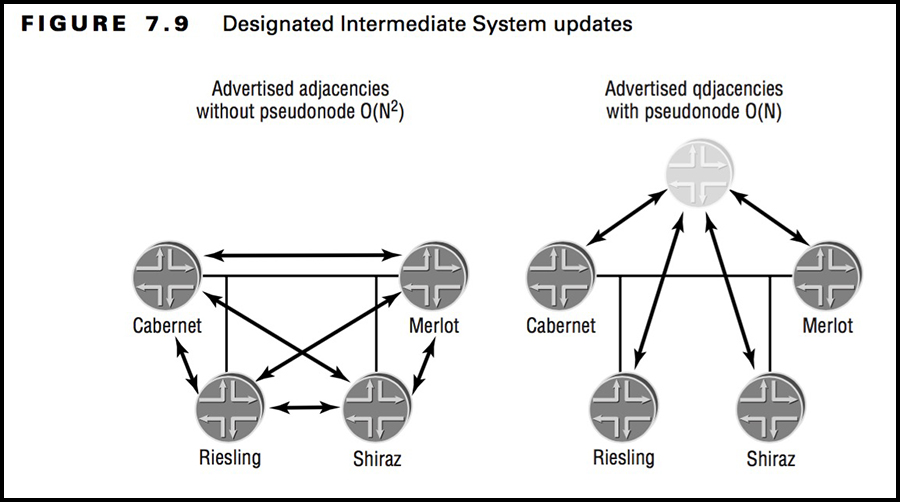
Check out this pic, taken from the old JNCIA guide, which you can and should buy and read!
Notice on the left that there’s four routers on a shared segment, each with an adjacency to each other.
The adjacency itself doesn’t matter, that’s easy to deal with.
Where things become a bit more tricky is when a router needs to run SPF, because the more topological connections there are between routers on a shared segment, the more complicated it becomes for SPF to do its thing.
In fairness, in a network of just four routers it’s not such a big deal – but every router you add makes this exponentially more complicated for SPF to deal with, because it has to process so many more potential paths.
To make this more simple, instead of each router seeming to connect directly to every other router on the shared segment, the DIS and the DR do something clever.
Notice on the right that there’s some kind of invisible ghost router. All four real routers are showing as being connected only to this new pretend router that we made up. There’s a name for this haunted ghost router: it’s called the “pseudonode“, and it’s the role of the DR and DIS to generate it.
It’s weird that OSPF does exactly the same thing, and yet it has no official name for this concept. As such, you’ll often hear IS-IS folks using the term “pseudonode” to describe it in OSPF too.
To show you what this looks like, I’m going to change the connection between R1 and R2 from point-to-point, to the default of broadcast.
Let’s take a look at what R1’s database looks like now, focusing in on the neighbor relationships:
root@R1> show isis database R1.00 detail | match neighbor
   IS neighbor: R1.02                         Metric:      100
   IS neighbor: R6.00                         Metric:      100
Woah, look at that. As far as the topology is concerned, R1 is no longer connected to R2. Instead, it looks like it’s connected to itself!
What does R2 show? I’m going to type this command on R1 too, because every router has exactly the same view of the topology:
root@R1> show isis database R2.00 detail | match neighbor
   IS neighbor: R1.02                         Metric:      100
   IS neighbor: R3.00                         Metric:      100
   IS neighbor: R7.00                         Metric:      100
Aah, okay! So it seems that “R1.02” is the pseudonode, and you can guess that R1 took the responsibility of generating it.
Instead of R1 connecting to R1, it’s now R1 connects to the pseudonode, and the pseudonode connects to R2.
(You can see here a subtle distinction between a “neighbor” and an “adjacency”.)
To quote from the JNCIA guide, “The pseudonode will advertise the neighbor relationships of all routers in its database update; the actual routers advertise a relationship with only the pseudonode”. This takes the strain out of the SPF calculation, because there’s less adjacencies to compute.
One final thing: this pseudonode doesn’t add anything to the metric (the “cost”) between two paths, because all links that are “coming out” of the DIS and DR have a cost of zero. I’ll tell you about metrics in just a second. To prove this, let’s look at the pseudonode in the IS-IS database:
root@R1> show isis database R1.02 detail | match neighbor
   IS neighbor: R1.00                         Metric:        0
   IS neighbor: R2.00                         Metric:        0
There we are. Metric of zero!
METRICS & REFERENCE BANDWIDTH
Like OSPF, IS-IS uses the Shortest Path First algorithm to work out the best route to a prefix.
OSPF’s “cost” is based on the bandwidth of the link. You’ll remember that OSPF was made a million years ago, which is why anything that is 100 Mbps or more needs to have a “reference-bandwidth” set to make it more accurate.
A similar thing is true for IS-IS, but in a different way.
Weirdly, by default IS-IS just gives every link a cost of 10, regardless of the speed! (The one exception is loopback interfaces, which get a metric of 0.) Remember that all of these protocols were made a long time ago, when network requirements were very different.
Don’t worry though: it’s very easy to change this.
First, you can increase or decrease the cost on a per-interface basis. You can even have different metrics for each level:
set protocols isis interface ge-0/0/0 level 1 metric 50
set protocols isis interface ge-0/0/0 level 2 metric 40
A much better idea though is to base the cost on the bandwidth of the link. Just set your “reference-bandwidth” of choice, and you’re “good” to “go”. Nowadays you have to do this in OSPF too, because all links of 100Mb and above all have a cost of 1, so in practice this is really no difference in setting up either protocol in the year 2021. Here’s how you do it:
set protocols isis reference-bandwidth 100g
At the time of writing, 100g is the biggest number you can choose in Junos, though I’m sure this will change in the future, when 100000000g links are the norm.
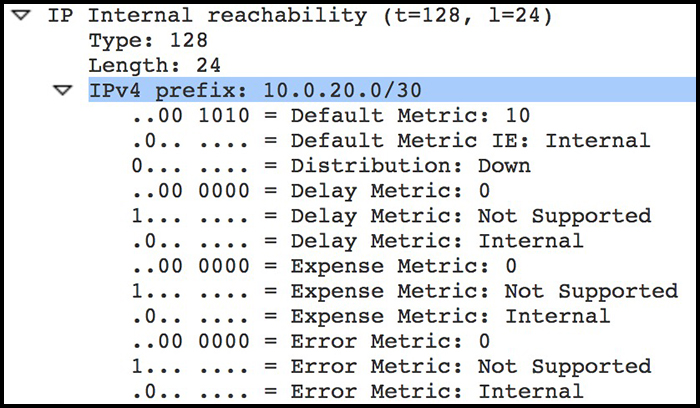 Hey, here’s a fun fact that you’ll never need to know in the real world, but is interesting trivia: there’s actually four costs in an IS-IS TLV. As well as the “Default Metric”, IS-IS also allows you to calculate a path based on the Delay Metric, the Error Metric, and the Expense Metric, which is literally how much money the link costs!
Having said that, even though these numbers are included in the advertisement (as you can see in this picture), these metrics are always set to 0, and no vendor that I know of actually uses them. Still, it tickles me that IS-IS has four costs, including one actual monetary “cost”!
One final thing. See in that screenshot, the first three lines of the IPv4 prefix are to do with the “Default Metric”.
- The first line is 10, which is the metric itself.
- The second line is whether this is internal or external. If this had been redistributed into IS-IS, this bit would be set, so you can tell if a prefix is internal or external – though you’ll see in a moment that this isn’t always true.
- Finally there’s something called the “Down” bit. Hold fire on that for a moment, because we’ll talk about that in Part 4.
WIDE METRICS
Here’s the other way that IS-IS shows its age.
By default, the maximum cost a link can have is 63, because the three original prefix and topology TLVs (IS reachability, IP Internal Reachability, and IP External Reachability) only gave 6 bits to the metric value.
Again, remember that all these protocols were invented a long time ago, when there were pretty much only four routers in the entire world. The idea that networks could have grown to the size and speed of today was the stuff of dreams.
Luckily, the gods of the internet made some extensions that support a 24-bit metric field. These two TLVs are called the Extended Reachability TLV, and the IP Extended Reachability TLV. See, I told you we’d come back to the “extended” bit!
When you use these, it’s called using the Wide Metric, and is configured like this:
set protocols isis level 2 wide-metrics-only
Interestingly, Junos advertises both by default, for backwards compatibility purposes. But even though it advertises both out of the box, it only uses the small metrics by default. So remember to configure the wide metrics if you want to use them, which you definitely do!
SOME RANDOM FUN FACTS ABOUT WORKING OUT THE BEST PATH
Level 1 paths are preferred over Level 2 paths. In other words, if a router has learned a prefix via an L1 router, and it is also learning it via the backbone, it is definitely going to prefer the route within the non-backbone area, because this will (or at least, should!) be where the prefix originally came from.
Internal paths are preferred over external paths. In other words, if an IP is being learned via IS-IS directly, and if that same IP has been redistributed into IS-IS from another protocol, IS-IS prefers its own route.
Finally, when you turn on Wide Metrics, the extended TLVs don’t contain the “external” flag – in other words, IS-IS doesn’t distinguish between internal and external prefixes when you’re using wide metrics.
THAT’S IT FOR NOW!
You are now officially three fifths of the way through this “course” that I wrote for you for free. Wow, that’s pretty nice right? If you want to click here, you might have good time. Entirely up to you of course.
In the mean time, I really hope you’re enjoying yourself, and having your eyes opened to how sweet IS-IS is.
When you’re ready, I’ve got two more parts for you. Click here for Part 4, where you finally get to learn what an IS-IS area is. It’s different to OSPF, so clear your mind of preconceptions, and then click there to see how they work, and how they can generate default routes automatically.
If you’re on Mastodon, follow me to find out when I make new posts. (2024 edit: I’m also on BlueSky nowadays too. I was once on Twitter, but I’ve given up on it, on account of… well, I don’t need to finish that sentence, do I.)
And if you fancy some more learning, take a look through my other posts. I’ve got plenty of cool new networking knowledge for you on this website, especially covering Juniper tech and service provider goodness.
It’s all free for you, although I’ll never say no to a donation. This website is 100% a non-profit endeavour, in fact it costs me money to run. I don’t mind that one bit, but it would be cool if I could break even on the web hosting, and the licenses I buy to bring you this sweet sweet content.


Pingback: Link Propagation 127: Dealing With Snowflake Networks
It’s truly funtimes in your blog and explanation ???, simple understanble, Junos it is now
Haha I’m really glad to hear it helped!
Thanks, not going to lie finding this subject a little tough. I do find you explanations very readable. thank you.