
Junos: IS-IS Study Notes, Part 1 – For Juniper’s JNCIS-SP and JNCIS-ENT Exams
I’m happy to say that I recently passed my JNCIS-SP (Juniper Specialist Service Provider) certification. “Congratulations, Chris”. Aww, thank you very much!
It was a unique experience: as I clicked submit on the final question, the exam centre staff burst in with cake and balloons to celebrate my victory. They’d printed a 10 x 3 banner saying “WELL DONE CHRIS, YOU HERO!” next to a big photo of my face, which required no photoshopping due to my traditionally handsome Hollywood looks. It was very kind of them – though considering that I was still in the exam room at the time, it was also clearly a direct breach of their own strict exam-condition rules. As such, everyone else in the room had their tests immediately null and void.
Anyway. IS-IS is, without a doubt, my favourite interior gateway protocol (IGP). And yet, so few people know how it works! Out of the link-state protocols, most people only know OSPF. And I think that’s a shame, because IS-IS is so much better.
The trouble is, there’s not a huge amount of study materials out there for it.
That’s why I’ve made this series of blog posts, to help you to learn about this brilliant protocol that I prefer to write as IS-IS, and pronounce as “Ai Ess Ai Ess”. You know: on account of ISIS. Gosh darn it, they ruin everything!! Anyway, let’s not let global terrorism stop us from learning about a sweet way to advertise prefixes within your network.
If you’re brand new to IS-IS and you’re keen to learn how it works, then this series of blog posts is especially for you. Let’s do it!
WHO ARE THESE POSTS AIMED AT?
These posts are written for people who already have a passing knowledge of OSPF, and have networking knowledge at around the JCNIS/CCNA level.
You don’t need to be an expert, but you do need to know what an OSPF area is, and how OSPF uses LSAs to advertise information. If you’ve got a JNCIS/CCNA level knowledge of OSPF, you’re good to go.
This lesson is split into five parts.
- In this first post we’ll talk generally about how IS-IS works. We’ll compare it to OSPF; we’ll talk about what the h*ck (heck) Level 1 and Level 2; we’ll explain the addressing system; and we’ll look at a basic config. It’s the start of your new love affair with a cool protocol!
- In Part 2 we’ll introduce the different packet types, and take a deep look into what an LSP is – the building blocks of the topology.
- When you’re ready I’ve got a Part 3 for you, where we’ll look at IS-IS metrics, the IS-IS equivalent of the designated router election, and something cool called the “pseudonode”.
- Hey guess what: in Part 4 I’m going to explain the idea of IS-IS areas. This doesn’t mean the same thing as an OSPF area, and it’s a little bit tricky to understand at first, but don’t worry: I’m very good at explaining things. You’re welcome!
- And finally, in the fifth and final part I’ll be showing you how to verify that IS-IS is up, how to troubleshoot it, and how to read the IS-IS database. And as a bonus, if you’re well behaved, I’ll even tell you the secret to eternal youth and happiness. Wow!
In total, these posts will take you about an hour to read. In the grand scheme of things, that’s really not very much of your time to give up in exchange for becoming a master of a brand new protocol, right?
HOW DOES IS-IS WORK?
IS-IS stands for Intermediate System to Intermediate System.
It’s a routing protocol you’ll use for advertising your own IP addresses throughout your own network – in other words, it’s an Interior Gateway Protocol, or IGP.
The protocol was invented by the folks in the ISO, the International Organization for Standardization. “Intermediate System” is their name for a router. In other words, the protocol is “Router to Router”. Or “Friend to Friend”, as I like to call it.
The basics are easy to understand, without even learning a single bit of theory:
- You configure IS-IS on the relevant interfaces.
- The router sends out Hello messages, and forms adjacencies with any routers running IS-IS on the other end of the link.
- The routers tell each other what links and prefixes they know about.
- The routers pass that knowledge on to their own neighbors.
- The end result is that every router in the network knows everything about every other router in the network.
- This information helps each router to build a complete topology of the network.
- Both OSPF and IS-IS use Dijkstra’s Shortest Path First algorithm to find the best route, using this topology information. If you’ve already learned about SPF in your OSPF studies, then you’re 80% of the way towards understanding IS-IS.
Everything you read there is exactly the same as what you’ve learned about OSPF. However, IS-IS often uses different terminology for the same or similar concepts. It also does some things in slightly different ways – and almost always, that different way is, in my opinion, better than the OSPF equivalent.
When it comes to the blocks of data that contain the topology information, OSPF calls them LSAs, or Link-State Advertisements.
By contrast, IS-IS uses the term LSP, or Link-State PDU. You may remember PDU from your spanning tree (urgh) studies – it stands for Protocol Data Unit, which basically means a packet. (Older network engineers will twitch at me saying that, but it’s close enough.)
Whether you’re using LSAs or LSPs, you can think of them as like the pieces of a nerdy jigsaw puzzle. You can each each router’s LSP, and piece them together to build the entire network topology.
Each router generates an LSP for itself, which is flooded throughout the network. These LSPs contain information like the Router ID, the links connected to the router, the IPs on the router, and the metric (or “cost”) on those links. You may recall that numerically lower metrics are better, so a path with a cost of 400 is better than a path with a cost of 2500. The faster the link, the lower the cost.
Hey, here’s a cool thing: IS-IS LSPs even contain the hostname of the router. That means that when you’re looking at adjacencies, or looking inside the IS-IS database, you can actually see the name of the adjacent device! You have no idea just how helpful this is. It makes troubleshooting like ten times easier than OSPF. I’ll show you what that looks like later in this series, and I can’t wait for you to see it.
IS-IS LSPs ARE SO EASY
You may remember in OSPF that there’s a lot of different kinds of Link-State Advertisement. Router, Network, Summary, External, yada yada yada. You also had to spend precious hours of your short life memorising stub areas, not so stubby areas, totally stubby areas, along with which LSAs are allowed in which areas, and why. It’s pretty confusing and tedious, and many people find it difficult.
Well, good news for you: IS-IS does away with all of that.
There’s just one kind of LSP, which itself can contain any information you like.
There’s also basically just four kinds of message: hello messages, LSP advertisements, and then two kinds of message that routers use to check that they’ve got all the latest and greatest LSP info. I’m oversimplifying a little bit there, but not by much.
Honestly, you’re going to look at IS-IS messages and then wonder why on earth OSPF had to be so complicated. In Part 2 I’ll show you these messages, and we’ll take a deep look at an LSP too.
TWO OTHER RANDOM QUICK THINGS
First, both OSPF and IS-IS elect a Designated Router for broadcast networks. The election works a bit differently in IS-IS because there’s no backup DR. In fact, you don’t need one, because IS-IS simplifies all that business too. IS-IS calls it a DIS, or Designated Intermediate System. We’ll check that out in Part 3.
Second, IS-IS was created by the International Organization for Standardization specifically to advertise ISO addresses. IS-IS was then extended for IPv4 and IPv6.
However, a weird quirk of it is that although IS-IS advertises IP information, the routers actually still “talk” ISO to each other. Don’t worry though, because this isn’t a big deal at all – you just need to turn on the ISO address family on each interface, and then additionally you assign a special “ISO address” to your router’s loopback.
When you first seem the ISO address on a loopback, you might find them to be a little bit intimidating, because they don’t look like IP addresses. But I promise you, they’re really easy to understand.
IF IS-IS AND OSPF ARE SO SIMILAR, WHY WAS IS-IS EVEN MADE?
Good question!
Like a lot of protocols, IS-IS was invented so long ago that not even a single person from back in those days is still alive today. I could tell you the number of years ago that it was invented, but your tiny brain wouldn’t even be able to comprehend such a large number. Okay, fine, I’ll tell you: 30 years. I know! It’s literally impossible to imagine so far back into the past. Even your great-grandmother is younger than that. This is back in the days of 1987, when there was only 10 videos on YouTube, tweets were only allowed to be 25 characters long, and the idea of the poop emoji was the stuff of sheer science fiction.
Anyway. Back in the 80s, when networking was in its infancy, there were lots of different and competing network address protocol. Back in those days, it wasn’t clear whether IP or ISO would win the battle for supremacy, or indeed another protocol.
OSPF was made specifically with IP in mind, and it was made by the IETF, the Internet Engineering Task Force, whereas IS-IS was made by the ISO, for ISO addressing. The two protocols have lot in common, but they were made by different organisations, for different addressing schemes.
It turns out though that IS-IS is extremely easy to extend to other address families. As such, IS-IS was tweaked to advertise IPv4, IPv6, or any other families we might invent in the future, such as IPv69 and IPv420.
And it’s great that this did happen, because IS-IS really is a dream. There’s a reason that it’s so overwhelmingly popular in the internet service provider space, and as you read more you’ll see why.
WHAT THE HECK IS AN ISO ADDRESS, AND HOW DO I READ ONE?
There are two consequences to the fact that IS-IS runs over the ISO addressing protocol.
- You need to enable the ISO address family on your physical interface. You don’t need to also configure an address on those interfaces. It’s enough just enable the ISO family. Super easy.
- You need to configure an ISO address on your router’s loopback interface.
ISO addressing was the system developed by the ISO folks, back in the days when networking was still brand new. If history had turned out differently, we’d be using their addressing scheme nowadays instead of IP, and we’d need to know a lot about them!
Luckily though, you don’t really need to know anything about them – because public ISO addressing is fully dead, and has been for decades. This means that ISO addressing for our needs is very easy indeed.
Here ares some example ISO addresses:
49.0000.0000.0001.00
49.1234.1921.6810.0254.00
47.0005.8083.0000.1B2F.6C0A.5001.00
Notice that you can use hex digits, like in the third example.
So what are we looking at here? Let’s work backwards, because that’s the easiest way to read ISO addresses.
The last two numbers in blue are called the NSAP Selector. It stands for Network Service Access Point, and it’s always 00 when the device is a router. In the olden days the idea was that this would be a bit like a TCP port, and 00 would mean that the traffic was destined to the router itself.
In red we see the System ID. This is the bit that uniquely identifies the router itself. Notice that in all three examples it’s 12 hex digits long, with two dots in between. The System ID is always the same length, which is why it’s easiest to read ISO addresses from right to left. Think of this as the equivalent of the “host” section in an IP address.
In fact, notice in the second example that the System ID is like an IP address (192.168.100.254), but with two dots instead of three (1921.6810.0254). You only need one ISO address on your router, so it’s common to use your primary loopback IP address in the System ID, and just rejig it to fit the two-dot writing system.
In green we see the Area ID. It’s worth saying now that the term “area” in IS-IS means something VERY different in IS-IS. It’s actually a bit tricky to explain, and I don’t want to bog you down in that stuff yet, so I’m going to leave that for Part 3 so we can focus on cool fun stuff. Do me a favour: put areas to the side just for now, and just be aware that they’re a thing that exist. I promise that it will make sense when we come back to them.
For now, let’s talk about what an Area ID looks like. The first number of the Area ID is always 49 nowadays. This number is the AFI, or Authority and Format Identifier. Back in the day, this number told you which authority dished out the address. But of course, no-one’s giving out addresses any more, so everyone just uses the number 49, which is reserved for private use.
The rest of the number is the area itself, and is actually a variable length field. All three examples have areas of different length. You can technically just use 49, but some people say that it’s good practice to at least put in a small area ID, like in the 2nd example (49.1234), to make things neater if you ever want to add more areas in the future. As I say, in Part 3 we’ll explain why you might want to do this.
As you can see, when you break it down it’s dead easy. You choose an area ID (and we’ll explain why and how you’d do that in Part 3!), you choose a unique system for setting the System ID (for example, base it on the loopback IP, or base it on the router’s MAC address) – and that’s it! You set it once, and then forget about it.
In fact, thanks to the fact that IS-IS routers advertise the hostname in their LSP, you don’t even have to worry about the ISO address ever again. Once the adjacency is up, you only need to look at the neighbor’s hostname. It’s not like in OSPF, where you have to actually look at the router ID, and work out what router it is based on the number only.
Now, let’s talk about one of the most important concepts, which is the IS-IS equivalent of an OSPF area: the Level system.
A REMINDER OF OSPF AREAS
Although OSPF is required knowledge for this series of posts, let’s have a quick recap.
In OSPF you have Area 0, which is your backbone. You can leave it at that, or you can optionally have a number of other areas which attach to the backbone.
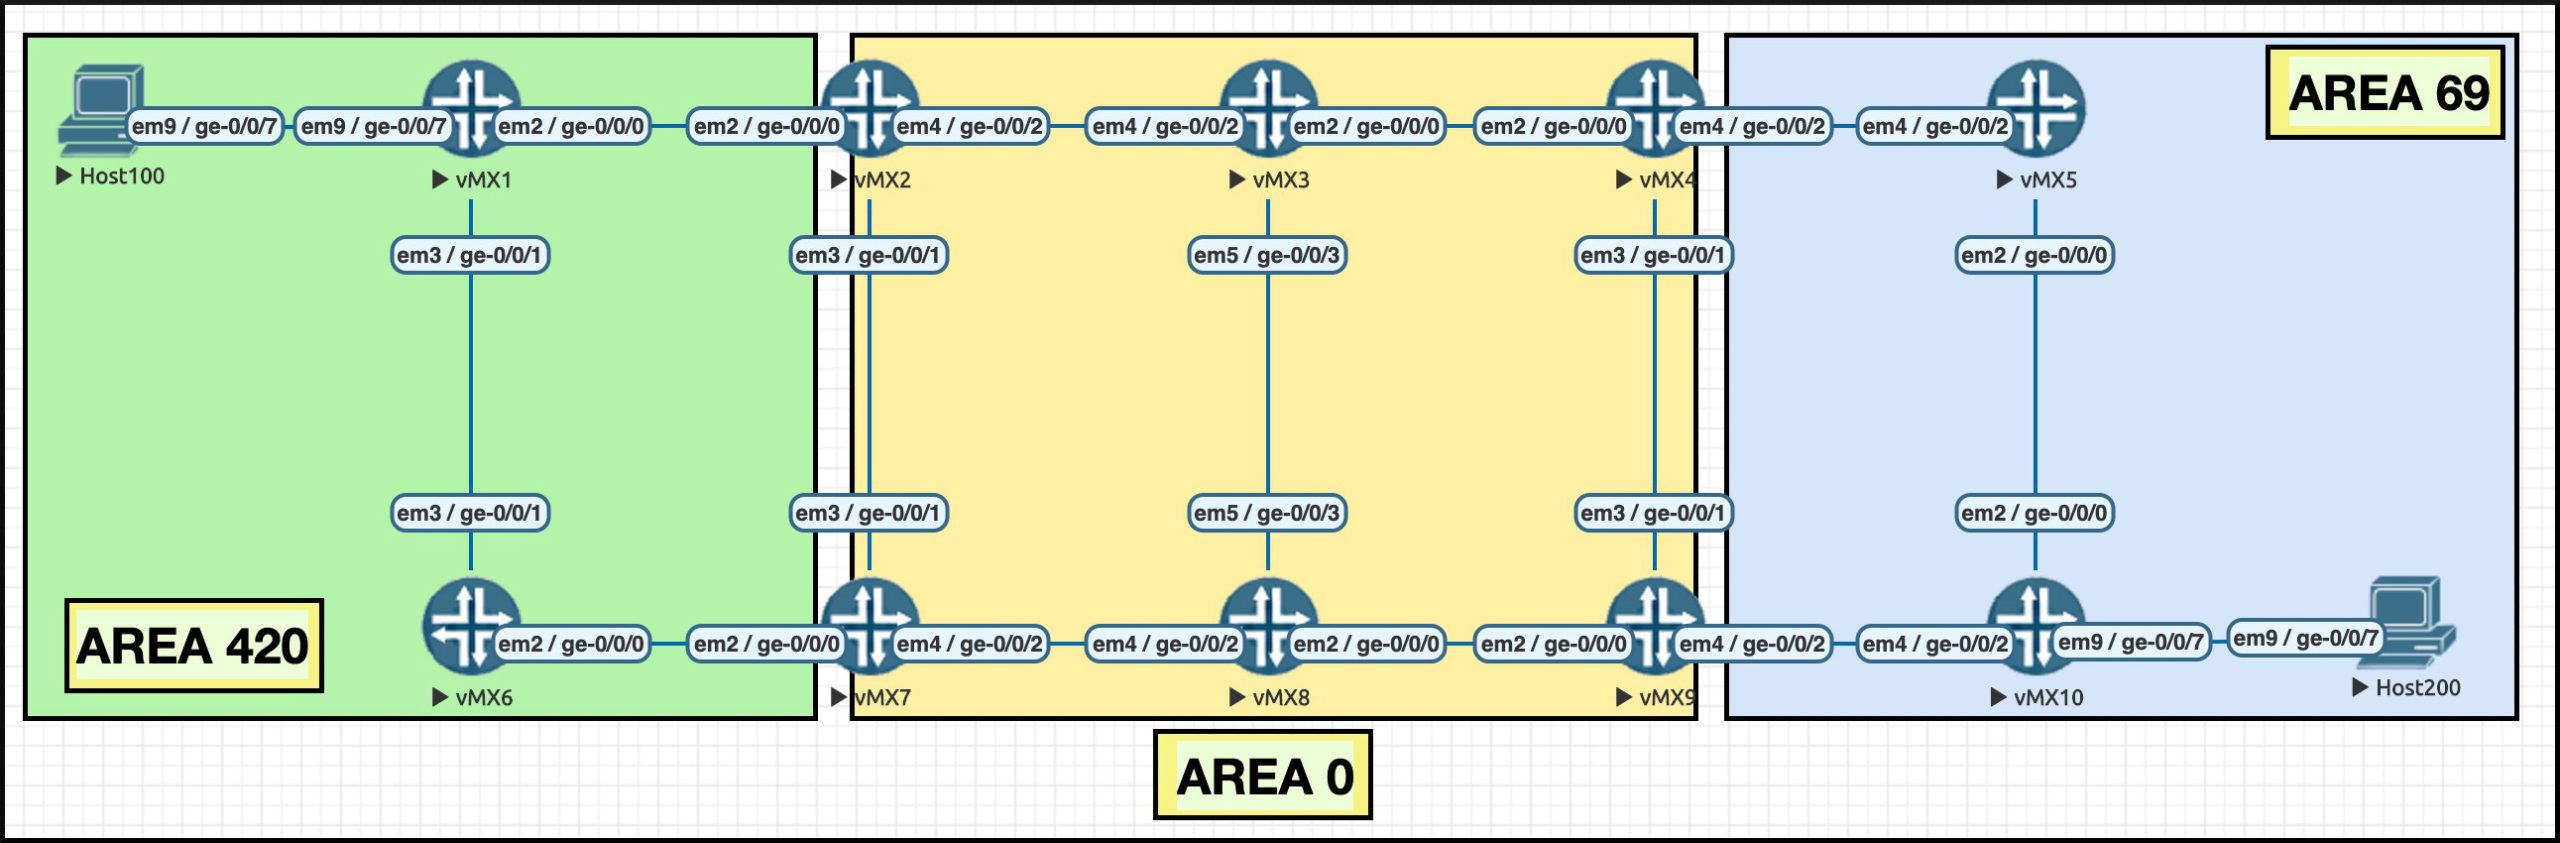
If you had a topology like [Area 420]—-[Area 0]—-[Area 69], like in this diagram above, then devices in Area 420 will use Area 0 to get to Area 69. This would be true even if you ran a cable from a device in Area 420 directly to a device in Area 69. This system of going via the backbone is intended to avoid loops.
You’ll remember that in OSPF, routers only know the topology of their area. For example, routers in Area 420 above only know the topology of Area 420. Routers in Area 0 only know the topology of Area 0.
You then have an Area Border Router (ABR) which has one link in Area 420 and one link in Area 0. The ABR knows the topology of both areas. For example, vMX2 in the diagram above has interface ge-0/0/0 in Area 420, and its other two interfaces in Area 0. This means that vMX2 has two separate databases, one for each topology.
Here’s a question to jog your memory: if routers in area 420 only know about their own area, how do they learn about IPs from outside of their area?
There’s two potential answers to that. The easiest way is for the Area Border Router to advertise a default route.
The other is for the Area Border Router to take all of the IPs it has learned from other areas, and readvertise those IPs into area 420. It doesn’t advertise the topology information – it only advertises the IPs itself, in such a way that the ABR says “if you want to get to any of these IPs, come to me”. The Area Border Router abstracts away (or “summarizes”) the topology information, and just advertises IP information.
In fact, you may remember that the LSA type used here is a “Summary LSA” for exactly this reason.
The routers in Area 420 don’t care precisely where the inter-area IP addresses are. All they care about is that they can get to them via the Area Border Router.
One final thing that I want to highlight: Area 420 doesn’t even know that Area 69 exists. Again, Area 420 routers only know that there is an Area Border Router which it can use to get to “everything else in the wider network”.
Even the Area Border Router between Area 420 and Area 0 doesn’t know that Area 69 exists. All it knows is that there’s some remote Area Border Router, which is itself summarising “some stuff”.
With that in mind, there’s actually nothing stopping you from creating an OSPF network that looks like this:
[Area 1]—-[Area 0]—-[Area 1]
Although it may seem useful to give the two non-backbone areas different numbers, my point here is that you don’t have to. The two Area 1 networks are still different non-backbone, with different topologies. The two Area Border Routers have no idea that the other ABR is also connected to an Area that has been given Area number 1, because all that stuff is abstracted away. When an Area Border Router summarises things, it doesn’t even advertise the area number that it originally came from – it just says “if you want to get to these IPs, come to me”.
AND NOW: IS-IS LEVELS
I highlight that because IS-IS works exactly like this, except that instead of calling it an area, IS-IS uses the term “level” to describe this hierarchy.
In IS-IS, it’s like this:
[Level 1]—-[Level 2]—-[Level 1]
You have a Level 2 backbone, and then optionally you have any number of Level 1 routing domains that connect to it. The Level 2 backbone network only knows the Level 2 topology, and each Level 1 network only knows its own topology.
You then have “Level 1/Level 2” routers, or “L1/2″ for short”, which act exactly like OSPF Area Border Routers: they take addresses from Level 1, and re-advertise them into Level 2. They also know the topology of both levels. As the name suggests, L1/L2 routers connect an L1 non-backbone to the L2 backbone.
Just like in OSPF, these L1/L2 routers will take IPs from one level, and advertise them to another. However, the default behavior is a bit different.
In the OSPF network you just saw, all prefixes in OSPF area 420 will be advertised to the backbone, and all IPs in the backbone will be advertised to area 420. This includes anything area 0 has learned from other areas, like area 69.
This is fine, but you generally don’t want this to happen. The whole point of areas is to abstract certain information away. It’s actually common in OSPF to configure an area as “totally stubby”, which means “don’t send me any IPs from other areas. Just send me a default route”. You can then choose to leak any extra prefixes from the backbone into area 420 using a policy, if you want to.
Well, as it happens, this is how IS-IS works by default.
By default, the L1/L2 router takes all the IPs in Level 1, and advertises them up to the Level 2 backbone. This makes sense, for full reachability.
However, by default, the L1/L2 routers does NOT advertise things from Level 2 down to Level 1. Instead, you just advertise a default route, and you create a policy to leak anything extra.
There’s two ways of making these default routes, and I’ll show you that in an upcoming module. It’s worth saying though that in the 2020s you probably don’t need to use levels. A lot of service providers often have a “flat Level 2 domain” even if they’re running 500 routers or more. We’re living in the future baby!
IS-IS IS FLEXIBLE ON WHAT LEVEL A LINK IS IN
In OSPF, a link can (by default) only be in one area. You might have a router which has one link in Area 1 and another link in Area 0, and this makes it an Area Border Router.
Interestingly though, there are extensions to OSPF which allow a link to be in more than one area at once. There’s good reason to do that: in some situations it can lead to more precise routing.
For example, on an ABR connected to many areas, you might choose to put a series of links in both Area 1 and Area 2 at the same time, so that devices in Area 1 wouldn’t have to go via Area 0 to get to something in Area 2, because that “something” will also be in Area 1.
When this is done correctly it means you still avoid loops, but get more optimal routing.
In OSPF, this was an add-on. In IS-IS this is there from day one: a link a can be part of both a Level 1 topology, and the Level 2 backbone, at the same time!
Service providers love this, because it means that the design of the backbone can be more flexible than in OSPF.
This also means that there isn’t always a clear divide between a backbone and non-backbone network: if you were to draw it out, there may be a little bit of overlap, and that’s totally fine.
Here’s an example. Notice that vMX1 is totally in a Level 1 domain, whereas vMX2 has two links in Level 1, and one link in Level 2. Compare that to vMX3, which is totally in a Level 2 domain. Finally, notice that vMX4’s link to vMX9 is in both Level 1 and Level 2 at the same time, which is totally fine. The two levels are separate topologies, and the link exists in both.

Interestingly, most vendors actually default all links to being L1/L2 by default. You then choose which level you want to turn off.
For example, if you turn off Level 2 on either end of the link, then that link will only be part of Level 1. Both links have to agree on what level they are in order for that level to come up.
To summarise, then: IS-IS Level 2 is the same as OSPF Area 0. IS-IS Level 1 is the same as an OSPF non-backbone area.
HOW TO CONFIGURE A JUNOS ROUTER FOR IS-IS
As always in networking, the theory takes ages to explain – but configuring it is very simple.
There’s three steps to creating a very basic IS-IS config.
First, you turn on the ISO address family on any interfaces that are going to form adjacencies, like so:
set interfaces ge-0/0/0 unit 0 family iso
set interfaces ge-0/0/1 unit 0 family iso
It’s as simple as that!
Next, turn on ISO on the loopback, and also add in your ISO address:
set interfaces lo0 unit 0 family iso address 49.0001.1921.6800.0001.00
Is the address understandable to you now?
- You know that you can ignore the .00 at the end.
- You can hopefully identify 1921.6800.0001 as the “host” address – the equivalent of writing 192.168.0.1 as an IP address.
- Finally, you can spot that this router is in area 49.0001.
Finally, you turn on IS-IS in the edit protocols isis hierarchy, by simply adding in your interfaces!
Optionally, turn off level 1 or level 2 as required. You can turn off a level on a specific interface, or you could even turn off a level globally using the command “set protocols isis level 1 disable”, for example.
set protocols isis interface ge-0/0/0.0
set protocols isis interface ge-0/0/1.0 level 1 disable
set protocols isis interface lo0.0
You could also turn a level off on all interfaces like this:
set protocols isis level 1 disable
You might optionally choose to make an interface point-to-point. In part 3 I’ll explain why this makes things more efficient. For now, just know that it’s done like this:
set protocols isis interface ge-0/0/0.0 point-to-point
Wow, that’s pretty easy right? Other than the ISO and loopback bit, you basically just add the interfaces under protocols isis, maybe make them point0to-point, and maybe turn off a level. Is it really as easy as that?
Indeed, it is!
Having said that, there’s some enhancements that you’re definitely going to want to know for your studies, and that you’ll almost certainly want to use in production, particularly around link metrics. But that’s for a future post.
THAT’S IT FOR NOW!
Wow, you covered a LOT in this post! You now know how how IS-IS works, what Level 1/2 means, how the addresses work, what an LSP is, and even how to configure IS-IS. That’s pretty good going!
Ready for more? Click here to read part 2, where you’ll learn exactly what an IS-IS Link-State PDU looks like, how adjacencies work, and you’ll see some very nice verification commands on the CLI too.
Hey there: thank you so much for reading! If you’ve enjoyed this post, please do share it on your social media of choice – Twitter, LinkedIn, FacePlace, GeoCities, Friends Reunited etc. The more readers I get, the more I’m inspired to make even more posts.
If you’re on Mastodon, follow me to find out when I make new posts. (2024 edit: I’m also on BlueSky nowadays too. I was once on Twitter, but I’ve given up on it, on account of… well, I don’t need to finish that sentence, do I.)
And if you fancy some more learning, take a look through my other posts. I’ve got plenty of cool new networking knowledge for you on this website, especially covering Juniper tech and service provider goodness.
It’s all free for you, although I’ll never say no to a donation. This website is 100% a non-profit endeavour, in fact it costs me money to run. I don’t mind that one bit, but it would be cool if I could break even on the web hosting, and the licenses I buy to bring you this sweet sweet content.


So happy to announce that… YOU ARE AWESOME CHRIS! (and so its this blog). I took my JNCIS-SP exam last Friday, hoping that I would enter 2019 with a brand new certification and so that happened! I mostly studied theorical ISIS using your wisdom. It was fun.
I’ll definitely become your most loyal follower, so behold a Brazilian-future JNCIP-SP guy.
Have a insane good 2019. “fun your network”.
JS.
João, that’s wonderful news!! I’m full of happiness at this news, not only that you were able to pass it, but that my blog helped you. The news has absolutely made my day. Congratulations on your victory, and all the best of luck with the JNCIP! 🙂
This is probably the most helpful summary of IS-IS I’ve ever seen. Thanks for taking the time to write it. You’ve got a new Twitter follower!
Hooray! Thank you, and apologies for the slow reply!
Excellent work as usual, Chris!
I’ve definitely used your content to help me along the way to JNCIP-SP so far.
Hoping to connect with you eventually 🙂 your content is out of this world on the quality scale. Very much appreciated.
Dude you got talent! [mic drop]
Haha thank you very much! It’s true, I can’t deny it 😉
Hi Chris, thank you very much for all this hard work, i have really enjoyed the way you have explained the ISIS first part, will be going to 2nd tomorrow.