

Junos: IS-IS Study Notes, Part 5 – Troubleshooting (For JNCIS-SP and JNCIS-ENT Students)
Welcome to this, the fifth and final part in my JNCIS-level series of posts teaching you the wonderful world of the IS-IS routing protocol.
Oh my, you’ve come so far on this IS-IS journey! To think that an hour ago you barely knew what IS-IS stands for. And yet now, you’re a master!
You’ve already read Part 1 where I introduced you to the basic mechanics and configuration, and where you learned about IS-IS levels.
Then you read Part 2 where we took a deeper dive into IS-IS messages, including the all-important Hello and LSP message types.
And then you read Part 3, where you became a world leading expert in LAN interfaces in IS-IS, including the Designated Intermediate System (DIS), and the pseudonode. You also looked at metrics and wide-metrics.
I bet you even remember reading Part 4, where you learned about IS-IS areas, default routes, and using policies to leak from L2 to L1. You’re so smart now!
This fifth and final part shows you how to verify and troubleshoot your work. Some of it will be new to you. Other bits you will have seen before, but this time we dig into a bit more detail.
Before we begin though, a quick word about safe troubleshooting. Please remember to wear gloves and goggles whenever you attempt to troubleshoot a routing protocol, just in case prefixes fly out of the screen and scold your hands or eyes or face. Also, never forget to take a backup of the entire internet before you begin, just in case you delete the world wide web by mistake. It’s happened before, and it’ll happen again. Finally, always – I repeat, ALWAYS – phone your friends and family to tell them that you love them. That’s not specific to troubleshooting; that’s just general life advice. You’re welcome!
THE TOPOLOGY FOR THESE TESTS
This topology is very similar to ones you’ve seen before. The hostnames are subtly different, but there are still ten routers, with everything set to be in the same area of 49.0001.
We have a “core” Level 2 network, with two Level 1 networks connecting to it. Do you remember what happens when routers are in different levels, but you have the same area everywhere? If not, go back and read Part 4, you cheeky scamp!
Notice that vMX1 and vMX6 on the left are entirely in Level 1.
vMX2 and vMX7 have two interfaces in Level 1, and one interface in Level 2.
vMX4 and vMX 9 are interesting, because the link connecting them is in both Level 1 and Level 2 at the same time! This is nice: we have a bit of overlap between the Level 1 and Level 2 networks on the right, which will let us see some cool stuff.

SHOW ISIS ADJACENCY
In Part 1 you saw how to configure IS-IS: you just add the interfaces you want to run it on.
You can (and should) additionally turn off Level 1 and Level 2 either on a per-interface basis, or globally. Perhaps you’ll set interfaces to something other than the default broadcast, too.
Let’s remind ourselves of the configuration on vMX_9 (to pick a random example), in set format. I’ve gone ahead and added some of the enhancements you learned about in Part 3, like the reference bandwidth, and only using wide-metrics:
root@vMX_9> show configuration protocols isis | display set
set protocols isis reference-bandwidth 100g
set protocols isis level 2 wide-metrics-only
set protocols isis level 1 wide-metrics-only
set protocols isis interface ge-0/0/0.0 point-to-point
set protocols isis interface ge-0/0/0.0 level 1 disable
set protocols isis interface ge-0/0/1.0 point-to-point
set protocols isis interface ge-0/0/2.0 point-to-point
set protocols isis interface ge-0/0/2.0 level 2 disable
set protocols isis interface lo0.0
There’s nothing new here to you, but notice that one interface explicitly turns off Level 1, another interface explicitly turns off Level 2, and a third interface doesn’t turn off either, which means that it runs both levels at once. That’s the interface facing vMX_4.
All interfaces are also configured to be point-to-point, which means there won’t be a DIS election any more. It’s a very good practice to configure this when it’s appropriate, because why bother creating a pseudonode when you don’t need one?
You also saw the command below in Part 2, which checks that adjacencies are up:
root@vMX_9> show isis adjacency
Interface             System         L State        Hold (secs) SNPA
ge-0/0/0.0            vMX_8          2  Up                   20
ge-0/0/1.0            vMX_4          3  Up                   23
ge-0/0/2.0            vMX_10         1  Up                   24
Interface ge-0/0/0.0 is Level 2, while ge-0/0/2.0 is Level 1.
You’ll remember that we left ge-0/0/1.0 as the default behaviour, which is to try to take part in both levels. Interestingly, that interface is showing as “Level 3”. This immediately tells me that it’s a point to point interface.
How do I know that? Check this out:
- On broadcast L1/L2 interfaces, IS-IS will form two adjacencies – one for Level 1, and one for Level 2.
- However, on point-to-point L1/L2 interfaces, both levels are done in a single Hello message, which uses “Level 3” to really mean both levels.
To be clear, there isn’t a special secret Level 3; the number just represents both levels. I’m sick and tired of people claiming that I know about a secret Level 3 that is only open to the shadow government of the world. I’m not a member of it! Please cease your investigations.
To show you what I mean, let’s delete the point-to-point configuration on either end of this interface on vMX_4 and vMX_9:
[edit]
root@vMX_9# delete protocols isis interface ge-0/0/1.0 point-to-point
The result: is that two separate adjacencies are formed. We also now see the “SNPA” of the neighbor, the Sub-Network Point of Attachment (ie the MAC address).
root@vMX_9> show isis adjacency
Interface             System         L State        Hold (secs) SNPA
ge-0/0/0.0            vMX_8          2  Up                   24
ge-0/0/1.0            vMX_4          1  Up                    8  50:0:0:50:0:3
ge-0/0/1.0            vMX_4          2  Up                    7  50:0:0:50:0:3
ge-0/0/2.0            vMX_10         1  Up                   20
SHOW ISIS ADJACENCY DETAIL/EXTENSIVE
There are also detailed and extensive versions of that command. Let’s take a look at the detailed version. You’ve seen this before, but you’ve learned more things since then, so it’s worth revisiting.
root@vMX_9> show isis adjacency detail vMX_8
vMX_8
  Interface: ge-0/0/0.0, Level: 2, State: Up, Expires in 23 secs
  Priority: 0, Up/Down transitions: 1, Last transition: 00:16:35 ago
  Circuit type: 2, Speaks: IP, IPv6
  Topologies: Unicast
  Restart capable: Yes, Adjacency advertisement: Advertise
  IP addresses: 10.8.9.8
  IPv6 addresses: fe80::5200:ff:fe4b:2
Notice that I was able to refer to the neighboring router by its hostname. It’s so helpful I could almost cry!
The first line shows you what you already knew: the interface, the level, and the state.
After that you see the “Last transition”, which is very helpful for troubleshooting, along with the “Up/Down transitions”, which is also clearly useful. If it’s flapped recently, or if the up/down count is quickly going up, you might have a problem! You can also see the address families it speaks, and its local addresses.
The extensive version of this command is the same, but it shows you the up/down transitions in more detail, with timestamps.
That output was from a point-to-point interface. A broadcast interface shows the same information, but additionally tells you who has been elected to generate the DIS for the broadcast network:
root@vMX_9> show isis adjacency detail vMX_4
vMX_4
  Interface: ge-0/0/1.0, Level: 1, State: Up, Expires in 8 secs
  Priority: 64, Up/Down transitions: 1, Last transition: 00:09:00 ago
  Circuit type: 3, Speaks: IP, IPv6, MAC address: 50:0:0:50:0:3
  Topologies: Unicast
  Restart capable: Yes, Adjacency advertisement: Advertise
  LAN id: vMX_4.02, IP addresses: 10.4.9.4
  IP6 addresses: fe80::5200:ff:fe50:3

vMX_4
  Interface: ge-0/0/1.0, Level: 2, State: Up, Expires in 7 secs
  Priority: 64, Up/Down transitions: 1, Last transition: 00:09:00 ago
  Circuit type: 3, Speaks: IP, IPv6, MAC address: 50:0:0:50:0:3
  Topologies: Unicast
  Restart capable: Yes, Adjacency advertisement: Advertise
  LAN id: vMX_4.02, IP addresses: 10.4.9.4
  IPv6 addresses: fe80::5200:ff:fe50:3
CLEAR ISIS ADJACENCY
This command does what it says! Add the hostname at the end of the command, or alternatively add the word “all” if you’re bloodthirsty.
SHOW ISIS INTERFACE
Here’s another useful one: “show isis interface” will show you whether an interface is point-to-point, what levels are enabled on the interface, and what the metric is for each level. See if you can spot which levels are disabled on which interfaces.
root@vMX_9> show isis interface
IS-IS interface database:
Interface             L CirID Level 1 DR        Level 2 DR        L1/L2 Metric
ge-0/0/0.0            2   0x1 Disabled          Point to Point        100/100
ge-0/0/1.0            3   0x1 vMX_4.02          vMX_4.02              100/100
ge-0/0/2.0            1   0x1 Point to Point    Disabled              100/100
lo0.0                 3   0x1 Passive           Passive                 0/0
In this output, every interface has a metric of 100. That’s because they’re 1Gb interfaces, and we configured a reference-bandwidth of 100Gb.
We also set “wide-metrics-only”. Remember that without this, the biggest metric that any one interface can advertise is 63. Do you remember why? If not, Part 3 has your answer my guy!
You can see that Level 1 is explicitly disabled on ge-0/0/0, and Level 2 is explicitly configured on ge-0/0/2. You can also see that both of them are “Point to Point”.
Interface ge-0/0/1 doesn’t explicitly say that it’s a broadcast interface, but it does tell you the name of the DIS on the interface, which implies that it’s broadcast. The fact that there’s a separate DIS for Level 1 and Level 2 tells you that this is an L1/L2 interface.
The CirID is the Circuit ID. Each interface on the router gets given one, to make it unique in the link-state database. 0x01 is shared between the point-to-point interfaces. Broadcast interfaces start at 0x02 and go up from there. It’s not too important; I’m just telling you for the sake of completion.
Cool cool cool! Now, let’s look at the extensive version of the interface output.
You can see below that it tells you pretty much everything you’d ever want to know, including:
- The MTU (“IIH max size” – remember that the MTU is found by padding the IIH, the Hello message)
- The CSNP interval (how often the Complete Sequence Number PDU is sent out)
- The DIS election priority
- The metric
- The Hello interval
- And who has won the DIS election (which is actually listed as the Designated Router, although that’s not strictly it’s name).
I’m deploying this command on the broadcast interface. Read it slowly, and try to spot all those details I just mentioned.
root@vMX_9> show isis interface extensive ge-0/0/1.0
IS-IS interface database:
ge-0/0/1.0
  Index: 334, State: 0x6, Circuit id: 0x1, Circuit type: 3
  LSP interval: 100 ms, CSNP interval: 10 s, Loose Hello padding, IIH max size: 1492
  Adjacency advertisement: Advertise, Layer2-map: Disabled
  Interface Group Holddown Delay: 20 s, remaining: 0 s
  Level 1
    Adjacencies: 1, Priority: 64, Metric: 100
    Hello Interval: 9.000 s, Hold Time: 27 s
    Designated Router: vMX_4.02 (not us)
  Level 2
    Adjacencies: 1, Priority: 64, Metric: 100
    Hello Interval: 9.000 s, Hold Time: 27 s
    Designated Router: vMX_4.02 (not us)
SHOW ISIS DATABASE
This is where the fun stuff happens!
It’s in the database that you get to see the LSPs themselves, just like in the screenshots you saw in Part 2.
If you just do “show isis database” then you’ll see a list of every router in each level that your router is taking part in. You can then add “detail” or “extensive” to see the exact IPs and adjacencies that the router is advertising in its LSPs.
Let’s take a look at vMX_9 again, which has a presence in both the Level 2 backbone and in the Level 1 network on the right of the topology:
root@vMX_9> show isis database
IS-IS level 1 link-state database:
LSP ID                      Sequence Checksum Lifetime Attributes
vMX_4.00-00                      0x3   0x1e16      383 L1 L2
vMX_4.02-00                      0x1   0x1aa2      383 L1 L2
vMX_5.00-00                      0x4   0xc2d2     1137 L1 L2
vMX_9.00-00                      0x3   0xaf29      389 L1 L2
vMX_10.00-00                     0x4   0xf724     1175 L1 L2
  5 LSPs

IS-IS level 2 link-state database:
LSP ID                      Sequence Checksum Lifetime Attributes
vMX_2.00-00                      0x5   0x1226     1073 L1 L2
vMX_3.00-00                      0x5   0xe2e8     1156 L1 L2
vMX_4.00-00                      0x6   0x66ab     1077 L1 L2
vMX_4.02-00                      0x2   0x18a3     1169 L1 L2
vMX_7.00-00                      0x5   0x539e     1131 L1 L2
vMX_8.00-00                      0x6   0xa3ae     1158 L1 L2
vMX_9.00-00                      0x6   0xf8cd      389 L1 L2
  7 LSPs
You can easily see that Routers 2, 3, 4, 7, 8 and 9 are all in the backbone (Level 2), while routers 4, 5, 9 and 10 are in the Level 1 network. Another way of saying it is that vMX_4, 5, 9 and 10 have each generated a Level 1 LSP.
In addition, vMX_4 is responsible for generating the pseudonode for the broadcast interface between itself and vMX_9, because we removed the “point-to-point” configuration on those interfaces. This happens separately for Level 1 and for Level 2, which makes sense when you remember that they’re separate topologies. This is what the “vMX_4.02-00” LSP is for: it’s the pseudonode for that broadcast segment.
Let’s compare that output with a router that is only in Level 1. What does its database look like?
root@vMX_1> show isis database
IS-IS level 1 link-state database:
LSP ID                      Sequence Checksum Lifetime Attributes
vMX_1.00-00                      0x3   0xfafc      829 L1 L2
vMX_2.00-00                      0x3   0xe701      803 L1 L2
vMX_6.00-00                      0x3   0x4b61      827 L1 L2
vMX_7.00-00                      0x3   0x8d10      799 L1 L2
  4 LSPs

IS-IS level 2 link-state database:
LSP ID                      Sequence Checksum Lifetime Attributes
vMX_1.00-00                      0x4   0xf044      829 L1 L2
  1 LSPs
That’s interesting. It has a Level 1 database of four routers, which is correct – but it’s also generated an LSP for itself in Level 2, even though it doesn’t have any Level 2 adjacencies! This is because we didn’t turn off Level 2 globally on that router.
If a device is entirely in Level 1, it’s worth typing “set protocols isis level 2 disable” to turn the level off completely. This will also stop accidental Level 2 adjacencies forming, and is a lot easier than doing it on an interface-by-interface basis. The same goes for Level 2 routers, by turning off Level 1 globally.
SHOW ISIS DATABASE DETAIL
If you add the “detail” flag, you’ll see all the prefixes within that one LSP, and all of the routers that the router is connected to.
Staying on vMX_9, let’s look at vMX_8’s Level 2 LSP. You can do this on any router in the level, because each router should have exactly the same information about every other router that it knows about. Notice we don’t specify Level 2 in the CLI command, because vMX_8 is only in Level 2. But we could add it on if we wanted to be specific.
root@vMX_9> show isis database vMX_8 detail
IS-IS level 1 link-state database:

IS-IS level 2 link-state database:
vMX_8.00-00 Sequence: 0x6, Checksum: 0xa3ae, Lifetime: 907 secs
   IS neighbor: vMX_3.00                      Metric:      100
   IS neighbor: vMX_7.00                      Metric:      100
   IS neighbor: vMX_9.00                      Metric:      100
   IP prefix: 10.3.8.0/24                     Metric:      100 Internal Up
   IP prefix: 10.7.8.0/24                     Metric:      100 Internal Up
   IP prefix: 10.8.9.0/24                     Metric:      100 Internal Up
   IP prefix: 192.168.1.8/32                  Metric:        0 Internal Up
   V6 prefix: 2001:db8::8/128                 Metric:        0 Internal Up
If you’re only used to reading the OSPF database, then your jaw will be at the floor right now from how easy this is to read! You can immediately see the three routers that vMX_8 has a connection to, listed by name. You can also see the four IPv4 and the one IPv6 address connected to it.
There’s also an extensive version of this command, which I won’t show here because it’s massive! But in short, the extensive version of the command will show you everything in that router’s LSP, including what areas it takes part in, its ISO address, timers and lifetimes and checksums. Also, if you’re running MPLS traffic engineering then the extensive command will show you all the RSVP bandwidth reservations at each priority level.
By the way, you can also see that all five prefixes are “Up”. What does that mean? You might be tempted to think that it means they’re working and operational, but in fact it means something else – it’s used to stop routing loops that can occur when IPs are advertised between levels.
A QUICK NOTE ON THE DOWN BIT
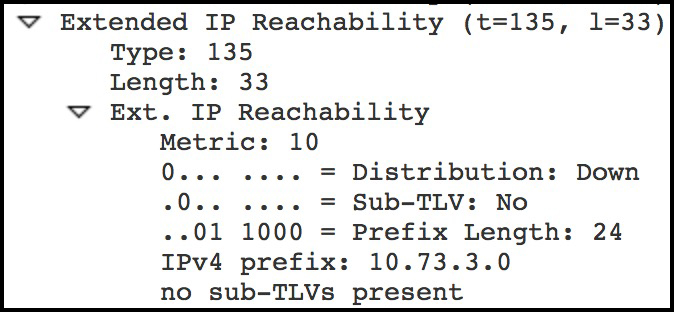 Each advertisement comes with something called the Distribution bit, otherwise known as the Up/Down bit, or the Down bit for short.
If ever a prefix is advertised from Level 2 into Level 1, this bit is set as Down. To quote the RFC: “If a prefix is advertised from a higher level to a lower level (e.g., level 2 to level 1), the bit MUST be set to 1, indicating that the prefix has traveled down the hierarchy.”
In Part 3 I added a default route on vMX_9, and advertised it into Level 1. Why didn’t vMX_4 redistribute it into Level 2? You may be tempted to think that it’s because the Down bit was set. Interestingly though, in my labbing I found that the down bit was NOT set!
I wanted to make sure I wasn’t going mad, so I made a second aggregate route for 192.0.0.0/8 on vMX_9, and also leaked this just into Level 1. I was surprised to see that the down bit WAS set for that route! So it seems like there’s some special rule that says “Don’t advertise a default route from Level 1 to Level 2.” I couldn’t find any documentation on it – but the labbing doesn’t lie!
On vMX_10 I am looking at vMX_9’s LSP. Notice that the 0/0 route is “Up”, while the 192/8 route is “Down”.
root@vMX_10> show isis database vMX_9 detail
IS-IS level 1 link-state database:

vMX_9.00-00 Sequence: 0x33, Checksum: 0x47a8, Lifetime: 1192 secs
   IS neighbor: vMX_4.02                      Metric:      100
   IS neighbor: vMX_10.00                     Metric:      100
   IP prefix: 0.0.0.0/0                       Metric:       10 Internal Up
   IP prefix: 10.4.9.0/24                     Metric:      100 Internal Up
   IP prefix: 10.9.10.0/24                    Metric:      100 Internal Up
   IP prefix: 192.0.0.0/8                     Metric:      210 Internal Down
   IP prefix: 192.168.1.9/32                  Metric:        0 Internal Up
   V6 prefix: 2001:db8::9/128                 Metric:        0 Internal Up

IS-IS level 2 link-state database:
Quirky bit of fun there! In any case, it’s the Down bit that makes sure that L2-to-L1 stuff doesn’t get re-advertised from L1-to-L2.
SHOW ISIS STATISTICS
You’ll only need to know this one if something has seriously gone wrong – it gives you a breakdown of each PDU the router has sent and received, and whether it was processed or dropped. You’ll also see the number of times that SPF has been run. You’ll even see the number of times an LSP has been regenerated, due to nearing the end of its lifetime.
root@vMX_9> show isis statistics
IS-IS statistics for vMX_9:
PDU type       Received    Processed        Drops         Sent       Rexmit
LSP                  43           43            0           44            0
IIH                1941           38            0          986            0
CSNP                769          769            0          374            0
PSNP                 18           18            0           15            0
Unknown               0            0            0            0            0
Totals             2771          868            0         1419            0

Total packets received: 2771 Sent: 1419

SNP queue length: 0 Drops: 0
LSP queue length: 0 Drops: 0
SPF runs: 23
Fragments rebuilt: 13
LSP regenerations: 4
Purges initiated: 0
SHOW ISIS OVERVIEW
And one final chill command which does exactly what it says on the tin. You’ll find the System ID, area, SPF timer info, address families, and so much more here.
root@vMX_9> show isis overview
Instance: master
  Router ID: 192.168.1.9
  Hostname: vMX_9
  Sysid: 0000.0000.0009
  Areaid: 49.0001
  Adjacency holddown: enabled
  Maximum Areas: 3
  LSP life time: 1200
  Reference bandwidth: 100000000000
  Attached bit evaluation: enabled
  SPF delay: 200 msec, SPF holddown: 5000 msec, SPF rapid runs: 3
  IPv4 is enabled, IPv6 is enabled
  Traffic engineering: enabled
  Restart: Disabled
    Helper mode: Enabled
  Layer2-map: Disabled
  Source Packet Routing (SPRING): Disabled
  Post Convergence Backup: Disabled
  Level 1
    Internal route preference: 15
    External route preference: 160
    Prefix export count: 0
    Wide metrics are enabled
  Level 2
    Internal route preference: 18
    External route preference: 165
    Prefix export count: 0
    Wide metrics are enabled
THAT’S IT – FOR NOW!
If you’ve read all five of these posts, then let me say: CONGRATULATIONS! You have truly levelled up over the past… however long it took you. Seriously, well done.
Did you like it? What do you think of IS-IS as a protocol now? Do you prefer it to OSPF? Or do you like both the same? Let me know in the comments. I’d love to hear your thoughts.
You and me have come a LONG way over these past five posts. We’ve learned a lot together, been through so much. I dare say that in the process we’ve becomes best friends, brothers, sisters, perhaps even lovers. Well, sad news: our love is now over, because you’ve come to the end of the series!
There’s plenty more to cover in IS-IS. We’ve not touched Graceful Restart, or authentication, or overloading, or the unique properties of redistributing external prefixes into a Level 1 network. Hopefully though, these four posts have given you enough confidence to go Googling for more information, and to start adding IS-IS into your labs. I hope they’ve given you a fun introduction to this great protocol.
If you read these posts in order to go for the JNCIS-ENT or JNCIS-SP, the let me wish you the very best of luck with your studies towards this awesome certification!
If you’re on Mastodon, follow me to find out when I make new posts. (2024 edit: I’m also on BlueSky nowadays too. I was once on Twitter, but I’ve given up on it, on account of… well, I don’t need to finish that sentence, do I.)
And if you fancy some more learning, take a look through my other posts. I’ve got plenty of cool new networking knowledge for you on this website, especially covering Juniper tech and service provider goodness.
It’s all free for you, although I’ll never say no to a donation. This website is 100% a non-profit endeavour, in fact it costs me money to run. I don’t mind that one bit, but it would be cool if I could break even on the web hosting, and the licenses I buy to bring you this sweet sweet content.
PS: As it happens, I have written a few more posts on IS-IS, which you might like if you’re still hungry for more. Give this post a read where I explain how leaving everything to the L1/L2 default can lead to some seriously disastrous consequences! Then, how about this one where I show you how to use routing policy to remove point-to-point IP addresses from your routing table, to make things more scalable. I hope you enjoy them!


The crash course on IS-IS was fun and informative, Thank you I can work networks running with IS-IS protocols with bit more confidence.
Thank you very much for your kind words Nirmal! Really happy to hear that I was able to help you. 🙂
Thank you for this IS-IS series. It has helped me immensely and comparing OSPF and writing this helped me understand IS-IS in a better way. Loved the way you conveyed it. Cheers!